


CRSKmD
-
Posts
379 -
Joined
-
Last visited
-
Days Won
19 -
Feedback
0%
1 Follower
Recent Profile Visitors
4,562 profile views


CRSKmD's Achievements
")


-
 RB20/25 covers don’t have threaded fasteners stock like RB26 covers. They are blind rivets so I will need to drill out and tap threads. I bought some M4x6mm button heads and will report back once done if I chose correctly length wise. have also got some loctite
 -
What size bolts did you use to reattach the cam cover baffles? Thinking it will need to be M3-M4
-
Yeah one of the first things I out in when I started having catch can filling up issues. Still prefer to empty 1-2 times a track day rather than every session
-
yeah I get ~0.6L per session into the catch can. very ethanoly. It ends up overflowing out the breather of the catch can on circuit days too even with a 2.3L capacity catch can and I only drain out ~0.6L max. So every session I have to come in and drain the catch can, which is a hassle. So this is me cracking the shits and doing everything I can without removing the motor (back of head sump drain/breather and oil restrictors off the table). plans short term are: full length splash plates remove oem cam cover baffle add foam and reinstall at -10 or -12 AN fittings to the side of the cam covers down to the sump (luckily I already have fittings in the sump) Yes the ~340,000km unopened motor is probably not helping things
-
The studs are needed to run the splash plates/ full length baffle plates do you have a link to which foam you used? I have seen autosport had the yellow stuff that’s E85 safe. https://www.autosport.com.au/fuel-tank-foam
-
Got around to installing the Tomei Cam Cap Studs and the Hypertune cam baffles/splash guards. Unfortunately, I was not aware that the cam cap studs do not clear the stock RB25 internal cam cover baffles. Some research found a set from boostdoc which includes a replacement cam cover baffle and full length cam baffle + tools and fasteners. but I'm not keen on re-buying what I have already bought. So the plan is to take the hard route and modify the existing cam cover baffles to clear both the cam cap studs and the hypertune cam baffle plate. I assume there must be people who have gone through this even just to convert from cam cap bolts to cam cap studs? If so any tips would be appreciated. Otherwise I think I will mark where the cam cap studs foul, drill clearance holes in the cam cover baffle, and remove the cam cover baffle oil returns to clear the hypertune baffle plate. I will also need to remove the baffle and drill and tap threads to bolt it back on so i can clean out any swarf. Fuel tank foam as extra cam cover baffling?
-
Thank you! The matching touches really ties it all in. If/when I redo the whole car it would likely be the same colour I did the Engine Bay/Brakes/Cam covers in 2018. or something adjacent
-
Looking at finally painting and installing my R32 GTR wing I bought back in 2018. I got two quotes: Quote 1: $880 includes: wing, spare boot, holes welded up prep/paint. Pro: full boot with wing AND hole-less boot with lip i can swap between Con: $$ Quote 2: $330 wing only. Pro: cheaper Con: lose my (relatively) rare no holes sedan boot Also to consider I do plan on painting my whole car at some point "soon" (been saying that since 2018) Anyway Enjoy these All Japan Day 2025 pictures of my 4 door, still rocking the Calsonic Livery! Rolling in Interior shot Matching Peer Pressure Racing overalls are pretty cute ngl. This year was a hard 1990 cut so I got to be over with all the older cool stuff Next to arguably the best car there. A mighty S-Cargo
-
Finally addressing my catch can and oil setup Plan is to do as much as practical without having to remove the motor or pull it apart. (no back of head to sump drain/breather or oil restrictors) First step is a set of full length baffle plates from Hypertune and a Tomei cam cap stud kit. I could probably have laser cut and bent up my own ones but this took any guess work out
-
Well, after a week of daily driving and having to crawl out between the wheel and the side intrusion bars. I got myself a quick release setup. I went with an NRG short hub and Quick Release with some cute heart cutouts on the pull tabs. Nice and matchy matchy with the rest of the interior accents I have going on. The only downside is the total stack height even with the short adapter is longer than the old HKB boss kit. Luckily I had some adjustment left on the column so move the wheel away.
-
Due to series of unfortunate events the 32 is currently my daily. Fuel economy and jungle gym aside it has not been too bad to drive around. That was until the ol' Varex decided that ~15 years and ~8 of those years on E85 was enough. The butterfly valve separated from the motors' shaft and managed to wedge/weld its self in the closed position. the varex when rapped sounded like there wasn't any packing left in it either. New Vibrant 3" muffler was selected to go in. While it is a shame to lose the quiet mode, the new Vibrant muffler definitely gives a more mellow/rounded tone which sounds great. To me it also sounds louder than the varex was open... so there is that. sorry neighbours
-
My 6 Point FIA harness have arrived (kinda). There was a mix up from the supplier and I ended up with 3" set rather than the 2" set. I contacted them and their customer service was top notch. It is being resolved and 2" ones will be on their way to be soon but in the mean time I was able to at least mock them up in the car to see the vibes. Need to organise some fixed back seats so i can actually use them as a 6 point. I am leaning towards the Velo Podium II XLs as I like the look of the bolstering compared to the GP90 XL or GPT2. The side and thigh bolstering on the GP90/GPT feels less that my existing Bride Digo R recliner. Velo Podium II XL Velo GP90 XL Velo GPT2
-
Got the flat door cards "good enough" for now. After cutting out the arm rest I removed all the stock trim material. Then filled the gap with a bit of Masonite and wrapped it in some adhesive foam to hide the transitions as much as possible. Then I applied some black vinyl material to the panel with some spray on contact adhesive smoothing the edges as best as I could. Here is how it sits in the car with the door handle and cut down window switch mounted
-
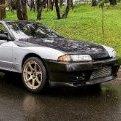
Fitted some Advan AD09s to try next. Likely slower than the CR-S but should work in the wet and last longer. Off for alignment and the new plates worked a treat! I was finally able to hit both my drift and grip alignment targets with the same setup! Grip Front: Toe total -2mm(1mm out each side) Caster +7° Camber -3.8° Ackerman +15° Rear: Total toe +3mm (1.5mm in each side) Camber -1.5° —————————————- Drift as above but drop the front sway bar and change the below. Front: Toe total -10mm(5mm out each side) Ackerman +5°


