-
Posts
161 -
Joined
-
Last visited
-
Feedback
0%
Content Type
Profiles
Forums
Events
Gallery
Media Demo
Store
Everything posted by GXE23
-
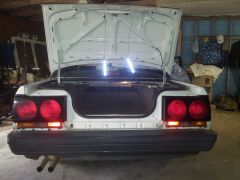
Here's my custom made clear front indicator lenses installed, before and after shots of the sides as well. Also, my rear bumper very bottom lip, was showing proper signs of aging, and slight rust. So I rust-proofed it, and being unable to get an ''exact'' match for the gray that already exists, I just opted for matte-black. Here's the end result. A lot better than what it used to be. *On that note, I must highly recommend "MOTOSPRAY" Automotive Paints. I have never come across a more exceptional Automotive paint (in a can form) in my entire life. More news and updates on the way soon. BEFORE: AFTER: I personally think simple touches such as a coat of paint and clear/colour coded lights do a World of difference, and it's so subtle, those non-familiar with the R31 wouldn't have a clue, which to Me personally, just makes it that much better. Also, I got under the car with some bug & tar remover, a can of heavy-duty degreaser & the karcher pressure washer and it too is a world of difference to what it was once before. Truth be told, it probably wouldn't hurt doing once again down the track. But for now (compared to the previous picture supplied when I posted about my Petrol Tank re-spray) it's a big difference.
-
I grew tired of the amber indicator lenses at the front of the car. So I went to Home Hardware and got a $5 30x30cm sheet of clear perspex, then got it cut to the size of the stock/existing lenses. I had to do a little filing and sanding on the corners to get them to properly fit. Then, I sanded both sides of them with 120grit Sandpaper to get a 'hazy' effect, until I was satisfied with it anyway. I then masked them up excluding the tips where the screws go on either side (just to hide the screw holes behind the lenses on the vehicle itself & so it in ways, coincidences with my clear/black side indicators) and sprayed them a matte black. Also picked up 10 orange indicator globes on Ebay for $9.99 and free postage. Will be set for quite some time now! Here's the end result: More pictures on the way and info, just haven't had the time or weather lately to grab snaps/pictures.
-
HELP! I've spent the past week trying to nut this shit out, but I'm getting no where. To skip over a lot of details and cut RIGHT to the chase. I am trying to complete my stereo install on my 1989 R31 GXE. I have re-run speaker wiring to doors/parcel shelf etc. I cannot for the LIFE of me (Without fear frying my head-unit) figure out which is 12V constant. And Which is 12v Accessories/Ignition. After looking on multiple pages/sites/forums, I now know that BLUE/BLACK are the Accessories/Ignition & WHITE/GREEN is 12V Constant. However, I have 2 white/green and 2 black/blue wires: Also I was told investing in a Voltage Tester would help. I have uploaded a picture of the one I have which works on 240V accessories but will not register ANY current on any of the wires on my car. Is this perhaps due to the type of Tester I have, as it doesn't have a "ground lead"? So ultimately, buying the tester has gotten me no further along with something that should be so simple. If anyone at ALL can help me with nutting out these last 2 wires, it'd mean the world.
-
Wheel turned up, as well as the boss kit. Finally debadged the car, still got a little bit of 'gunk'/glue residue to remove when I can get my hands on some sepitone liquid. As soon as I do I'll throw pics up. Didn't want to part with the badge as much so I threw it on the interior with what-ever left-over paint I had, from respraying my petrol tank. I first sanded it back, especially the rust, and then went about rust-proofing it and respraying it Machinery Gray: After looking at these properly now, and seeing it in certain light, Definitely gonna get under there with some degreaser and tar and grime remover and give it a blast with the pressure washer! Gah! That's filthy! Also purchased a Black R31 Rear Louvre which I'm yet to go pick-up. Paid $49.00 on Ebay for it. It's black, but I plan to hit it, with a Matte White or potentially a Gloss Black, yet to decide, will obviously make a final decision when I have it 'in my hands'. The top two 'support brackets' are missing. But this is no issue, as I'm going to have to slightly modify it to fit snugly around my (aftermarket) roof-antenna. Bloody ripper bargain if I've ever had one!!
-
Just purchased this little beauty for $75.00 and free postage. 320mm in diameter, compared to the more commonly found 350mm diameter, looks like it'll be a comfy wheel! And snagged a Boss Kit for $35.00 + free postage:
-
Welcome Jesse! Bloody ripper bargain for $600 that's for sure! Look forward to any future posts/pictures/works!
-
Thursday 24.06.13 4 New Tyres, "Duro" brand and the exhaust done. Before/After video:
-
Since a seller on Ebay stuffed up, in sending me the wrong type of back-light globes for my Dash Cluster, I'm having to wait on the new ones to turn up, from there, I can put my cluster back in, with bright white LED lights. After that's done I can have my on/off neon switch properly installed/fitted, and then finally finish my stereo install. This week, I'm due to get 4 New tyres, balanced and a wheel-alignment. Whilst it's up on the hoists I'm getting the cannon muffler fitted as I have a hole in my current rear exhaust muffler, which would otherwise fail roadworthy. Have been quoted $465.00 not including the exhaust installation. So I'll post the total price I pay for that when it happens later in the week, and post photo's / videos of the muffler, compared to stock exhaust. After that, I'm having O'Brien out to replace my cracked windscreen, for $232.00. Should be $282.00, But luckily for me, I was unaware, but for the month of June 2013, if you book anything online with O'Brien Glass, they slash $50.00 off the total cost of whatever work, You're wanting done. Once that's done, I can run her into the Mechanic for a Roadworthy and see how she goes. I would like to think, and with hope, that there really shouldn't be much wrong with it, if anything at all. After doing a service today (Inclusive of K&N oil filter, Penrite HPR30 Oil, & Installing an In-line Catch Can) and getting underneath the car, the bushes and seals, and just about everything under there seems to be in top-notch condition. Anywhom, just an update. More to come soon!


