


predator
-
Posts
23,258 -
Joined
-
Last visited
-
Feedback
100%
Content Type
Profiles
Forums
Events
Gallery
Media Demo
Store
Everything posted by predator
-
kittens...
-
 well if you are relying on "but the cop did it" to get off .. it's not worth pursuing. It's like saying "well that minister went and robbed a bank, therefore I can too " .. The excuse "but somebody else was doing it" kind of means nothing in court dude.. Again, just because "it was safe" won't get you anywhere as well, as you broke a listed road rule.. I could say I was going 10km/hr over the limit because it was dry and nobody around - again that's not going to get you off anything when it comes to these things
 -
more pix
-
This guide will show you how to upgrade your "non type m" single pot brakes to 4 pot "type m". I was unlucky enough to get the single pot calipers with my r32, and they came in pretty poor condition, so thought it wasn't a bad time to upgrade them before compliance. The process to remove or fit R33 GTR or GTS-T calipers/discs should be very similar to this guide, and much of this will still be applicable (just use all r33 calipers, lines and discs). This may give you a little bit more stopping power, due to the wider diameter discs. For reference, total cost was $440 (basically cost of 2nd hand rotors and calipers.. fitting = free). To begin.. ======= Tools: a) 19mm socket, probably with a nice breaker bar as these are stubborn bitches B) 10mm socket or spanner c) 14mm socket or spanner d) 12mm spanner (or adjustable spanner) e) big ass flat heat screwdriver (for leavering things off) f) Can of WD40 spray or equivelent, for stubborn bolts (which you *will* find!) To do conversion: a) type-m 4pot caliper x 2 B) type-m brake lines and all fittings x 2 (mandatory!) c) type-m spec discs, which will generally be much thicker than the non type-m d) brake fluid bottles x 2 (DOT 3 or better rating) - supercheap auto e) brake bleed kit (supercheap auto) Remove Wheel ============ 1. Start by parking where you are going to begin the work, hit the handbrake, and rotate the steering wheel about 3/4 lock left if you're going to do the left side, and 3/4 right if you're going to do the right side. This will make it a hell of a lot easier to get to the right bolts, etc easily. 2. Jack the front of the car up at the corner you're going to do, and remove the wheel. 3. If you have the single pot calipers, you should see something like this.. Image gone AWOL, please re-post if possible Remove Old Caliper ================ 1. Start by removing the old caliper, by unbolting the two bolts that sit behind as shown in green. They may be quite hard to budge but eventually they'll come clear. Think they are 14mm. Image gone AWOL, please re-post if possible 2. Once those two bolts are removed, you should be able to slide the caliper off the actual disc, which should look something like this: Image gone AWOL, please re-post if possible You can just pull it to the side (with brake line still attached) so its out the way, you'll remove it properly later. 3. Pull the pads off (lever off using a long flat-nosed screwdriver if necessary), and you should be left with just the bracket there. 4. The two bolts that hold the caliper bracket on are 19mm, and on mine were a real **** to get off. Basically the only way I could get them off was by resorting to a breaker bar (big ass socket lever.. like a standard ratchet socket, except non-ratchet), with a 19mm socket. Anyhow, eventually they will come out (some WD40 sprayed on might help there). Image gone AWOL, please re-post if possible Once these are removed, you should be able to simply pull the bracket off and be left with just the disc sitting there. Remove Old Disc ============== 1. This is pretty straight forward, you should just be able to slide it off, but if its a bit gummed up (like mine) - you may have to give it a couple of taps with the hammer. The old disc should then pull straight off.. Image gone AWOL, please re-post if possible 2. This photo shows the disc totally removed from the hub. Image gone AWOL, please re-post if possible Bash Time!! ========== 1. The stock dust/heat/whatever shield will get in the way/rub on the thicker discs you're about to put on so you're going to have to bash it out the way. Luckily its just dodge sheet metal, so a hammer will do wonders there. You don't have to complete kill it, just bash it enough at the ends so its out the way enough. Test by putting your new disc fully onto the hub, and rotating it by hand. If you hear/feel rubbing, take it off and bash that section of the dust shield a bit more... until its all freely rotating. 2. You will also have to peel back the top corner back a fair bit, as this will also stop you getting the new caliper on properly due to the bolt position. Again, bash, bash.. till its well pressed back out of the way. 3. Slide your new disc on. As you can see I picked up a good set of slotted rotors with my calipers. DBA rotors are a good choice if you don't have any rotors to go with your new calipers. Slotted rotors will dissipate heat better, and are better for the track or hard braking up mountains or the like. Expect to pay around $200-$300 per corner for the discs new. Image gone AWOL, please re-post if possible Fit new calipers ============= 1. Now its time to fit your nice new grippy calipers. Below you can see what they look like, before they are fitted: Thankfully, the hubs for the "non type-m" and "type-m" have exactly the same bolt positions to allow the caliper to go on, allowing a "factory fit" style fitting to the non type-m without any fabrication. What you will notice is that the two big bolt holes (the 19mm ones) which hold the single pot caliper bracket are exactly the correct position to fit the 4 pot caliper itself. 2. Depending on whether you calipers came with any pads, or what pads they did have on, or the previous disc thickness, you may have to press back the pistons into the caliper to be able to slide the caliper properly onto the disc. You'll have to refer to a "how to replace your brake pads" guide to see how to do this.. 3.Slide the caliper onto the disc near the bolt holes, taking note of point 2. If its not going on easily with the pads in, you'll have to push the caliper pistons back a bit using a clamp. 4. Bolt the new 4pot caliper on, using the two bolt positions mentioned above (see removing_oldcaliper.jpg for photo). You can use the exact same bolts again as the single pots. Tighten them nice and tight, as you don't want the caliper moving anyway but grip. You should have something that looks like this: Image gone AWOL, please re-post if possible Gives a bit more confidence than the old eh? Brake Lines ========== In a way this is one of the more fiddly parts of the process. Make sure you have the type-m lines or equivelent, as the non type-m have a different thread pattern on the caliper end and WILL NOT work (trust me I tried) 1. First of all you'll have to start removing the old line, which involves removing all the clips, which are bracketed at 3 points to the wheel arch. Leave the top one!! (nearest to the wheel arch)..you'll see why later. There is not magic way to really get these off, I just used a long flat head screwdriver (gives plenty of leverage) and kind of levered as best I could, mainly working from the back of each clip. Eventually with a bit of stuffing around they'll pop off. You'll work it out eventually Image gone AWOL, please re-post if possible 2. Once all brackets are removed, slip out the line at at each mount point. You'll find you have to generally pull down from the bottom, which will pull the line through the hole, and allow you to slide the brass fitting through. 3. You should now have the line pretty much seperated, except for the top bracket. And you should be able to move the whole line and old single pot caliper around a bit. NOTE: DO NOT REMOVE THE TOP NUT YET!! Wait until the new line is all pretty much fitted to all the correct points and THEN when you're ready to go, you will quickly swap it over (see later) 3. 5. Secure the bottom most line bracket to the hub.. this will be the metal bracket with the large circle in it (you did get the bracket with your new lines correct?). These points are circled. Image gone AWOL, please re-post if possible will have the hole, but you'll have to track down the correct sized bolt to fit the 2nd. Bolt the bracket in these two positions. You may want to sit the "flare nut" (one that goes into caliper - circled green) in the thread (ready to screw), before tightening the bracket bolts. This is because its fairly rigid, and there is no flexibility once those other bracket bolts are tightened. 6. Start securing the other points of the new line in place. This will pretty much go on exactly the same as the old line, except at the caliper end the different flare nut setup to the old banjo bolt setup. Insert the rubber through the bracket, and then lead (pull) the actual brass fitting through at each point. Use the old "clips" to clip the line to each point, sliding them on, to hold each point firmly in place. 7. Tighten that flare nut near the caliper using a 10mm spanner.. Be careful not to screw too tight at the end, or you may strip the thread in the caliper (then you are screwed) - although it does need to be a tight fit so that there is no escape point for the fluid. 8. Now your new line is pretty much all in place, except for the last point, its time to do the final connection. This can be tricky, but see how it goes. Image gone AWOL, please re-post if possible Using the 12mm spanner, start undoing the top flare-nut. This is a tricky one. I actually ended up snapping the line on one side because it was so gummed up but see how you go. If you snap the line, you'll have to get another, or get another nut flared on. Leaving the top most bracket in place helps hold the line in place, allowing just the line nut to be undone. This is why this one is left until last. Once the top nut is loose enough, remove the bracket. As quickly as possible remove the top nut, and quickly screw in the new line at the top using the 12mm spanner. Brake fluid will start coming out, but there is not much other way to do this. The way I've mentioned you're likely to lose as little fluid as possible from your master cylinder, and piss out everywhere. If you do lose it all, its not the end of the world, but you'll have to top up the cylinder a bit more later on. Now the line should be full in place! 9. Make sure everything is nice a secure, and there should be no play in the line at any point if done correctly. Check everything, all bolts are tightened well, and nothing looks out of place. The Other Side ============ Do the other side, its exactly the same process for each side. Bleeding fun ========== Undo the bleed line on one caliper, and fully bleed the system, as per standard procedure. You will have to refer to other info on how to bleed each caliper, but it's a fairly standard process, no matter what the car. This will generally take two people. If you are unsure of how well you've done it, and the brake pedal still appears spongey or other weirdness, drive VERY carefully to a brake place, and they'll be able to bleed the system properly for $50 or so. Its hard unless you've had some experience. You're all done! Enjoy your new found stopping power. Quick note on rears (changing from single to 2pot type m or r33 calipers): I would say would be very similar to doing the fronts, but haven't done this yet myself. Most of your stopping power does come from the front, but never discount the rears in giving you good overall braking performance.
-
you miss fight club? wasn't it your idea to shut it down? there is always a reason for fightclub..
-
They just had them on Today Tonight.. they didn't actually come across *too* badly or say anything too stupid.. seeing as they were out to grill them to pieces after all. Don't think they'd be rushing to do it again..
-
very nice! thanks for your old brake lines btw.. finally got my 4pot brakes sorted and in now..
-
although i *do* have 2x 4door skylines that are white and 1986 era.. if u get the idea but thats probably not a good idea..
-
i have 3 cars and yet only one is registered so I am only watching.. unless you want to shout me a trailer ?
-
is dorri day this weekend? Think i'll come..
-
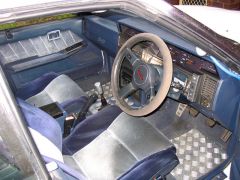
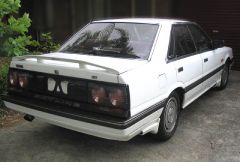
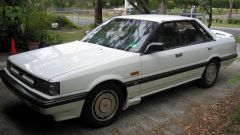
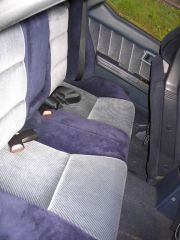
Picked this up over the weekend.. a HR31 Passage GT. Don't see many of these around up here in QLD so its something different. It's going to need work as part's of it are rough around the edges, but for the most part its straight, pretty much all in tact, and goes ok for an rb20. It's chasis number is in the 3000's and it's a late 1985, which I'm guessing makes it one of the first few every produced. It's pretty much tricked out with most things (although some are now a little rooted) that you'd feel be pressed to find on many modern cars: stereo controls on the dash, old style climate control, elec mirrors, windows, cruise control, headlight squirter thingos, adjustable "soft, medium, hard" electronic suspension (unfortunately stuffed ), and who knows what else I haven't discovered yet. Will be interesting to give the cruise control a try.. thats if it still works.. Horny interior, but it needs a general tidyup.. and I thought I was only after one project car We'll see how this one goes - only going to do things slowly on this one. Thankfully the engine has been swapped over for a nice silvertop RB20DET and gearbox so there is some potential there for maybe a drifter, or just overall pimp cruiser. Don't really need 3 cars.. so if anybody is after a nice clean and reliable aussie R31 for a daily let me know
-
From the album: predator's Gallery
interior -
From the album: predator's Gallery
rear -
From the album: predator's Gallery
side2 -
From the album: predator's Gallery
backseat -
From the album: predator's Gallery
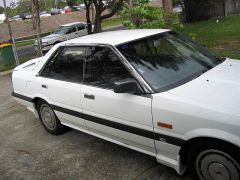
side -
Compliance workshop troubles
predator replied to stingray's topic in Importing, Compliance, Modification Laws & Regulations
like duncan says.. not a bad idea .. if its SEVS its the workshop's responsibility to get it right. Anyhow, took a few pix of mine.. the first photo shows how its rivetted in. Hopefully I've done it right, as I'm just playing it by ear here.. Its very solid. The 3rd shows the positioning there.. I built another parcel shelf, and to hide the ugly speaker holes until i get some in the back there. You can see in the 2nd photo in the another car I just picked up over the weekend. Interestingly enough on that one, points are back rather than right up against the seat.. yet in my mate's GTR they are right up against the seat. Its almost like 50/50. So bah, who knows.. we'll find out when i meet an engineer. -
It's kind of interesting. I am in two minds, yes, it was stupid - but it is her car, and her kids, and her conscience if the worst did happen. Does it make it any different to parents just not supervising their kids properly and putting them in danger at home or wherever else? I am sure my parents and probably most have been guilty of that at some time. Are parents charged with these sorts of crimes for a lapse of judgement? In a way, when you start getting into these things it starts getting about taking the right of parents to raise their children in their own way (however wrong many would view some things). That is where it gets tricky. Some parents let their kids do silly things, or put them in dangerous circumstances all the time (not watching kids near a pool, etc). But in a way, the kids are their responsibility, and its their lives that they are putting in danger. If they are shitty people, they will make shitty parents if you ask me, and raise more shitty adults to continue a deadbeat family. Anyhow, guess I am not a parent so really don't know. Does anybody have remourse about going at speeds past the speed limits after the fact if nothing happens? I doubt it, and that's why you do it. But likewise, you could spin out and hit another car and kill a family - its just different sides of the same coin. It's a little rough trying to take the kids away for one silly action I think though assuming this was an isolated incident.. although would have doubts about that
-
try this: http://www.miata.net/garage/tirecalc.html it will give you an idea of how far out your speedo will be changing tyre sizes..
-
can you take these ones to court? I've always thought having a tape recorder would get you off any defect if it went to court. "ok officer, so you are defecting me for xxx" "yes, that is correct" "under what Australian design rule are you defecting me for, and/or which roadworthy requirement are you defecting me for under the laws of Queensland?" "um, er.. << b.s. answer >> " * I'd imagine that would probably get you off in any court case right away. Unless they can state a valid statue, down to the finest letter then its not a valid defect I'd imagine. "how have you come to the determination that this vehicle is in breach of this requirement?" Now that is most likely where they'll fall in a heap, with no accurate measure how can they even legally defect you. The more questions you asked here the better you'd be off later on. As an example, maybe for height if they say "well I have this fancy measuring doovy".. but then you start drilling them on the angle of the road, sprung weight and all sorts of other crap Court case comes, sounds like cop doesn't even know the laws he is enforcing.. you're off the hook.
-
Fuel pump...not where i thought it would be??
predator replied to wolverine's topic in General Maintenance
You may have to tilt it to get it out, as like you say there is a few houses and a couple of wires coming off it.. but it will come out if you twist and pull .. Once you have the bracket out, mounting another pump just makes common sense as to where to place the new one; which is as close to the old position as possible.. I'd recommend using a large hose clamp (or two) to secure the pump to the bracket... like so.. -
well *finally* finished most of this off yesterday for both sides.. turned out that caliper, whilst the thread is slightly stripped, still takes the proper flare-nut off the proper Type-M lines ok, because i think it has thick thread. So didn't need to get that rethreaded - if it starts to leak I'll have to think about it I guess. I did manage to snap the metal line (nut was seized shut, causing the line to twist) that goes to the master cylinder, so going to have to get that repaired before the job is completely done Nothing ever goes perfect when things are old and gummed up. Otherwise everything is in place, ready for it to be bled. Basically once you have the proper "type m" brake lines, it's a fairly easy process. And that would go for R33, or maybe even GTR brakes. I have nearly finished writing up a tutorial on how to do it, with photos and everything. If anybody needs a hand with the process, let me know and I'll try and help out..
-
damn bogans...
-
If its just a digital photo you have, there isn't much evidence. Even so - just taking it to "Today Tonight" or other trash tv might get a mention.. then again I think the police have close connections to that show, so doubt it.
-
cops are hypocrites.. the amount of times I have seen *them* breaking the laws they are meant to be enforcing is ridiculous. Respect the law? well not if they're not obeying it themselves. The older I get, in a way the less respect I have for the police. My parents told me it was the other way around??


