


cowie165
-
Posts
1,741 -
Joined
-
Last visited
-
Feedback
100%
Content Type
Profiles
Forums
Events
Gallery
Media Demo
Store
Everything posted by cowie165
-

How to: Anodize your brake calipers
cowie165 replied to shmiddy's topic in Suspension, braking, tyres and drivetrain
Ah, understood. For what it's worth, the pics I posted in post#130 were masked with tape, then peeled off once the final coat had started to form a skin. Mark -
How to: Anodize your brake calipers
cowie165 replied to shmiddy's topic in Suspension, braking, tyres and drivetrain
Dude why not just peel the tape off? -
How to: Anodize your brake calipers
cowie165 replied to shmiddy's topic in Suspension, braking, tyres and drivetrain
Nicely done Rylan. Cool tip with the coathanger. And hey, if you're lazy like me, you can just spray red over the entire rear caliper! Lettering was too hard cause I was in a rush too! -
How to: Anodize your brake calipers
cowie165 replied to shmiddy's topic in Suspension, braking, tyres and drivetrain
Ah, yep. I think I just used the undercoat, same as everyone else. The aerosol paint stripper is sooooo much easier than the gel/paste stuff. As for colour, if you flick back to about page 2, you can see the timing belt cover that Geoff painted. My aesthetic preference is for about three coats. If you've not done much painting before, just remember: don't rush - use lots of light coats, start spraying before the caliper and use a smooth one-way motion, let the paint dry between applications with a bit of sanding if you feel like it. And I was reading your last paragraph thinking, "dude you should also overhaul your calipers..." and then I read you already have the kits. Nice. I overhauled my calipers around a year ago (when I painted them) and learned a few lessons along the way. Such a massive difference when braking! You'll be stoked, and moreso because YOU did the work. Sometimes I get tired of the dudes with the mentality of "he with the fastest wallet, wins." -
I don't have a welder.
-
I had the same weird smell when my gearbox rear main seal was knackered. Stank out the car. When I removed the shifter boot it was even stronger. Kinda stuck in the rubber boot on top of the gearbox. I feel your pain dude.
-
That'd be my preference too but my wheels are 9.5" wide! You have to buy 4x4 size ramps and they cost uber $$$. So jack stands it is for me then!
-
How to: Anodize your brake calipers
cowie165 replied to shmiddy's topic in Suspension, braking, tyres and drivetrain
@Flash89: wipe the majority of it out with a rag. Then spray the rest with BrakeKleen. It comes in a tall can with a red lid. @Rylan: CP199 is the undercoat, right? If you're just going for gloss black, any high-temperature paint will work. As Chris was getting at, the primer is a silver undercoat and the colour coat is transparent - the more coats of colour coat, the less metallic the end result. If you hit it with black, you'd need a 'clear black' to keep the metallic finish. Rylan the best bet is prob to go with something like VHT engine enamel and then use another high-temp gloss clear on top of that. Hope that help my friend. I can still remember when you were waiting for your car to come over from Japan! And yeah, the CP199 thing is like McDonalds selling a BigMac without the bread -
R32 Gtr: Sydney, Super Schmick Condition
cowie165 replied to cowie165's topic in For Sale (Private Whole cars only)
The only thing that would hold up a RWC is the driver's headlight has taken a stone. Good news is that I have the glass to replace it. -
R32 Gtr: Sydney, Super Schmick Condition
cowie165 replied to cowie165's topic in For Sale (Private Whole cars only)
Hey Kieran, I vaguely remember the rule-of-thumb is comp test results need to be in the 'normal' range (ideally 140-160 for RB26) with no more than 10% difference between highest and lowest reading. As far as I know, standard oil pump. It was running standard boost until a few months ago when I accidently cut of one of the boost restrictors when I was fitting the oil filter relocator. It has prob driven 500km since then. Fuel pump/timing belt has not been changed. Visible belts (fan belt etc.) have clear text on them still, which I guess indicates they are fairly recent, but your guess is as good as mine. Front bar is standard (replaced with new from Mr Nissan during respray) with vents added by the paint shop. Gearbox is standard, seals replaced in 2005, oil changed too. Hope that helps dude. -
R32 Gtr: Sydney, Super Schmick Condition
cowie165 replied to cowie165's topic in For Sale (Private Whole cars only)
Hey Dave, sorry about the wait dude. The dash in front of the passenger seat is now fitted, because the one then fitted (in the pic) had dried cleaning fluid or something that wouldn't come off. Looks even better now Shifter/handbrake boots were bought new in 2005. Wheel and shifter knob were replaced from a later model GTR. Centre vent was replaced with new item in 2005. The floor mat is a bit messy but it was the only half-decent pic I have right now. Mark -
My Personal Gallery
-
-
From the album: cowie165's Gallery
-

From the album: cowie165's Gallery
-
Hey Sean, SAU rules are no eBay threads dude. From the Rules/FAQ: 7. No external links! - Do not post likes to items being sold on e-bay, or other forums. If you wish to start a thread advertising the same items on SAU, you must include all details and price in your thread. Asking people to refer to e-bay for more info is not acceptable. If you're too lazy to copy and paste the details on here, your thread will be deleted.
-
Awesome post Nathan. Great pictures.
-
R32 Gtr: Sydney, Super Schmick Condition
cowie165 replied to cowie165's topic in For Sale (Private Whole cars only)
Ben cheers for replying for me, and for the kind words. JETR-32 the price is $19,999. -
R32 Gtr: Sydney, Super Schmick Condition
cowie165 replied to cowie165's topic in For Sale (Private Whole cars only)
Wow! Ian I love your work. Compression test conducted this morning: 145 140 150 145 150 150 -
R32 Gtr: Sydney, Super Schmick Condition
cowie165 replied to cowie165's topic in For Sale (Private Whole cars only)
Ian did you receive those underbody pics you requested? Compression test tomorrow morning. Results shall be posted. -
Cool. I am looking for the Revell 1/144 Challenger 604 kit. If that isn't the type you deal with, no problem! I can zoom back over to eBay.
-
Danny are these injection moulded plastic or die-cast? Can you source decals for plastic kits?
-
R32 Gtr: Sydney, Super Schmick Condition
cowie165 replied to cowie165's topic in For Sale (Private Whole cars only)
As a few blokes have been asking why did I respray the car: When in Japan, some the sphincter of the universe at the caryard decided to forklift it around rather than drive it. Using the forklift crushed the outer sill panels and by the time the car arrived in Aus the panels were starting to corrode and were heavily damaged. I bought new outer sill panels from Mr Nissan Japan and had a bodyshop fit them. As I was paying for the entire interior to come out for the sill panel replacement, I decided to go ahead and respray the car, replace the right rear quarter and rear quarter glass on both sides. Hope that helps! Cowie -
R32 Gtr: Sydney, Super Schmick Condition
cowie165 replied to cowie165's topic in For Sale (Private Whole cars only)
I'm happy to remove some stuff (Consult/PDA, Alpine head unit, etc.) to reduce the price. -
R32 Gtr: Sydney, Super Schmick Condition
cowie165 replied to cowie165's topic in For Sale (Private Whole cars only)
You're a good man Marcus Here's a few underbody shots as requested: -
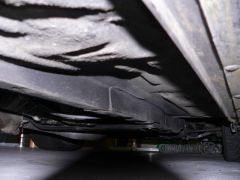
From the album: cowie165's Gallery


