

spudtatoe
-
Posts
213 -
Joined
-
Last visited
-
Feedback
0%
Content Type
Profiles
Forums
Events
Gallery
Media Demo
Store
Everything posted by spudtatoe
-
 Car was running fine the day before I opened up the fuel tank because my pump came loose and stopped my fuel gauge from working. I fixed that and thought everything was sweet Installed a new coil pack about a week earlier but had driven the car heaps with no problems. Car idles fine. I'll check battery voltage and look for air leaks etc. I'm stumped because I backed it out of the garage, let it idle for a few minutes while I was waiting on someone, backed onto the road and took off and got to the roundabout, went to take off again and stall.
 -
Ok, so I drove about 800 or so metres, got to a roundabout and stopped so the car could go, went to take off again and car just turned off. Got CEL, oil and battery I think. Then the only way to keep the car from stalling out was giving it a shit tone of gas and left foot on the brake changing from park to drive otherwise when you changed it would cut out
-
Ok scrap all that I must have the fcking lines around the wrong way because I've just found the piece. Can someone please show photos of the internal lines going to the lid or float piece? They must be the wrong way around? Or is it possible that there was just fuel in the lines and a few good revs would fix that?
-
Ok I need some major help regarding my lost flathead into the fuel return line [emoji849] The piece isn't big enough to get through the metal pipes circled. So where has it gone? I'm not 100% that it went in there but I don't know why else the car would stall out? Other thing I can think of is I got the fuel lines in the tank to the top bit the wrong way around. But the car runs and fuel comes out the return line[ I'm in the process of getting off that hose but I can't feel anything in it... Thanks!
-
April 11/12 I'll start off with saying that a family friend who owns a panel beating company has offered to help repair my wheel arch as long as I help on some aspects of it which I'm stoked about! He said it's gone in quite far so will probably need to go on the chassis straightener, then we'll probably have to bog it up then paint it. Awesome news Now I started getting into the fuel gauge issue. Heh. Honestly the reason why it wasn't moving (I won't say working because it always was) is actually quite amusing and no one would be able to guess unless they saw it. It took me honestly about 3 hours to even get to the top of the tank, the hardest part was removing the hoses for the out and in, I managed to loose the removable flat head piece for my screw driver, I'm hoping it didn't go into the return line lol. Another issue was that Niagara Falls seemed to have found its way to the outlet, turns out taking off the fuel cap really helps relieve the pressure I stopped there because fuel just went everywhere and filled the plugs so I couldn't test the float. Second day I plugged in the plug after the fuel evaporated and to no surprise it didn't work (makes sense now at least haha). I really didn't want to take off the hoses and plugs for the pump under the float mainly because it looked quite daunting lol. Anyway as I do I unplugged them and pulled out the float Next I plugged in the float and as gravity works, the float moved to the 'full' position And the gauge moved! But that doesn't make any sense right? Because if it freely moves and the gauge works, it should work inside the tank right? Is that a floating fuel pump maybe? Hmm... that's not where it should be. Much better. So, all back together and it's working! I finally have a gauge that works.. no more topping up fuel every hundred kms haha. So.. why wasn't it working before but is now even though nothing really changed? Well I'm going to take an educated guess and presume that the fuel pump was sitting on top of the float which means it wouldn't move or a fuel hose was stopping it from moving. Anyway I'm super happy that it's fixed and for free!
-
Sweet, I'll try give him a ring.
-
Today I got my faulty coil replaced and had a wheel alignment done. Too bad my f*kn fuel gauge isn't working now. Can never win. I feel like it broke when I got a flat battery. Don't wanna buy a new sensor and it be the dash, vice versa. I also got ahold of some brand new carpet for free! No longer have to look at my stained boot It's starting to look awesome! Also is anyone here in Auckland a panel beater? Or knows of a good one that's reasonably priced. Looking at this smashed in arch is driving me bananas
-
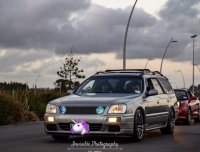
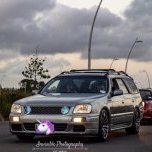
Post A Pic Of Your Stagea Thread
spudtatoe replied to CruiseLiner's topic in Four Door Family & Wagoneers
Gah!!! White stagea with silver trim!!! If I read correctly there was only 779 cars produced with this colour (5S5) Assuming your white is WK1 haha -
S2 Stolen and now door latch issues?
spudtatoe replied to djhutchie's topic in Four Door Family & Wagoneers
You should be able to take off the doorcard and see the latch mechanism and test it from there. Its all pretty mechanical in my s1 when it comes to the door handle, lock etc -
Think I should just be able to pop out all the bubbles with a pin
-
The wrap is definitely different and stands out, don't know if I like that yet haha. I didn't use a heat gun, I probably should have. But just got a few helping hands to hold the wrap while I use a card and a towel to stick it down, it's a bit rough and I still need to go and pop the bubbles haha
-
Cheers bro, Not too sure about a full wrap for now. I'm pretty keen to find a replacement door, but looking on GTR-Registry tells me that only 774 cars were produced with my colourway (5S5) So that definitely will make it hard to find. Although I'm actually thinking about respraying the car later on in the future, but I would still like a door haha. Bubbles are a pain in the ass, reminds me exactly of wrapping the books for school haha.
-
Pak N Save Takanini haha, cleanest and only S2 I've seen
-
Post A Pic Of Your Stagea Thread
spudtatoe replied to CruiseLiner's topic in Four Door Family & Wagoneers
I'm pretty sure they're just 6 speed auto, unless someone did a manual swap -
Post A Pic Of Your Stagea Thread
spudtatoe replied to CruiseLiner's topic in Four Door Family & Wagoneers
I love when people say spud haha, That would absolutely piss me off if someone keyed my car. I'm definitely more of a C34 Stagea guy, remember, when it comes to the Autech RB26 stagea, if something breaks you basically have to uy another gtr. I personally would buy a RS4S (2.5l Turbo Manual) if you want a C34, You could probably build up the RS4S to perform better than the Autech C34 and it may still end up being cheaper. Not really too sure when it comes to the M35 models, but I definitely respect a good looking one. I'd love to have one of each haha -
Post A Pic Of Your Stagea Thread
spudtatoe replied to CruiseLiner's topic in Four Door Family & Wagoneers
Looks dope as man -
Okay today I got wayy more done than I would have expected. Started off today taking apart the engine to find out what coil(s) are bad. I honestly hate the de neo, they make it so hard to get down there. I'd done this job once before when I changed out my spark plugs, I did this on december the 24th lol. So i've had the misfire for that long! and obviously the spark plugs didn't make any difference, although they did need changing. and i've lost my 12mm socket at some point yesterday so I struggled to get off the intake/throttle bit (honestly no clue what its called lmfao) Found the culprit, Mr #6, and of course it was the hardest one to get to with it having the metal bit floating there . Jez mentioned that I should swap coil 5 and 6 around to see if the misfire follows coil #6, because if it stayed on that cylinder i guess it could be the coil harness or something else. I will be collecting some second hand coils with 150,000kms on them for $50 on satuday, was contemplating buying a single Splitfire but thought against it. Next job, the camo wrap. I've never done any sort of wrapping before. There are a few bubbles and blemishes here and there, i'm gonna try and use a needle and poke holes in them and use a card to try and get them out. I'm pretty 'wrapped' with how it turned out I'm also going for a wheel alignment and tyre swap etc next saturday
-
Thanks! It's definitely on the list to do
-
Subframe went in perfectly, We measured just to be sure and everything was equal, mostly the arm brackets took most of the hit. Putting the subframe went pretty flawlessly thankfully, just the ATTESA bleeding was the long part, Haven't gone for a decent drive yet, only gone around the block. I'll see how I go for time tomorrow and hopefully I make my way to the tyre shop. Then when/if I get back from there I'll be taking apart the stupid DE to look at my coils as my misfire is just getting worse. It's like being in an earthquake, it's uncomfortable at all speeds haha
-
Today was pretty good, got the suspension top hat rubber bits turned 90 degrees so they sat on the spring nicely. Drilled out the exhaust flange bolt that snapped about 4 months ago and put in a new bolt. Also chucked some washers on the studs in the flange just after the cat, as repco gave me a stud with the unthreaded middle part of the stud being a different length. Took it for a test drive and it's awesome, couldn't listen for knocks or odd sounding things as for some reason our hot mix road got replaced with stupid stone shit so now we hear every single bloody car that goes past. I'm also on the search for some side skirt brackets as mine are all mangled and rusted n shit. Tomorrow I'll try and get a wheel alignment done and maybe the wrap put on.
-
Yeah the rim took a bloody beating haha! Wasn't doing anything stupid either, just pulled out and a car appeared. Thinking it possibly came out of a driveway or something. I kind of got side swiped but on an angle. I'm planning on beating out the arch, but I got quoted $1200.... Meanwhile the Mazda 6 only had scratches and a cracked headlight.... All 4 of the old wheels had curbing on them. Previous owner(s) managed to do it over time I guess. Not sure how but they did haha. I'd love to own a 180SX one day but they're so expensive in NZ haha
-
Gah! Wasn't supposed to have those photos after the thanks. Oh well.
-
Stagea Rebirth Thread Hi all, Probably don't really need to make a whole thread for the build. But I noticed that there were some grey kind of areas when I searched on how to do things. So I'm kind of just going to try and put everything into this one thread. Keep in mind this is my first car and I had never really worked or touched a car before, so this was all so new to me. If you do have any questions feel free to ask and i'll try answer them. First of all, 27th of Jan (Crash day) Funnily enough I was doing my restricted license test, needless to say, I failed. This was a learning experience for me, so don't crash lol. Damage wasn't too bad. It could have been so much worse, Bent subframe Broken control arms Bent in shock Cracked rim Smashed door Smashed in wheel arch Here are some photos of the crash. 1st of Feb This is where I kind of headed off task a bit and started doing some side jobs that I had listed to do in the future, and since I knew the car wasn't going to be moving for a while (Didn't end up moving for 2 months lol) I pulled off the fenders and front bumper etc, wanted to give all behind there a good wipedown. I managed to strip the last bolt holding on the RH fender so that didn't end up coming off for a fair while. I started trying to drill it out but gave up on that. So I just left it for the time being. 6th of Feb Picked up the new parts from Liam (cheers bro) Got pretty much every part I needed from him, all went into the trusty Hilux. I even sat with the replacement door in the back lol 11th of Feb A few weeks go by and we've done quite a bit of work I guess, all the old damaged stuff out and swapped over the diff, axels etc into the new subframe. This was a pretty long day and we worked pretty hard. I'm sure if we had done this before it would have been a lot faster. 15th of Feb Picked up some new V35 'premium' rims for $300, with 2 bold and 2 5mm tread, and a spare tyre with some tread. Decent deal if you ask me. Definitely should put em on this Golf though 19th of Feb Bought a pair of vice grips and got that stupid stripped bolt out with ease, so now all the front end panels were off and I gave them a good clean down. This also means I could get off the side skirts. 25th of Feb Now I started to sand back the side skirts for repainting as they were pretty shocking, I'd never done any sort of sanding or spray painting before so this was all so new to me. Apparently I sanded it back too far but oh well. I got one of the side skirts plasti dipped (yes, I know, plasti dip isn't really that good haha). Well, It didn't turn out the best, from me dropping my phone on it while it was still wet wasn't the best as that left a huge spot, along with bugs wanting to go and sit on it. I am still yet to paint the second side skirt and am putting it off till I man up lol. 26th of Feb We put in the replacement subframe, which was pretty much all we did that day. We had some issues with the new shocks, they didn't have bumpstops or the shock boot. So we went to swap them over onto the new shocks from the old ones but we couldn't get it over a little lip. My uncle took them away to get them sorted. I also test fitted the new wheels, and bloody hell lol. They didn't sit flush. I sat there googling the specs for the bore and what not, it should all add up! So I made a post on the Facebook group (Join that if you haven't haha) and Jez, straight off the bat said to check for rings around the hub or the wheel, I took a look and couldn't see anything About a half hour later and posting a close up of the hub someone pointed out that the non rusted ring was probably a spacer thing. Turns out it was. Stupid thing. 4th March Another off task thing I did, Stripped out the rear interior and decided I would give cleaning out the spare wheel well a go, as one of the previous owners apparently spilt some fluids in there and they ate away at the sound deadening material, which made the whole area sticky as hell. And everything I did to try and clean all the stickyness off just made it worse. I used like 10 cans of degreaser and yeah, that didn't work. Apparently dry ice works a charm, I tried to find where to get some and bosch sells it, but without being able to drive there that was a no go. I'm a pretty impatient guy so I didn't want to have it shipped lol. I ended up just using a heat gun and scraping it up. Should have just used a heat gun from the beginning because it was super effective, besides my terrible hand eye coordination and me burning my hand which has now left a hefty scar. 7th March Camo wrap arrives!!! I always wanted an invisible door. (thats all that happened today lol) 12th March Gave the spare wheel well a final clean before I put in the Dynamat. Dynamat edges are pretty sharp as i've learnt, and it does sting when you get cut. So that all went in pretty well, I used the 'Dynamat Extreme Wedge Pack' which is 18x32 in size. It seemed to cover the wheel well pretty good, covered more area than the factory stuff. 18th March Oh man, we did heaps, got everything back together, got the shocks installed, wheels on, and the car started for the first time in almost 2 months! Bleeding the ATTESA system was probably the hardest thing over all that we did today. I searched high and wide on threads for how to bleed the system, but I couldn't find one for the stagea which was annoying, so we went with what we could, we opened the black nipple and got all the air out of that, then proceeded onto doing the front nipple, we think we bled that one properly. The plug in the drivers side kick panel was weird. First off with that, my plug didn't have the same colour plug hich confused us but we figured its the only plug that looks like it, so we went with that. We still didn't really know how to make the fluid come out the bleed nipple as when we unplugged the connector the pump started (or a pump) and fluid came out, and we kind of just unplugged and plugged back in quite a few times until it stopped coming out/was just fluid with no air. Not 100% sure if its actually bled lol. Definitely going to be wiring up a switch to that connector as its a pain to get down there. I then left the next morning at 5am to do a 3 day kayaking trip in Lake Tarawera, so bonus pic! 22/23 of March So when we put eveything back in on the 18th we forgot to put on the sway bar, so I had to install that, and faarrk. That was hard with the car up on jack stands as the lower control arms were angled downward from the suspension and weight of the wheels, so this made angling it hard. Along with the fact that I left half of the old swaybar bolt on the old subframe control arm. We got the swaybar installed. And I proceeded to put on all the front end panels and lights. I never got around to opening and cleaning the lights which is annoying but oh well, not that hard to take out. So now its up to date, i'll try update this thread when I do more things I guess. I need to take a trip to the tyre shop and get an alignment done as well as balance and change the tyres over to the new wheels. My rear also looks like it has a bit too much toe in. Oh, and I still need to install the camo wrap. Thanks!
-
Nissan Stagea C34 RS [4K] - RB25DET NEO Manual RWD
spudtatoe replied to CRSKmD's topic in Four Door Family & Wagoneers
I only have like 5 likes videos on my YouTube and this is one of them. It's a very well done video, good to show my mates about what Stagea. Great vid man! -
What about the message at the top of the pages that say emails are being returned?

