


Neostead2000
-
Posts
80 -
Joined
-
Last visited
-
Days Won
2 -
Feedback
0%
1 Follower

Neostead2000's Achievements
")


-
I had no transmission at all so I managed to find a big box manual gearbox from an R34 GTT for an insanely good price in EU. I converted it to push type which cost more than the transmission almost, with parts from Amayama! These engines are very strong and can put out decent power with a properly sized turbo. You can save on money from parts like pistons and rods, and invest those in the transmission and other parts. I suggest you join the RB20 Enthusiasts facebook group, plenty of info and almost daily posts there about 20DE/DET/Neo+T builds. (I hope I'm not breaking any forum rules by mentioning third party platforms, just trying to help the buddy out)
-
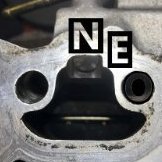
I have up to date pics of the engine build and turbo conversion over on my instagram @skpro_jects if you want to take a deeper look. Basically the exhaust manifold is straight bolt on and the ports match (they arent any smaller than a 25 or 26 head). the intake ports are different shape so the 20/25det manifold will bolt up but wont match properly or seal. You will need to port match using the 25det gasket as a stencil. Personally i ran the entire stock 20neo intake setup and have configured the swirl valves and torque valve to work based on my custom parameters to help with off boost response and spool. But this is using a standalone aem v2 ecu. The stock 20det ecu wont be able to control them.
-
Still not a guarantee fix. I used a high quality butyl-mastiq (the black goo that's not really silicone nor polyurethane, same stuff they use from the factory that just spreads out like melty cheese), and I still get lots of water on both sides of the trunk when raining or washing the car. I also suspect the factory spoiler rubber gasket might not be sealing well, so I'm thinking of adding a thin layer of grey silicone around the bolt holes on both sides and see if that's where it also leaks from. The biggest issue is that these cars don't come with a drain hole on each side like other coupes and hatchbacks.
-
8v - 2.48ms 9v - 2.15ms 10v - 1.74ms 11v - 1.41ms 12v - 1.15ms 13v - 0.99ms 14v - 0.89ms 15v - 0.82ms 16v - 0.81ms I'm running these values on my RB20 Neo with 570cc Denso R35 stock jets and it's great. Also bought a set for my Legnum VR4, love these injectors!
-
Hey Kaz, Unfortunately I am not at home currently and wont be for a few more months so I do not have access to my files or CAD. And at this point I prefer to keep the files to myself as I want to potentially make a few more pairs and see if they will sell within the EU before openly marketing them. But the way it's shaped and how small it is, I don't think you can fit both an indicator and a fog light onto the same surround, unless they were very small LED-type clusters.
-
Well the things I make are entirely custom and built from the ground up, unless it's a factory replacement part like the GTR Indicator surrounds. I made a slight revision to the gauge panel and now it can be printed in 3 separate main parts, which then get assembled simply by using some grub screws. I already sent one to a chap in the UK and he seemed very happy with it. I just checked and the shipping cost to the UK is about the same for Australia too, about $12. The good thing is now the panel can be placed in a bubble envelope which allows the quicker and cheaper shipping price.
-
 Update on this. I didn't chase the dual filament bulb idea simply because after looking more closely at it, it was way too big to fit inside the parker light section. I also didn't want to cut the housing and add another light source near the parker. So I used the GTR surround CAD file I had designed and slightly modified it to fit a Micra K11 indicator (the one on their fender). It uses a 5 Watt bulb so now the dilemma was fixing the quickly flashing relay. This was easily remedied by buying a plug-in 3 pin relay which has a knob to control the pulse, cost me $5. It goes in the place of the factory relay under the steering wheel. The indicators now all blink properly and even though this Micra indicator is a tad smaller than the GTR one, I find it sits more neatly in my custom surrounds and should be more than enough for tech inspection and letting other see my intentions on the road!
 -
Got the panel finalized and printed. Wasn't too fussed with smoothing it out at this point because it was the prototype and going into my own car, but I'm super stoked with how nice it fits. They are angled perfectly when you glance at them from the driver's seat; not too low, not too high, and at least the left hand doesn't cover the 2 gauges from the left going right. I might offer to make these and sell to people, but I'm unsure how many people would be interested in it, also considering I'm in EU so shipping would be a pain? Let me know what you guys think
-
I haven't done this page any justice. Initially I wanted to keep it regularly updated, but I've had some moments of pause then moments of too much progress and too many pictures, so I failed to catch up. I decided to make an Instagram page to showcase the entire process with even more pictures, so if you're interested in following up, please do drop by: https://www.instagram.com/skpro_jects/ If I can find the time, I will update it here also, but I really cannot find the time. I'm doing 10-11 hour days every day to get this Skyline finished up by the end of this year!!
-
Actually I do not know and cannot find a regulations sheet anywhere. I'm more worried about whether people infront of me would be able to see whether I'm indicating left or right, and I assume not since right now the only indicator is on the side fenders.
-
I soon have to pass initial inspection (rego) and they check for functioning parking lights as well as indicators. As I understand it, the R33 in general has 1 indicator light at the front of the bumper, one on the side of the front fender, and 1 parking light inside the edge of the headlight. I am running an S-Roc Greddy front bumper which came without any indicator facets and I am reluctant to gluing on LED strips or drilling holes. My other car has a very similar headlight design, but the corner parking light is a dual filament bulb which glows dimly at all times but when you use an indicator, it starts blinking with it more brightly. Could I take that same setup and apply it to the R33? I could find a socket with 3 wires (two signals and 1 ground), then use the same 21/5w bulb. Then splice the fender indicator signal wire to 1 wire on the socket, splice the other signal wire to the one for the parking light, and connect both ground wires to the third wire on the socket. Would this work?
-
UPDATE to my own enquiry from October 11. It turns out my belt WAS in fact overtightened, and upon re-reading the factory belt tensioning procedure, I believe I simply did it incorrectly the first time and added extra tension on the pulley. Basically the FSM says to install the tensioner pulley and spring, time the belt, then leave the pulley nut LOOSE and turn the engine over by hand more than 2 times (I did 4 full revolutions). After that, you need to hold the pulley with a hex key without moving it further in or out, simply keep it there while you torque the nut to 52-55Nm. I did that a second time now and I could feel the belt was looser this time around. Started the car multiple times afterwards and the belt whine completely went away!
-
Ok another update dear god I hope this is the last one!!! I managed to make the car start and work with the custom 24-1 trigger disc! I checked the CAS connector signal wires once more and noticed that pin 4 (1* crank) signal had 5 volts as it should. But pin 3 (120* CAS) signal had 0.223v, which should be 5. I then suspected the ECU itself, as I noticed it had been opened before due to the warranty stickers being slightly off. So I took it apart, carefully separated both circuit boards and started looking at it dumb. I traced the 41+51 and 42+52 pins and they went to Jumper locations which seemingly had no jumpers positioned on them. It appears the previous owner must have swapped them or it may have come from AEM this way. I placed the jumpers on locations JP1 (1+2) and JP2 (1+2), leaving JP3 and JP4 disconnected entirely. Placed everything back, selected the right type of signal (falling edge if going from 5v to 0) which is CONTRARY to what AEM have listed on their instruction sheet. I put the CAS back in ballpark area and what do you know, she fired right up and running even better! I quickly set the timing back to factory 10* advance and now it's running fully sequential injection and ignition. Basically the takeaway is, AEM is absolutely trash with very misleading instructions and outdated information. To think they still offer these series 2 ECUs for nearly $2000 or more is insane. I paid $1100AUD for mine so I guess it's worth it. Now I can finally focus on tuning this damn thing!
-
That's actually a good point you two discussed because when I tuned my Mitsubishi, the VE table was a true % efficiency table with psi load on the Y axis and RPM on the X axis. It was very straight forward; I knew that *in general* my motor was close to 100% efficient around 5000-6000 RPM so I knew around those load cells I would have to aim for pretty much 100% VE as a value, and when I was done tuning it, it took a very nice form and had logical steps from cell to cell. Now when I jumped onto this AEM, Josh is right, it doesn't have a "true" VE table. It just has a fuel map that you can set to be based off TPS or psi load (from the MAP). I chose MAP-based of course, but I noticed the values did not correspond to VE percentage, but rather you could choose, as GTSBoy said, whether to display the values in injector ms or RAW. And the RAW value apparently just goes up to 255 because that's the max value programmed into AEMtuner. This threw me off when constructing my initial base fuel map because now I had no bearing on the value scales. However, after further tweaking with it, I understood that it's just arbitrary numbers. What's important is to have a decent and logical AFR map, then have a good, calibrated O2 sensor to compare against and simply start adjusting the fuel map on a cell by cell basis, until my target AFRs match my real AFRs. In the end, the map should take a similar shape as if doing standard VE table, and the VE is still static based on the hardware so there was not much point in getting hung up on that. I'm still learning, this is only my second car that I have started to tune so I'm in no way an expert and clearly lacking some further understanding, but I will get there eventually. Also slight update, I ended up buying a metal spatula from the general store. It's normal steel, 0.3mm thick precisely. I took it to a laser cutting studio and had them cut out the disc from it. It was near perfect, just needed a light wet sand with 120 grit to get rid of any potential burrs from where the laser starts it's beam. It looks proper and fit incredibly snug onto the shaft, slightly better than the OEM disc I might add. There is also plenty of space on each side of the disc inside the optical head. And of course, AEM failed me once more. I loaded up their custom settings for their custom disc and guess what? NO START! I swear with this car, it's 1 step forward, 2 steps back. I had a starting, running, perfectly idling car with the stock disc and custom settings. And now with an exact copy of the AEM disc, and with their proper settings which are meant to be PnP, it doesn't even get spark or fuel. If I set the crank signal to read from both rising and falling edges (which normally you shouldn't do), then it makes spark but no fuel. And when I try to time it with a light, I only get a flash at the start of the crank and at the end. Gonna give it 1 more day today and if I can't make it work, I'll throw in my stock CAS disc...
-
I took a genuine 33 GTR indicator Surround from my buddy's car (left side), spent quite a lot of time measuring every single angle and dimension, then drew it up completely from scratch in solidworks. A friend has a 3D printer and we ran 1 prototype which fit but needed very slight adjustments. I then mirrored the surround and printed the right side which fit perfect. I will have to print 2 more for my S-roc bumper and may even offer to sell them online if people are in the need for those. I'm also currently finalizing a single DIN triple gauge panel for 52mm gauges which are slightly angled towards the driver. The panel can fit under the HVAC unit, however I am missing the radio bracket as well so I need to make that first. I will post pics once I get those made.


