


BH_SLO32
-
Posts
500 -
Joined
-
Last visited
-
Feedback
100%
Content Type
Profiles
Forums
Events
Gallery
Media Demo
Store
Everything posted by BH_SLO32
-
I regularly modify looms for SAU members and this includes several RB25 conversions for Cefiros. The RB20 loom is very similar to that found in the R32 skyline so you can at least use the pinout for same. If you would like someone to wire the loom to suit don't hesitate to contact me. I wire up everything to give as close to factory functionality of the RB25 as possible, this includes AAC, FICD, VCT, air regulator, AC, boost solenoid etc. The most popular loom conversion I do is for members dropping an R33 series 1 & 2 RB25 into an R32 skyline. Cheers
-
With the Haltech Software running, go to the "Setup" menu and then select "Program Setup" and finally select "Edit Com Port Details". You will probably find the default Com port is used by something else. Simply select the port you wish to use and you should be fine. PS. Not all Serial to USB adapters will work. Haltech recommended a Dontronics to source a suitable adapter (ES-U-1001-R100/US232R-100). Cheers
-
Run the climate control diagnostics first to see if any sensors are playing up. The compressor is switched on via the ECU which receives a signal from the climate control. I had the intake air temp sensor fail in my R32 (it read below 0degs) so the climate wouldn't switch the AC. Solution was a 10c resistor which corrected the sensor and allowed the AC to switch on. If the sensors all check out ok, you will the need to check the pressure switch (in front of the radiator on drivers side) which protects the compressor when the gas pressure is low. Continuity across the switch will imply good gas pressure. If the pressure is low the switch will be open and won't feed power to the compressor. Check the DIY section for running the climate diagnostics. Hope this helps.
-
Yes, for 4 stock wheels with tyres.
-
Check the bottom of the radiator to see if there is any other form of oil that uses the bottom of the radiator to cool. The autos run their transmission fluid through the bottom of the radiator for cooling. I have personally seen an internal failure of the bottom rail and transmission fluid pump into the radiator and the auto.
-
I have some stock R33 wheels with Nangkang tyres and probably 90% tread. $300 if interested.
-
The RB25 water pump has an elongated hole for the small bolt on the top side of the pump, the other RB pumps don't have the elongated hole. The location of the small bolt hole in the RB25 blocks is different to the RB20 and Rb30 and consequently if you use an RB20 or RB30 water pump you won't be able to install the small bolt. All the other bolts however, align correctly. I have found in the past that Nissan is cheaper to buy an RB25 water pump than Autobahn.
-
Yeah, you should be fine. Assuming the loom has been modified correctly, all the important wires have been covered in the 3 main plugs you already have connected. Cheers
-
Nothing I would worry about. My manual R32 has the same. I can't remember if the auto RB20 looms have an additional plug or not or whether the RB26 has an additional plug but the important thing is the 3 main plugs from the loom are connected so if you have a manual you should be fine. I assume your car was originally non-turbo?
-
You have mail
-
I have for sale the parts purchased a couple of years ago to build an RB30DET for my skyline. Unfinished project. Item 1. R32 RB25DE non-vct head. The head has been machined and new valve guides and heavy duty springs installed. Camshafts are standard. Includes intake manifold, new manifold gasket, rocker covers, cam gears, head bolts etc. The camshafts are currently not tensioned down and hydraulic lifters are sitting in an oil bath. RB26 head gasket and some other gaskets included. Excellent Condition $800 2. RB30 block that has been acid bathed, decked, bored and honed to suit oversize CP forged pistons. Bottom end is disassembled but includes, RB30 oil pump, stock rods, crank, crank girdle, sump etc. CP pistons included (Cost $1200 alone) Good Condition $1100 I am located on Brisbane Southside. Unfortunately I don't have any photos at present but will load some on the weekend. PM or contact me on 0404002142 Ben
-
Darrin, I had some discussions with Kate and the motor is from a series 1 stagea and from what I have seen they share the same ECU plug as the series 2 stageas with NEO motor. I am guessing the series 1 ECU wont have all the outputs that a NEO ECU has. My sister use to own a series 1 stagea and from the little I had to do with the car, it appeared to be an R33 engine but with a different ECU. If my sister still had the car I would have spent some time investigating the inputs/outputs to better understand the ECU logic. Unfortunately it is not to be. Cheers Ben
-
Earthing the fuel pump near the fuel pump will remove the FPCM and the resistor from the fuel pump circuit. At least now it will simplify the wiring as you said. I cannot state how important it is to have good earths. Fingers crossed you have fixed the problem.
-
In the RB20 loom, pin 104 is a green wire with white stripe on the 12pin plug (the largest of the 3 in-cabin plugs). This plug only has 5 wires, 2 wires to the wiper motor plug, the 2 wires to the fuel pump resistor and pin104 wire. This might help if you are looking for plug location of pin104 and 106 in the GTR loom. Cheers
-
The operation of the FPCM in the GTST is controlled by the RB20ECU. From memory it earths pin 104 which only happens when the engine is cold. Once warm it switches off. It is not load related. The FPCM circuit runs in parallel with the fuel pump resistor and allows are greater current draw (better pump performance) when the engine is cold. Not sure if this is emissions related or simply to allow more fuel when cold. The GTR ECU seems to control the operation of the FPCM in the opposite fashion (ie. battery voltage when cold and earthed when warm). I will confirm. With your setup I would therefore expect that the FPCM circuit to switch on ONCE WARM as opposed to switching off when warm. Therefore, I now don't think this is your problem. I think your problem might be related to load and would suggest looking at the Map sensor wiring.
-
I think I may know what is going on. The turbo R32's have a fuel pump resistor (silver rectangular item) mounted on the passenger strut tower. Plug 5 in your photo is the connecting plug. If you haven't directly ground the fuel pump (ie the fuel pump wiring is standard), with the fuel pump resistor disconnected the fuel pump will run off a parallel circuit through the FPCM until the engine is warm and then it will switch off (pin 104 from ECU controls the FPCM operation) shutting down the engine. The fuel pump runs through the resistor circuit to earth most of the time but also through the FPCM circuit for a short period when started. So if the resistor is not connected the motor will run for a period and then just shut down. From my own testing it appears the FPCM switches off when the engine gets warm. This is the case for the RB20 ECU. The RB26 ECU control of the FPCM is similar. Plug 3 and 4 are the O2 sensor (2 off) plugs, plug 1 is what I believe to be a diagnostic connector for the ECU tacho output (from memory). Plug 2 I think is the boost solenoid. I have found some wiring differences with the R33 RB25DET and R33 RB26 white in-cabin plug (the plug near the ECU in the passenger footwell). I recall one of the differences was the switching wire for the FPCM. I would not be surprised if it is different with the R32 Rb26 either. First thing I would do is connect the fuel pump resistor. Cheers, Ben
-
I have found in the past that the boss kits that I have used don't seem to have pins that are thick enough to cancel the indicators. I slide a piece of rubber tubing over over the pins (1/4" vacuum tubing works well) and problem solved. Cheers
-
Thermal Switch Install, Need An Opinion Asap
BH_SLO32 replied to cabbie_bro's topic in General Maintenance
Yes, you are right. Wire it up as per the instructions (Reference 2). It wouldn't really matter if the red wire is on pin 87 and blue on the bottom unless you were planning to power 2 items then you could use the two 87 terminals (it is a twin throw relay). The switch closes (and turns on the fan) when the thermal switch activates and powers the relay coil. Hope this helps. -
I have pulled RB engines and gearboxes (non 4wd) out the top so many times I have lost count. I have an engine crane only but almost always will pull the gearbox out with the engine because it is much quicker than removing the gearbox whilst in the car (if the engine has to come out as well). Disconnect the power steering pump and AC compressor and pull to one side. Disconnect the exhaust dump pipe, heater hoses, and wiring to the starter, alternator and gearbox. Remove the engine wiring by disconnecting sensors and then secure above firewall. Remove radiator and intake piping, vacuum hoses as required. Remove tailshaft and disconnect speedo drive. You can then remove the single engine mount nut for each side by removing from underneath the cross member. With a jack underneath the gearbox, remove the 4 cross member retaining bolts. With the engine crane positioned over the engine slightly forwards of the engine mid length position, you can load the engine crane and drop the gearbox partially. Note, you will need a reasonable angle on the engine if you are to get the gearbox bellhousing over the radiator support. Remember to add a plug to the back of the gearbox to prevent loss of fluid. It usually takes me about 10-15mins to remove and install an engine and gearbox once everything has been removed/disconnected. I usually will have 1 or 2 people present to ensure nothing grabs when the engine is coming out or going back in. Some food for thought. Cheers
-
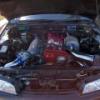
Yes, the R32 has 3 cabin plugs whilst the R33 has either 1 (or sometimes 2) long rectangular white plugs. I always remove the R32 plugs and then connect each plug wire to the corresponding RB25 wire. To do this you will need to spend sometime identifying all the wires in both the R32 and R33 cabin plugs and then join the wires where required. You can identify the wires through the aid of the pinout diagram and wiring diagram for the R32 and R33 motors. I have attached a photo of a loom I did sometime ago which shows one of the R32 in-cabin plugs with wires soldered to the appropriate wires in the RB25 loom. You can also see the original RB25 white plug. Hope this helps Cheers
-
Fear not as the only significant change to the wiring for a series 2 RB25 is the power feed for the injectors and there is no ignition coil relay near the ECU. The injector feed on the series 1 motors is a dedicated feed coming from the 8 pin plug near the P/S reservoir whilst the series 2 loom has a common feed for the coils and the injectors. I would recommend not touching the factory R32 body loom down the drivers side (starter, alternator, oil pressure etc). What I do recommend to people planning to do this conversion is to grab the R33 body loom wiring on the drivers side when purchasing the RB25 as it incorporates part of the engine wiring loom. I normally get people to send me this loom so I can remove the knock sensor wiring and the air regulator wiring. This wiring terminates in one of the 2 grey plugs in front of the intake manifold (see photo). I have also attached another photo of this wiring after it has been removed from the body loom wiring and wrapped as a separate mini loom. Dont forgot that in addition to the major wiring modifications I have mentioned in my guide, you still need to connect all the other ECU wires like start signal (pin 43), tacho (pin 7), fuel pump relay (pin 18) etc. Cheers
-
I have done a few looms for SAU members now and the most common is the RB25 into R32. I have been preparing a ROUGH guide on the wiring basics for this conversion and provide it to people when they ask. I have been developing it for sometime and it isn't complete but I think it will help. Please note that I have not addressed ALL the wiring connections required to get complete functionality of the RB25 and you will still need to connect the relevant fuel pump trigger wire and start but this should not be too difficult. Hope this helps. Cheers RB25_into_R32_Wiring_Guide.doc
-
Putting Rb25de Into R32 Gts
BH_SLO32 replied to i want a skyline's topic in Engines & Forced Induction
You will not need to modify the wiring for the dash only the engine loom. I have prepared plug'n'play looms for a number of members of this forum and the most popular is dropping an RB25DET into an R32. I remove unnecessary wiring from the R33 loom and integrate specific wiring from the R32 (eg climate control inlet water temp and fuel pump resistor - not applicable in a non-turbo R32) and more importantly the loom plugs which connect to the R32 body wiring (eg 8pin plug near power steering reservoir and 3 plugs near ECU). The R33 RB25 has a common power feed to the O2 heater, boost solenoid and VCT. I separate the O2 heater power feed and connect it to the dedicated feed from the R32 loom and then supply separate power for the boost solenoid and VCT by connecting to one of the main loom power feeds. Hope this helps. Cheers -
Depending when you plan to do the conversion, I can offer to do a plug'n'play loom for you. Send me the RB20 and Rb25 looms and I will return it ready to simply plug in and go. I wire up all items to ensure complete functionality of the standard RB25 ECU (eg. boost solenoid, VCT, FICD, A/C etc). I normally charge $300 for a series 1 or 2 RB25 or RB26. I have personally done the RB25 into R32 conversion twice and can recommend it. The RB25 gearbox will require more work and if you already have a manual R32 you will need to either modify the gearbox crossmember or make a new one. If the car was originally auto and you plan to use the RB25 gearbox, from what I have seen the original crossmember should bolt up ok. Cheers
-
Autobahn sell them. Cheers
