

pure_methamphetamachine
-
Posts
148 -
Joined
-
Last visited
-
Feedback
0%
Content Type
Profiles
Forums
Events
Gallery
Media Demo
Store
Everything posted by pure_methamphetamachine
-
Rather than using the little white wire to power the VT coil, why not run a decent sized wire/cable directly from the battery?
-
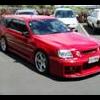
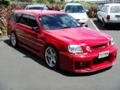
Post A Pic Of Your Stagea Thread
pure_methamphetamachine replied to CruiseLiner's topic in Four Door Family & Wagoneers
Masa kit I see -
Post A Pic Of Your Stagea Thread
pure_methamphetamachine replied to CruiseLiner's topic in Four Door Family & Wagoneers
Mmmm.. Black 260... I just got a few upgrades for my car: 2 bosch 044's, 1000cc injectors, and an HKS T51R Kai BB. Installation will start Sunday 28th June (I have no time prior [cries]) -
I am neither bagging nor doubting you. It is just my opinion. And yes, I too have seen many "pro" build engines that fail instantly. Yet they never seem to learn... Bugger about the cams dude. How the f did they manage to break?
-
Post A Pic Of Your Stagea Thread
pure_methamphetamachine replied to CruiseLiner's topic in Four Door Family & Wagoneers
Cheers for the comments. I am just organising the photos for the build thread. Do you guys want it from the start, or just the last lot that finished with what I have now? It was factory --> fully forged + stereo 1 --> added T04z --> stereo 2 --> painted --> current motor. DO you want all 3 years worth, or just the last (stereo 2 --> painted --> current motor)? -
Pull the motor out and pull the head off (you can EASILY pull it off with everything attached outside of the car). Fully drain block of all oil and water. Make sure head bolt holes and water galleries are 100% dry. Add a thin(ish) smear of loctite stuff (see below) in head bolt hole, and put quite a lot in the water gallery, ensuring you go down as far as you can. You can put like 4mm thick of it in there. Allow to dry, put head back on and put the motor back in. Do this on EVERY water gallery and head bolt hole, but only in the part of the gallery that is next to the bolt hole. This half @rsedly emulates an N1 block (all the N1 is is a factory one with more meat between the bolt and gallery). Loctite: Can not remember the exact stuff by name or number, but it is a 2 part epoxy(?). One tube is yellow, the other is black. Tubes are small too, like little super glue tubes. Mix like araldite and apply. The stuff looks like concrete, as opposed to araldite which is clear like a resin / glue.
-
Let me guess: 1) You are running a factory block ie non N1 or RRR GT 2) You run 1.3 bar or more, or have hit / exceeded 1.3 bar a few times in the passed Your block is cracked between where the head bolt goes into it and the water gallery on the outside of the bore. 99% chance it's the cylinder 5 or 4 one EX side). The crack is usually very small, but grows. If you pull the head off you may not even see it as it starts sub-surface. Skim the block and you'll see it clear as days. You get trace oil accumulating in your radiator I take it, especially in your overflow? You empty it, it comes back? The crack is small, but as the oil pressure is greater than the water pressure, it forces the oil through the crack into your water system. Over time, the crack will get bigger, and more will start on other head bolt / gallery places. The harder you drive, the faster it does it. That is exactly what mine and many others have done. That is why the N1 was made, then the GT block, and why I went to an N1. Changed to N1 block. No problems at 2 bar. Other friends (boost ran [bar] / time it lasted before oil in radiator): 1.6 / 2 weeks 1.6 / 6 months 1.5 bar / 8 months 1.5 bar / 1 week 1.5 bar / 2 days 1.6 bar / 2 years and still no problem The time for the cracks to start is random. You can either replace with an N1 block, or do a semi-temporary / semi-perminant fix on your factory block. You do not have problem with oil cooler, I guarantee it. Pull the motor out.
-
I'm not saying it is not possible, there are just too many risks to not justify doing it. If you skim the head, if so how much, had it already been done, are you using REALLY good valve springs etc. Just not a risk I'd be willing to take, that's all.
-
A 1.8mm head gasket is not sufficient a-mod for clearance of lift of this nature. At high revs you also need DAMN strong valve springs for that lift. People put universal blue on the crowns, put head on, cam belt etc and do a few rotations of the crank, remove the head and look for valve marks. This method, although indicative, can not account for valve expansion due to the heat transfered to it combined with the oscillary motion causing it to not only stretch in length, but also move sideways as it exits the guide. Upping the lift exposes more valve and the sway increases exponentially. Even the Tomei website state that if you exceed 10.2mm in lift, you need to scallop them (and they do it for free when you buy pistons off them). Tomei pistons are also 0.4mm lower than std, allowing decompression for more boost but also higher lift. End of the day, it's the owners choice. My question is, do you REALLY want to risk an entire engine?
-
Post A Pic Of Your Stagea Thread
pure_methamphetamachine replied to CruiseLiner's topic in Four Door Family & Wagoneers
I'll see if I still have a slip lying around. According to the drag calculator: Weight 2000kg, time = 11.8 means I need 530.4HP For 800 at engine, ET is 10.3 Using the Engine Motor Horsepower Estimate Calculator - Trap Speed To cross at 220km/h they calculate I need 870HP at the fly. It does state 650kW, but they are talking ENGINE, not wheel power. And still have factory gearbox. -
You going to use step 2 or 3 springs Angus? No offence, you know your pistons need to be scalloped for that lift?
-
JUST MAKE SURE you undo the water and oil line connections / supports (10mm heads) on the block to turbo brackets, and these brackets themselves (12mm heads unless people have changed and lost the bolts and replaced, and they'll be a 13mm head [they are an M8 thread]), and the water and oil line connections / supports on the turbos. Also the actual banjo bolts at the side of the turbos (14 and 17mm heads from memory). DO NOT FORGET you have a 10mm head bolt IN side at front, behind the cam backing plate. You can either remove cam gears, then the plate and access, or, put a 1/4" drive 6 POINT socket on a magnet and put in the gap on the IN side. Use a 6" 1/4 extension and push it into the socket, then use a ratchet to remove the bolt. Once bolt is out, lift extension and use magnet to get bolt out. Put magnet back in the hole and pull the extention up to make the socket disconnect. It will hit the magnet and you can pull the magnet out and it's all done. Once head is ready to come off, get 1 person each side (IN and EX) to lift it. Get a third person to push the turbo oil and water lines out of the way, and disconnect the wiring under the IN plenum you can not access ie cold start (on runner [right next to head, purple plug, near cyl 3]). You will also have to remove on the EX side, a 14mm head bolt that holds the PS bracket on as the lower 2 bracket bolts are in the block. The top is the head. IN and EX sides at back corners of head also have 10mm headed bolts. If all your stuff is factory, you will also need to remove the bolts that hold the bracket to the oil pressure sensor housing. Undo the water pipe (U shaped) that goes from thermostat housing to hard water piping under IN plenum as that rubber pipe is block connection. The metal job is head connection. Undo the water lines at the factory water cooling at oil filter. Remove all other obvious stuff. If you just want to swap it, and not fully remove and inspect, you can leave all wiring side alone, lift the head, remove gasket, ensure the dowells are put back in place and put new gasket on. NOT ADVISABLE as you really want to clean the surfaces, but if you are time desperate like we were on the way to a race meeting, you can do that.
-
Post A Pic Of Your Stagea Thread
pure_methamphetamachine replied to CruiseLiner's topic in Four Door Family & Wagoneers
It's only posted an 11.8 as I always do it with full trim (including stereo), so i'm pulling over 2 tonnes down the strip. It has no traction in first. Or second. And when the track cools, sometimes not in third. Cross the finish doing 220 which should be good for a 10 second pass. I just need different wheels to capacitate slicks, which I refuse to do as it is a waste of money. -
Post A Pic Of Your Stagea Thread
pure_methamphetamachine replied to CruiseLiner's topic in Four Door Family & Wagoneers
Cheers. I can post up a build post if ppl want. It will just be an f load of progression photo's. -
9.15mm lift. ANy more and you have to machine the head So: Tomei Poncam HKS Step 1 A'PEXi Sttep 1 GReddy Step 1 You can get different durations from every manufacturer, but the lift will all be around 9.1 to 9.15mm
-
I run a Nismo one. Yes, head can come off easily with everything IN and EX attached if you know what you are doing. Done it heaps of times on various 26's.
-
Post A Pic Of Your Stagea Thread
pure_methamphetamachine replied to CruiseLiner's topic in Four Door Family & Wagoneers
At all 4, yes: An older engine photo. I'll take new ones and post soon Engine: RB26DETT Each engine component balanced to 1 / 1,000g, then as a complete system to 1 / 1,000g N1 Block Tomei Forged Pistons Tomei Forged Conrods Tomei Forged Crank ARP Conrod Bolts Custom Ported and Polished Head Custom Valve and Valve Seat Design Tomei Cam Shafts Tomei Slide Cam Pulleys Tomei Valve Springs Tomei Valve Spring Retainers Tomei Valve Buckets Tomei Valve Guides Nismo Plenum N1 Oil Pump N1 Water Pump Nismo Oil Baffles HKS T04Z Turbo HKS Extractor Manifold HKS Front Pipe HKS Drag 60mm External Wastegate HKS 100mm Dump Pipe A’PEXi 100mm Exhaust HKS Air Filter HKS Map Sensor HKS Intake Piping Kit HKS Compressor Outlet Piping GReddy Induction Hard Piping Kit Twin ARC Blow Off Valves Nismo Engine Mounts Nismo Gearbox Mount Nismo Metal Head Gasket Tomei Metal Throttle Gaskets Tomei Metal Intake Gaskets Tomei Oil Restriction Nismo Main Bearings Nismo Big End Bearings Nismo Centre Bearings Complete Nismo Seal Set Gates Racing Belts Blitz 10 Series Racing Platinum Plugs HKS Metal Exhaust Gaskets Procoated Piston Crowns Procoated Piston Walls (Teflon) Procoated Manifolds Procoated Dump Pipe Custom Blow Off Valve Control System Custom Oil Catch Can Custom Air Separator Custom Overflow Custom Water Spray Tank Splitfire Coils Fuel System: Nismo Fuel Pumps [Lift] (x2) 11 litre surge tank Bosch 044 fuel pumps (x2) Sard 800cc Injectors Sard Fuel Pressure Regulator Tomei Fuel Rail Custom Dual Fuel Cooler System Cooling: GReddy 600mm x 300mm x 115mm Core FMIC GReddy Hard Piping Kit GReddy Oil Cooler GReddy Oil Filter Relocation Kit GReddy Radiator Piping Tabata Twin Core Alloy Racing Radiator Custom Water Sprayer System Custom Power Steering Cooling System Suspension: BC Suspension Kazama Adjustable Rear Castor Arms Kazama Adjustable Rear Toe Arms Ikeya Formula Adjustable Rear Camber Arms Kazama Adjustable Pillow Mount Rods Nismo Sway Bars R33 GTR Strut Bar Drivetrain: R33 GTR Gearbox Nismo Super Coppermix Twin Plate Clutch Nismo Chromium Molybdium Fly Wheel Nismo Pressure Plate Nismo Release Bearing Nismo Slave Cylinder Tomei LSD Brakes: Brembo Calipers Brembo Rotors Endless Pads Electronics: HKS F-Con V Pro ECU HKS EVC V Boost Controller GRID TS Dancer HKS Turbo Timer Defi BF Boost Gauge Defi BF Fuel Pressure Gauge Defi BF Oil Pressure Gauge Defi BF Exhaust Temp Gauge Defi BF Oil Temp Gauge Defi BF Water Temp Gauge RevLite Sequential Shift Light Exterior: Custom Front Bumper with additional air rams for oil cooling, air intake etc 260RS Side Skirts 260RS Rear Bumper Ganador mirrors Nismo Smoke Indicator Lenses Dolphin Spec 2 Grille Interior: Dolphin 300km/h Speedo Dolphin triple meter hood Series 3 R33 GTR Seats Nismo Gear Knob Momo Wheel Nismo Floor Mats Rolling: Rays / Volk GTC 18” x 10” 2 piece forged +17 Wheels 275 x 35 R18 Toyo Trampio all round Nismo Valve Caps ICE: Pioneer AVH-P7950DVD Touch Screen DVD Pioneer DEX-P01ii Head Unit Pioneer DEQ-P01ii Equaliser Pioneer CD-IB100 Pioneer CD-RB20 iPod Nano Kicker K\ZX850.4 Amp Kicker ZX1000.1 Amp (x2) Kicker ZX200.2 Amp Kicker Remote Bass Control Kicker Hyper Flex Power Wire Kicker S8L7 Subs (x4) Hybrid Audio Legatia 6.5” (x4) Hybrid Audio Legatia 3” (x4) Hybrid Audio Legatia 1” (x2) Custom A Pillars Custom Door Pods Custom Door Panels Custom Sub Enclosures in Boot Extra Batteries Cooling Fans Additional: Custom Radiator Breather Tank Custom Overflow Tank Custom PS Reservoir Custom Oil Catch Can Custom Stereo Battery Terminals Custom Fuel Filter Brackets Custom Fuel Rail Brackets Custom Fuel Reg Brackets All Oil Lines Braided All Fuel Lines Braided All Water Lines Braided All Vacuum Lines Braided All Manifold Lines Braided All Wastegate Lines Braided Performace: 502kW / 683HP @ wheels, 3,003Nm. Pump Gas. Daily Driven. -
I've been using one for 3 years. It only clatters in neutral with the foot off the clutch. Push the clutch in and it is silent. I love the clutch. Easy as hell to drive on, as easy as my factory one. People say they're good for 600ps, but mine is nearly 700 AT THE WHEELS. I do 7000rpm launches spooling 1.6 bar in neitral (cheers launch control with anti lag) and it is fine. It is only if I hold it at that for 4 seconds then release it it sometimes overheats. It has never given me problems on the circuit. Personally, I would recommend one of these to any and everybody unless you wanted a PURE drag clutch. They are so easy to drive on. Most people do not realise they are driving a twin when they drive mine. P.
-
All GReddy / HKS / A'PEXi /Defi / Blitz gauges are made by Nippon Seiki. Just find the same sensor by any listed before and it'll work.
-
No. They are no longer being made. You can buy them off people who bought them at the time they were available but didn't use them. They are rare, very rare.
-
Post A Pic Of Your Stagea Thread
pure_methamphetamachine replied to CruiseLiner's topic in Four Door Family & Wagoneers
The money pit... Speakers in the pillars Speakers in the doors 502kW @ wheels -
Oily Spark Plug
pure_methamphetamachine replied to hammerfall_kai's topic in V Series (V35, V36, V37 & Infiniti)
Usually rings are gone. -
Rb26 Turbo Upgrade, All Dyno Results
pure_methamphetamachine replied to SLY33's topic in Engines & Forced Induction
Tomei Crank Tomei Rods Tomei Pistons Tomei IN 260 10.85 / EX 270 10.85 PnP head T04z 1.7 Bar HKS F Con V Pro A'PEXi 100mm exhaust 2 nismo lift pumps 2 Bosch 044 externals 800cc Sard 3.5 bar @ idle rail pressure 600*300*110mm FMIC 2 fuel coolers Nismo Plenum (and a sh!t load more but that's the main stuff. If people want a full list I will add) 502kW at all 4 -
P-spec Ii 260rs
pure_methamphetamachine replied to pure_methamphetamachine's topic in Four Door Family & Wagoneers
Thanks. I'll actua;;y take some photos, and post them up. P. -
P-spec Ii 260rs
pure_methamphetamachine replied to pure_methamphetamachine's topic in Four Door Family & Wagoneers
All I know is when the ex head mechanic of Nissan Japan (not a dealer, Nissan itself), along with the ex head engine designer and builder for Nismo tell me to run it in that way, that is what I do. Period.
