Sean'O
-
Posts
407 -
Joined
-
Last visited
-
Feedback
100%
Content Type
Profiles
Forums
Events
Gallery
Media Demo
Store
Everything posted by Sean'O
-
Gday mate, Yeah I’m new to the forums too, its all good fun on here. I'm probably in the same boat as you knowledge wise but i think if you asked the majority of people on here, they wouldn't touch e-bay "performance" enhancers with a 10 foot pole, I remember something a while ago on the forums that acted like a 'electronic supercharging' thing with a fan that looked like a pod filter, absolute bull dust. Don't know what the laws 4 you guys are over in SA but in Vic I’m pretty sure "piggy back" computers like the APEXi SAFC and this product aren’t allowed. Personally I think your better off giving this a miss and investing in quality brands, you have a good lookin car, it would be a shame if this bugger did some damage too it, just my 2c :sorcerer:, Have a good one, Regards, Sean'O
-

Rb25de, Rb20de & Rb30e (skyline & Cefiro) Extractors/headers Group Buy
Sean'O replied to Eug's topic in Group Buys
Dude you rock!!!!! yeah i knew there may have been a bit of "cost cutting" for $170, thats why i was a bit , ohh well we all get a better deal now eh , This is going to be the best christmas ever! lol Regards, Sean'O -
Rb25de, Rb20de & Rb30e (skyline & Cefiro) Extractors/headers Group Buy
Sean'O replied to Eug's topic in Group Buys
Gday, Yep I have all my money ready to go but I was holding out to see what’s happening with the HPC, any response from them? I'll just get the HPC and hope it works out ok, there is no way I’m forking out $350+ in Aus for the stuff , So I’m in for the extractors w/ 2.25" outlet, gasket, economy, HPC Jezz I hope the other guys know the date is coming up fast, ohh and what’s the deal with payment and stuff? Regards Sean'O (...........well that makes 4 woot :sorcerer:) -
Wow man, that could have eneded sooooo bad lucky you cold handle it to a safe stop, Take care, Regards Sean'O
-
Gday mate, Just 2 questions, 1. How much would a LED lighting kit cost for an R32 GTS? (i am going to replace bulbs in my dash with LED's anyway since a few have gone lol), and do you have any pictures of what the finished product would look like? (website url is fine) 2. The "Street Custom" dials, whats that little electronic display on the right for? , or is the picture shown just for a different car? Thanks, Regards, Sean'O
-
Rb25de, Rb20de & Rb30e (skyline & Cefiro) Extractors/headers Group Buy
Sean'O replied to Eug's topic in Group Buys
Thanks heaps for that, Yeah true $170 will be hard to pass up regardless of the outcome Thanks mate, Regards, Sean'O -
Rb25de, Rb20de & Rb30e (skyline & Cefiro) Extractors/headers Group Buy
Sean'O replied to Eug's topic in Group Buys
Hey, Sorry if that came out wrong, I appreciate it very much that you are organising this group by and i'm no expert either so I appolagise if I asked a little too much. I didn't mean to come across as critical about every kw, i'm just concerned (as everyone one would be) that this is a fair amount of money we are spending and just want to know what we are getting so there are no supprises later. Thanks again for going to all this trouble 4 us, Regards, Sean'O -
Rb25de, Rb20de & Rb30e (skyline & Cefiro) Extractors/headers Group Buy
Sean'O replied to Eug's topic in Group Buys
Hey, Have a look at this web site, this bloke has talked me into not getting the heat wrap, Particurally the last "IN CLOSING" section where he states "If you want a true thermal barrier that will reduce thermal loss in the header, reduce under hood temperatures, and make a few horsepower in the process, have your headers coated by one of the many companies available (links to a few are above). Most all of the coating companies offer inside and outside complete coating as standard. DO NOT allow your headers to only be coated on the outside, this is not a complete or quality process" Just wanted your opinion on this, Regards, Sean'O -
Rb25de, Rb20de & Rb30e (skyline & Cefiro) Extractors/headers Group Buy
Sean'O replied to Eug's topic in Group Buys
Hey again, Just to clarify, what kind of HPC coating in particular is it? Will they be coating the header both internally and externally? Will it provide heat protection like the heat wrap used by Greg? $170 for the coating is a pretty good price too considering that the heat wrap and high temp paint used by Greg will end up being a similar price. Also, by changing the outlet, does it alter the overall cost of the unit? Regards Sean'O -
Rb25de, Rb20de & Rb30e (skyline & Cefiro) Extractors/headers Group Buy
Sean'O replied to Eug's topic in Group Buys
^^^^ Ha ha ha, good work man, stick it right up em' Regards, Sean'O -
Hmm, well that all looks very pretty but, it sounds very expensive and in my case a bit unnecessary, I only have a RB20DE, and its not a dragster lol, so I don't think I will need the heat protection presuming that the extra heat by just having them in there won't damage anything during everyday driving. However I would like the corrosion protection to make them last a bit longer, wouldn't the caliper paint (as suggested above) be sufficient here? What we need here is an opinion by somebody who installs exhausts, or someone who has had this particular unit for a while. I'm still assuming that the level of heat protection etc is dependant upon the style of driving your car goes through, if you just drive to work and back I would guess that ceramic coating is a bit extreme, but if you do track work or something, maybe its worth it. Again I’m just prating on, we really need some guidance here, Regards, Sean'O
-
Hey Greg, Well that’s pretty silly paint lol, I wonder why they would bother putting it on then? anyway, I’ll be getting a set of these, how would i go about getting the paint off? What are the downsides to not heat wrapping them? just a hotter engine bay or will other things go wrong? I am still a bit hesitant about heat wrapping mine because I heard that you can do damage too them when they don't cool down quick enough. Have you come across any of these problems? ohh and what heat wrap did you use? Thanks mate, Regards, Sean'O
-
Rb25de, Rb20de & Rb30e (skyline & Cefiro) Extractors/headers Group Buy
Sean'O replied to Eug's topic in Group Buys
Gday mate, Yep, well you can count me in 100% for the extractors and a gasket, lets hope we secure the 4+ people eh' I think I’ll hit up the black paint when it gets here lol, But just to remind you I’ll have my money on the 8th - 9th (you know how lousy banks are lol), So just shoot me a PM about payment details, Any issues just reply, I’ll be watching this thread like a hawk lol, Regards, Sean'O -
Hey mate, Yeah that makes sense, i just saw it and assumed it was the temp lol, Awesome yeah I thought I might be able to 'bend' the heat shield that I already have, but I’ll have to wait and see, otherwise thanks for clearing that up , lol yeah the paint, dw I don't have any beef with red, just a preference. Well I’ll keep you posted, I have 'bout $200ish atm however I’ll get some cash around the 8th & I’ll give you an update At the present time I’m in good work man, awesome deal! Regards, Sean'O
-
Hey Eug, This may sound like a stupid question but I was wondering what happens to the stock exhaust temp sensor when you install them? :sorcerer: Also I have read around that there is a possibility of things melting in your engine bay with extractors, do these guys supply some kind of "heat shield" to go with them? or am i better off just getting some exhaust wrap? ohh one more, I see that they are red, obviously they have painted them this colour, is it possible to get them in say black without incurring any extra cost? Otherwise this sounds like a good deal, I am seriously considering joining in, Cheers buddy, Regards, Sean'O
-
Nice work mate, all the best!! Regards Sean'O
-
How To Install A Sub And Amplifier In An R32
Sean'O replied to Sean'O's topic in Tutorials / DIY / FAQ
Yeah true, you make a good point, However, the way I mounted my sub, it is pointed towards the cabin and is pushed up against the rear seat, virtually covering the hole left by taking out the plate. So i don't know too many things that could squeeze through and have enough inertia in the event of a crash to push through the seat.... and then though my head lol. Second, my sub doesn't have a cage of some sort to protect it, so I wouldn't be letting stuff fly around in my boot anyway lol. But yeah I totally agree with you, I said that on my original DIY that its optional to take out the plate. If you often have heavy stuff in your boot that is loose, your probably better off keeping it in. Safety First guys, Cheers linxus40, Regards, Sean'O -
How To Install A Sub And Amplifier In An R32
Sean'O replied to Sean'O's topic in Tutorials / DIY / FAQ
Gday Bill, Yeah i thought i would hold onto it just in case i needed it later.......like now lol, anyway this is what it should look like, i'm pretty sure they will be the same for every R32, however i could be wrong. My one is a Clarion Unit, model number: EP-812D. http://image-cache.skylinesaustralia.com/f...0_11_786716.jpg Here is another angle, http://image-cache.skylinesaustralia.com/f...0_11_792171.jpg Just make sure you don't remove the rear wiper motor or something silly like that and you should be fine, Cheers, Regards, Sean'O -

-

-
How To Install A Sub And Amplifier In An R32
Sean'O replied to Sean'O's topic in Tutorials / DIY / FAQ
Hell yeah man, i'll take a bargin over flashy stuff anyday. Finished installing the speed meter today without a hitch, so expect another DIY pretty soon Cheers, Regards, Sean'O -
How To Install A Sub And Amplifier In An R32
Sean'O replied to Sean'O's topic in Tutorials / DIY / FAQ
Gday mate, Yeah you don't need the stock amp, i found mine was rattling quite a bit, when i took it out there was something broken and rumbling around inside it lol. The big plate, well.... I understand your logic, yes it is technically part of the structure of the car, but if I were challenged about it I would say it only serves an aesthetic purpose to hide the back seat through the boot. That’s why I chose to cover it up with the cloth. A cop would have to look very hard to notice it was missing. However i could be wrong and would have no problem putting it back in , only a 30 min job max. But yeah i have been in a 32 with the plate in, much more rattles and less sound so...i just chose to take her out. Thanks for the fuse idea, like I said I’m not really the best audio guy when it comes to the technical details , I might have a play with it when I install my speed meter in the coming weeks (another DIY coming). lol, yeah the ring, i thought i was pretty clever after that :sorcerer:, because i didn't want to cut into anything if possible, i suppose this could work for 6 x 9 speakers too if you manage to get the magnets through the stock holes in the shelf, cauz I know for a fact you can't hack into the metal. Lets just say the sound is WOW!! compared to the old speakers Overall I am very pleased with how my system sounds especially when considering how budget it is compared to others out there. Cheers mate Regards, Sean'O -
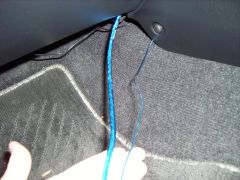
Hey, Before this DIY I am going to assume that you guys know what a sub does for your music experience and what an amplifier basically needs to work. If not here’s a great video form Crutchfield that explains the basics. Sub and Amp Guide I had recently installed speakers to replace the stocko’s in my 32, so I did have a little experience with taking the car apart, especially the back seat etc. If you have not done this before, save yourself a headache and do a search on the forums, they are a great help. Similarly, if you have a friend with a bit of audio ‘know how’ they come in handy. Tools you will need - HU manual - Screwdriver set - Ring spanners (couple different sizes) - Wire stripper - Crowbar (easier on your back) - Stanley knife/ scissors Materials needed - Amplifier wiring kit - Sub - Amplifier - Duct tape (ohh yeah J) - Black cloth (optional) Step 1 Go down to you local shopping centre, pick up a sub, amp and wiring kit. The amp I would suggest getting second hand, unless you have lots of money to burn lol. You could also buy your wiring gear separately from any electrical specialist to save money, but I am a complete novice at this stuff so I just quoted the power I’m running at a JB hi-fi and they gave me the appropriate kit. Step 2 Open up your hood and remove the negative wire from your battery terminal. Step 3 Find out where you want to mount your fuse. Assemble fuse holder and wires to the positive battery terminal, (all connections included in wiring kit). Make sure you leave the fuse out. Yes i know my wheels are crap lol, dw they are next to go lol Step 4 Remove the kick panel one the drivers side by taking out a few screws. Step 5 Find an existing hole in the firewall to pass through power cable, the closest one is on the drivers side, it will be plugged up with a piece of foam, just pop it out and follow the wired with your hands to a thick rubber seal. Once you have found the seal, you will have to work a hole in it with a long screw driver. Its all trial and error process until you feel there is a large enough hole to pass the wire through. I found wrapping the end of the wire with thick duct tape made it easier to push through. Once you have pushed roughly 1 – 1.5 meters of wire behind the firewall, put your hand behind your pedals and search behind the carpet for your power cable. This is by far the most laborious task of the whole install, I’m pretty sure some of the more experienced audio guys on SAU have a few tricks on how to make this easier. Step 6 Time to take out the HU. You will need to remove all the parts that cover the centre console. There are quite a few DIY specifically involving this, again I found searching a great help. There are quite a few screws dotted along the centre console that need to be taken out. They start from about where the seatbelts are, don’t force anything, if it doesn’t come away freely you have probably just missed a screw. Another thing to note is the black piece of plastic that surrounds your HU and the air conditioning etc, this also has to come off. Once you have removed your shift knob and gaiter there are two 2 - 4 screws and 2 clips that need to be popped up and it should come away quite easily. Don’t rush this, the plastic is flimsy and easy to crack. Now you should be looking at a number of screws and brackets holding your HU in place. Step 7 To remove your HU, there are 4 screws holding its bracket in place, simply pull these guys out and put them aside, it should look something like this. Behind your HU you should see a number of wires all bound together and 2 holes for your RCA cable. This is where you need your HU manual, if you don’t have one do a search of your HU model on the net, that’s how I found mine. The manual will reveal what each wire does by color. You need to look for a ‘trigger cable’, in my case it was called a ‘AMP REM’ wire. My trigger cable was already cut so I just stripped it and connected the new trigger cable provided in the kit. Next plug in your RCA cable into the appropriate slots in the HU. Take both these cables and pass them through the back of your center console on you passenger side, later you can wrap these guys under your glove compartment. Helpful Tip: If you drop a screw behind your centre console, grab a strong magnet and use that to pull it out the back. Step 8 Now you should have a length of red power cable sitting on your drivers side and a bundle of RCA and trigger cable on your passenger side. Step 9 Take out back seat, basically pop out bottom section first with the crow bar and slide it out towards front of the car. Next take out two screws at the base of the top section, and slide the top section of the seat up (sounds nasty) and then pull towards the front of the car slowly. Caution: Once you slide the top section of the seat up, before you pull towards the front of the car, look behind the seat to make sure that no wires are threaded into the cushion. I say this because the bloke in Japan who installed rear speakers in my car threaded a wire through one of the metal supports of the seat, I have no idea why, but this meant that I had to operate with half a seat in my face for the rest of the install. Step 10 (Optional) Once the top section of the seat has been taken out you will see a large metal plate held down by about 15 screws, take this sucker out, it’s a) Creating a barrier between you and your boot and b) It will impend valuable bass from coming into your cabin. Here is a pic Step 11 Run your cables through either side of your car by removing the “skyline” door skirts and popping up the carpet (Just like in the Crutchfield vide). Don’t forget to pass your RCA and trigger cable underneath the glove box and then behind the kick panel on the passenger side. Step 12 Duct tape the 3 cables underneath where your rear seat was so that they are out of the way where the clips go. Then simply pull the wires out into the boot. Step 13 (getting there) Grab your ground cable and attach it to one of the holes left vacant by the metal plate taken out. Your boot should now be looking something like this. Step 14 Hook up your amp, there is heaps of documentation about this on the web and on SAU, again I am a novice and this was no problem at all. Step 15 Get your speaker cable and connect it up to your sub, again heaps of info for this. Step 16 (Testing Yeah!!) Ensure everything on your amp is turned right down! Put your fuse in, reconnect your negative battery terminal wire, turn on your head unit and select your pre-sub output to ‘ON’. Even at low volumes with a tiny bit of gain you should be able to feel the sub vibrating just a little bit, if so WELL DONE!!, otherwise, something is not right L, look over all your connections, check your fuse, make sure your sub and amp are wired up correctly. If you can’t find the problem post in the Audio forums or call your local audio store, they will be able to sort your problems out. Step 17 Cable tie/ duct tape any loose wires behind HU and in your engine bay then put your console back together in the reverse order. Don’t put your rear seat in just yet. Step 18 (optional) Remove the stock amplifier; it’s the silver grommet looking thing hanging at the top of your boot. To remove it you need to get back into the car and take out the parcel shelf wood cover thing. Pull it up where it is attached to the metal to pop it out of place in about 4 places. Take caution here, the wood (whatever it is) is quite flimsy and could snap, I found the easiest way to get it out is to put your finger in a hole in the centre of the cover, pull up slightly, let the wood bow in the middle and then pull slowly towards the front of the car. Now you should be able to see a small metal plate held down by 4 screws, remove this as thus and move aside. The stock amp is being held in by two screws, take them out and then slide the amp out from inside your boot. Put the metal plate back in the same place. If you wanted to replace the rear speakers as well now would be the perfect time . Like I said at the top of this post I had already installed aftermarket speakers 2-3 months before, but I found something very interesting. The wood cover thing, was actually sitting on the rubber surround of the speaker (since they did not quite fit in the existing holes in the wood cover thing). This would no doubt have done some serious damage if I left it. SOLUTION I fabricated some ‘rings’ made out of extra speaker cable so that the wood thing did not sit on any part of the speaker. It was a bit tricky to fit the wood thing back in……. I love duct tape. Step 19 (optional) If you put everything back together now, you will be able to see the back of your rear seat through the boot, and personally I think it’s a bit tacky. I decided to cover this hole with some cloth I found lying around the house, I guess you could pick up some from Lyncraft or something, not really sure what cloth it is, just make sure it matches you chassis color. Use the metal plate at a template, cut a good 2 cm wider so that it covers the hole completely. Next Duct tape the cloth over the hole from inside cabin, stretch it so that there are no kinks, you should now have a boot looking like this. Much better Step 20 Put car rear seat back in Step 21 Tune your amplifier (again go to the audio forums, heaps of info here) Step 22 Mount Sub and amp, then you’re Done! :sorcerer: Thanks everyone, Comments and improvements welcome, Regards, Sean’O
-

-