

GTRPSI
-
Posts
1,355 -
Joined
-
Last visited
-
Feedback
100%
Content Type
Profiles
Forums
Events
Gallery
Media Demo
Store
Everything posted by GTRPSI
-

Cp Pistons Suit 26 And 26/30 Brand Fn New
GTRPSI replied to ydr030's topic in For Sale (Private Car Parts and Accessories)
Standard wrist pins or upgraded ones? -
R32Gtr Tien's, Drifteks Rb26 Cams Ect
GTRPSI replied to mr et's topic in For Sale (Private Car Parts and Accessories)
What are the cam lift, durations and base circle sizes? What are the lobe conditions like? -
What is the capacity of the sump? Does it come with a extended pickup? Trap doors inside? What is the lift on the 264 cams?
-
The link does not show because you need to register to view the links.
-
Bendix Ultimates Screaming Like A B!tch
GTRPSI replied to Imtorqing's topic in Suspension, braking, tyres and drivetrain
My Ultimates chewed out the wifes rotors after 15,000Km of gentle street driving, the other 2 cars that get abused have EBC Red Stuff ceramic compound, have done over 30,000 Km and the rotors look like the day i put them on. Also with Red Stuff zero dust, the Ultimates turn the wheels black every second day, i got sick of washing rims 3 times a week. Sounds like you need to copper or glue the back of the pads in, 2 schools of thought, one is to lube the rear backing where it contacts the piston, the other is to glue it in, either way will stop it. Ultimates correctly fitted should not squeal, however they will dust up and chew out your rotors. -
Gts-4 Pads
GTRPSI replied to central coast person's topic in Suspension, braking, tyres and drivetrain
I just stuck my nose into my RDA catalog, there are 2 pads listed for a R33 GTS-4, one is 137mm X 54.2 and the other is 121 X 50mm, looks like 2 different calipers were used.... -
Braided Brake Lines Problem Please Help !
GTRPSI replied to sultanaz's topic in Suspension, braking, tyres and drivetrain
Check your PM, they are correct, i got my HEL lines from Import Monster and they were identical and went straight on after opening the thin clip holes on the front lines. -
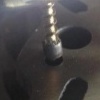
That cap Jeff linked back to is exactly the same one i used. Leave a little leg on the cap so after you solder it in you can bend it over so the cover fits on. Take note that the silver stripe running down the side is the caps negative terminal side, dont put the new one in the wrong way.
-
We have 19X10 +20 with 275 tyres, rear guard lips needed a trim, a narrower tyre would have been fine. Rim lip sits dead flush with rear guards.
-
No his rears are locking up first, check his first line in his post, larger front rotors will induce more front braking due to the leverage effect of a larger front rotor. A silly way would be to fit smaller rear rotors.
-
Clogged radiator, or fins on the water pump after that, more than likely a clogged radiator As mentioned could be a faulty temp sender too, you never know....
-
I used HEL, Import Monster carry them, cheap, ADR approved and your supporting a forum sponsor (and SAU Nats sponsor) Very helpful mob too.
-
R32 has 280mm front rotors R34 has 310mm front rotors. Increasing your 280mm front rotors to 310mm will move the brake bias to the front, balancing your brake bias.
-
R33 Gtst Rotors
GTRPSI replied to SHIRUBA_XXXIII's topic in Suspension, braking, tyres and drivetrain
I have RDA rotors on all my cars, all of them now run only RDA Slotted or Gold zinc dimple drilled and slotted rotors, our GTR runs them too with Red Stuff pads. Our cars are pushed hard, my 21 year old test pilot son has had them glowing more than once, on one of my fords that did not have braided lines he pushed hard enough to burst a line, when replacing it the rotors had nice blue heat marks hinting to me how had he pushed it. Oh and those RDA rotors on Ebay.....thats me, PerformanceCarPartsOnline Must also mention, the original cross drilled rotors on our GTR started cracking after 5 3 lap time attack laps at Winton....... If anyone want s pics of RDA rotors with Red stuff pads after 30,000Km of hard driving, happy to put them up, no grooves, no lips, no fading, the rotors still look like the day i put them on. I also have pics of the same rotors with Bendix Ultimate pads on the wife car after 20,000Km, she drives like a granny and the rotors are ready for the bin, its not the rotors, its the aggressive pad compound that wears out the rotors. -
R32 Gtr What Is The Real Limit?
GTRPSI replied to GTRAAH's topic in Suspension, braking, tyres and drivetrain
R32 GTR, 19x10 +20, when lowered needed the guards rolled/cut a little due to running 275 tyres, a narrower tyre would have been fine. -
Why Are My Brakes Screaming For?
GTRPSI replied to SargeRX8's topic in Suspension, braking, tyres and drivetrain
Ive tried a few pad combinations on my Sumitomo calipers without noise issues. Have you pretensioned the spring plates that fit between the 2 pins over the top, they are designed to apply pressure on to the top of the pads and hold them down to assist stopping noise. With time and heat they lose tension and a little bend back into shape for more pressure helps, also make sure the hump on them is pointing in the direction the rotors turn. One other trick is to chamfer both edges of the pads with a 45 degree cut, this gives the pads a smoother contact ramp, but as said you need a few hundred Km to allow the pads to spread a layer of material on to the rotors. I used EBC green stuff and now use Red Stuff Ceramic compound without issues on my Sumitomos with the stick on backing plate supplied with the pads, not a sound to be heard and they are rated to around 650 degrees. no need to chafer them, just drop them straight in.... -
Are you opening the bleed nipple while someone pushes the pedal to the floor, closing the bleed nipple and then telling the person pressing the brake pedal to release it? This ensures when the pedal is lifted that fluid gets drawn out of the resivour rather than air drawn back in from the bleed nipple, make sure the bleed nipple is closed before the brake pedal is lifted. It can sometimes take a few goes to eventually get the air all out. One other thing, some bleed nipples can need to be opened a little more than normal, just try to avoid getting any brake fluid over your newly painted calipers..... When we took our calipers off for painting and the fitting of new seals and braided lines a few weeks ago, it took a bit of time to get the fluid coming out of the calipers bleed nipples.
-
The electronic techs over at Austech should know someone or you could go to any electronics repair shop or someone who does Tv;s, however have a look at my reply over there, you may want to check if the Atessa ECU is getting the 2.5 V at its end also in case you have a break in your wiring harness or a bad connection under the rear parcel shelf. As i mentioned, do any of the caps look burnt?
-
In case anyone needs more pics or to see how i fixed my G force sensor and what my problems were see the link below, i posted at another forum im a member of that has a electronic subsection, you may need to reg to view the pics though. http://www.austech.info/electronics/68309-gtr-gforce-sensor-fix-help.html It been working fine for a week now, just a burnt out Cap that cost 38 cents.....
-
Im after the passenger side power window switch surround (small round plastic that the switch sits in), all the plastic plugs on the doors covering all the screws, infact any of the original interior screws etc. Just had a respray and the panel shop lost most of the stuff. Price and also postage to Melbourne.
-
Zillr in the pits at the SAU nats at Winton today.
-
Yellow Jacket Coil Packs
GTRPSI replied to quiksta's topic in For Sale (Private Car Parts and Accessories)
PM sent on behalf of Zillr. -
When Does A 5" Cat Become A Restriction
GTRPSI replied to blue_vl_t's topic in Engines & Forced Induction
I had a decat pipe and bolted on a FIA approved 100 cell metal substrate race cat on our R32 GTR with twin high flowed HKS2540 turbos. Yes at top end, say 5600rpm onwards you can feel some loss of power and turbo response, the higher you revved, the more you lost. Now heres the funny part after i spent all my money on it.......its still not street legal, it will not pass emissions testing, it does not meet the requirements, its just a race cat for classes that specify a cat must be installed. I was better off staying with a gutted out cat with flanges and keeping the most restrictive/best scrubbing cat on the side in case i needed to go for emissions testing. Learned the costly way. -
The idle control valve also has a gasket on it from memory, take the whole valve off and check its not full of crap. Also disconnect (unplug) it and start the engine to control the base idle yourself via the screw, that way you control its position, regardless of what the ECU wants to do. Warm up valve, just get a pair of multi grip pliers and clamp one of the hoses shut to close it, however you said you changed it anyway. Spray some WD40 around your manifold joins and listen to the idle to see if you have a vacuum leak. Check hoses under the manifold (and elsewhere) for cracks, easy to overlook a perished hose.
-
Best way to confirm your not dropping your oil level by building it in the head is to drive it warmed up at low RPM and then drop it into second and boost it. At low Rpm there should be no oil build up in the head and a squirt to the redline in second should not be enough time to drop your oil level low by building the oil into the head. If its still dropping id be looking at the oil pressure sender, oil pump pressure relief valve or something more serious like rod bolt stretch, loose main cap girdle etc which may lead to a spun bearing. Try a thicker oil see what happens.....
