

boost_bus180
-
Posts
70 -
Joined
-
Last visited
-
Feedback
0%
Content Type
Profiles
Forums
Events
Gallery
Media Demo
Store
Everything posted by boost_bus180
-
okay well Ive been lurking round this forum for a fair while but rarely have much to contribute. My 180sx build is getting near the business end and will soon be attending a lot more track days so thought Id make myself known in case I bump into you in the paddock sometime. Ive had my 180sx for a few years now, bought it in 2006 in pretty stock form and just tinkered with it in the shed while it was my daily. As is often the case, it pretty soon got to the stage where it tipped over the line of being a suitable daily so I bought a C34 aswell which meant I could get a bit more serious with the 180sx. Ive tried a fair few different types of amateur motorsport including dirt rally, motorkhana, drag, drift and sprints and am pretty much hooked on timed circuit work so thats where the 180sx being built for now. I dont really have a class in mind as I dont have the time to commit to a series, just the occassional club day and sprint events. Up until recently its mostly been built in the back yard, here's a few pics ofthe progress Ive made so far... ENGINE S13 SR20DET ENGINE IMPROVEMENTS new oil and water pumps machined timing case machined crank journals decked block shaved head balanced crank and clutch KING bearings JE pistons TOMEI rods 1.2mm metal head gasket GREDDY valve springs ARP rod bolts and head studs NISSAN nitrided valves and guides cold start and idle control solanoids removed from under inlet manifold coolant lines romoved from intake manifold KOYO 53mm twin core N-flow radiator FORD mondeo twin 12" thermo fans TRIDON thermo temp switch BILLION radiator hoses Custom alloy coolant resevoir Custom alloy air seperator NISMO radiator cap NISMO thermostat NISMO oil cap NISMO engine mounts - modified GREDDY underdrive pulleys (water pump and alternator) BLITZ LM filter Custom alloy inlet pipe GREDDY T518Z 8cm turbo kit BLITZ LM intercooler flipped with custom alloy piping and T Bolt clamps TOMEI 256deg/11.5mm poncams TOMEI rocker arm stoppers SPLITFIRE coil packs GREDDY winged and baffled sump shaved rocker cover with -12 breathers custom oil catch can setrab 25 row oil cooler with remote mounted filter and billet oil block Tuned legth steampipe exhaust manifold with ceramic coating XFORCE dump pipe RSR 3" front pipe KAKIMOTO 3" cat back METALCAT cat - gutted Magnafuel quickstar EFI regulator boost Fuel Cell RCI 45L Bosch Fuel pump 200 l/h Carter lift Pump surge tank custom MoTeC engine loom with plug into fire wall aircon removed power steering removed INTERIER MoTeC M84 ECU Race Technologies DASH2 stack dash Race Technologies DL1 Data logger BLITZ spec R SBC BRIDE ZETA III driver and passenger seats custom fixed seat rails with modified floor pan TAKATA 4pt Harness Fire extinguisher hand held MQ 4L mechanical fire bomb complete strip except for dash shell 100% custom wiring loom using MoTeC wires, Deutch plugs and water proof switches dry cell battery relocated to back seat NARDI sports type rally suede steering wheel WORKS BELL rapfix II quick release WORKS BELL short boss kit body stock type x kit SUPERMADE headlight moulds bonnet held with aero catches poly carbonate side windows poly carbonate rear windscreen front bar dzus clipped on boot floor cut out and replaced with sheet metal aluminium rear undertray custom front tubs custom tube frame front end - everything forward of the struts full weld in cage DRIVELINE Z32 5 speed Machined bell housing with adapter plate semi solid gearbox mount custom cross member Short shifter OS GIKEN STR twin plate clutch with light weight flywheel custom single piece tail shaft custom tail shaft loop CUSCO 1.5way diff BRAKES AND SUSPENSION 5 stud conversion ABS removed Willwood pedal box Willwood master cylinders Willwood rear bias adjuster PROJECT MU braided lines - F PROJECT MU 6 piston calipers - F PROJECT MU 355mm 2 piece rotors - F PROJECT MU HC+ pads - F Skyline 2 piston calipers - R 310mm slotted rotors - R PROJECT MU HC+ pads - R WHITELINE adjustable 27mm front sway bar WHITELINE adjustable 22mm rear sway bar GREDDY type S coilovers ZENITH TUNING steering column spacer ZENITH TUNING solid rear cradle bushes D PROJECT tie rods D PROJECT rose jointed tie rod ends D PROJECT rose jointed caster rods D PROJECT lower arm brace D PROJECT semi solid steering rack bushes D PROJECT rose jointed rear camber arms WHEELS ADVAN RS (silver) 17x9.5 +15 front and 18x10+25 rear RAYS Gramlights 57d luminous orange 17x9+12 front & Rear RAYS blue lock nuts this is what it looked like when I picked it up in 2006. After 6 months of searching it was the cleanest one I could find. It was in immaculate condition with 60,000km so I drove from melbourne to sydney to pick it up. Had it for 2 days before I started pulling it apart and the modding began. started off with the just basic stuff like R32 front brakes, few suspension parts, intercoolet, boost controller, turbo, power fc ect So kept it like that for a little while, was using an old nismo clutch at the time which I had left over from a previous project but it got a bit tired so in went a twin plate from OS Giken With that worn in and a freshly tuned 219kw, I went to heathcoat drags for a bit of fun and mananged a few 12.6 sec @119mph before all the teeth off 3rd gear sheared off. Using this as an excuse to upgrade, I bought a conversion kit for a Z32 box and bolted it up.
-
looks awesome so far mate! Ive had a fiar bit of fabrication done to my car by Meridian aswell, currently there at the moment actually. keep the pics coming, glad to read you're keen to build it again
-
mine was the same on the passenger side. one of the globe terminals became loose and became intermittent causing the signal to arc across the posts and melt the plug. eventually it became so bad that the plug became unusable and the light didnt work at all. fixed it by getting new globes and then cutting off the old plug and rewiring it with new wires and connectors. not hard to do if you can solder
-
HWY - 470.... city - 400.... race track - 150
-
Queensland Meet And Cruise
boost_bus180 replied to darrinspencer's topic in Four Door Family & Wagoneers
yeah I'd be down for that. I know that side of the world well, just let me know if you want a hand organising it -
Queensland Meet And Cruise
boost_bus180 replied to darrinspencer's topic in Four Door Family & Wagoneers
thanks for the day out, will def try to be at the next one. few quick photos from along the way.... -
Queensland Meet And Cruise
boost_bus180 replied to darrinspencer's topic in Four Door Family & Wagoneers
Sounds good, will be there at the springwood meet -
Queensland Meet And Cruise
boost_bus180 replied to darrinspencer's topic in Four Door Family & Wagoneers
you can put me down for this too. my first stag cruise, will be great to meet a few more stag owners! -
***project Mu 6 Piston Brakes***
boost_bus180 replied to boost_bus180's topic in For Sale (Private Car Parts and Accessories)
Bump -
selling my PMU brake kit that I've been holding onto for a while, still tossing up whether or not to put it onto my track car and have some other stuff I wanna buy in the mean time. If they sell then good, if not they'll just go back to the spare parts box I'll eventually fit them to something. This is the top of the range caliper kit from Project mu, designed for race use and extreme braking conditions. Kit has never been used, just trial fitted so the rotor hat has a few minor scratches from the wheel but nothing you would see once a wheel is on. brake lines havn't been used, still as new. features: High strength body cut from billet aluminium (not forged) High performance, quality, durability and extreme braking capability Aluminium alloy construction manufactured straight from billet Surface finished in hard aluminite with heat-resistant coating Caliper Specifications Total length : 300.0mm Total width : 160.0mm Total height : 76.8mm Piston Diameter : 41 / 30 / 25mm Rotor Diemensions : 355mm x 32mm Kit Includes 2 x Calipers 2 x Caliper Aluminium Bracket 4 x TYPE HC Brake Pads 2 x 355x32mm 2 Piece Rotors 2 x Project Mu Teflon Brake Lines with copper washers (are for a silvia but 99% sure skylines are the same) Brake Pad Springs high quality allen key bolts with washers Price is firm at $4500 pick up from Brisbane. current asking price for the same kit from Nengun is $5854 so this is a fair bargain! Low Ballers will be abused
-
Mv Automatics Shift Kit
boost_bus180 replied to boost_bus180's topic in Four Door Family & Wagoneers
hey Trent yeah been really good. Still living in Bris, let me know if you're ever up this way should catch up. Congratulations on the wedding too honestly mate on really light throttle the shift between 1st and 2nd is a bit harsher than standard but nothing over the top. all other shifts are not noticeably harsher while just putting round. its easily barable -
Mv Automatics Shift Kit
boost_bus180 replied to boost_bus180's topic in Four Door Family & Wagoneers
shift kit was around $500, fluid was castrol transmax z and was around $300 for 16litres -
k well a lil while ago I installed a stage 2 shift kit from MV automatics and was shocked to learn that although there are stacks of topics on this site regarding the shift kits, noone has made a how-to guide to help those who are keen to do it but a bit nervous about doing it themselves without a step by step install guide. Unfortunately a lot of photos from the end of the install and vids of tensting it's performance decided to delete themselves but Ive got enough to get the points across and hopefully help you out a bit. tools needed: basic socket set jack 4 x jack stands hammer oil drain pan funnel to refill with fluid lots of rags Kit includes: shift kitted valve body transmission filter 2 x 50mm welsh plugs sump pan gasket 4 x bottles of tansmax z fluid step 1: Jack the car up enough to comfortably crawl underneath. Its important to have the front and rear at the same height off the ground so you can make sure u get the right fluid level. step 2: Remove the drain plug allowing the oil in the sump pan to drain out while undoing all the bolts around the outside that hold the pan on. Because I have a 3" exhaust it was necessary to either remove the front pipe or remove the cross member in order to allow enough space to get a socket on a few of the bolts. in my case it was easier to remove the cross member and use a jack stand to support the transmission. Be careful not to remove all the bolts at once, leave 2 or 3 in (though loosened) at the front corners to allow more fluid to drain out the rear. Once you've got the majority of oil drained, remove the remaining bolts and remove the pan. This is how it will now look Step 3: undo wiring plugs which will almost certainly break and remove the filter. Step 4: Remove all bolts securing the valve body to the transmission and remove it. Be aware once this is removed, 3 large springs will fall out and probably land on your face so be ready for that. to make it easier for installing the shift kitted valve body, I used a strip of foam to mark where all the bolts I removed go. a sheet of cardboard would work equally as good too. Step 5: From here, you need to unbolt the solanoids from the stock valve body and bolt them onto the new shift kitted valve body and reposition only 1 of the springs on top of the cam it was originally on. The other 2 springs can go in the bin step 6: because you have binned the other 2 springs, you can now insert the 2 x 50mm welsh plugs into their holes. the best way to do this is to use a socket the same size as the outer diameter of the plug and gently tap in with a hammer. you MUST NOT use a socket that fits inside the plug, this will distort the shape and prevent a perfect seal. It is possible to insert the welsh plugs with only a hammer but you'll have to be patient with it, not the easiest thing to do. Step 7: raise the shift kitted valve body into place taking care to insert the spring correctly and to reconnect the wiring. refit all the bolts which you removed and fit the new filter. Now as all the electrical plugs broke when I undid them, I used locwire to secure them in place and to ensure they dont come undone. Step 8: properly clean the sump pan to remove any gunk and make sure you completely remove the old gasket. refit the sump pan with the new gasket and the cross member or exhaust (depending on which you had to remove) Step 9: refill the auto with fluid. now this part I dont have pics of and Im not sure if the way I did it is the most efficient DIY way (someone feel free to provide a better technique) I used a funnel and hose attached to the dipstick to fill the auto with oil. once it took a fair bit, I removed the pressure line from the trans cooler and pointed it into a clear bucket. I then started the car up so the auto pumped out the old fluid and circulated the new fluid. I could only run the car for a few seconds before having to stop and refill it. this process was completed several times until roughly 15litres of new fluid was poured in and 15 litres (total including what was drained previously) of waste oil was pumped out. using a clear container made it easy to tell when the old oil stop coming and the new oil started coming out. Once I felt it was pretty much done, I connected the trans cooler hose back up and let the car run for a few minutes while I cycled through all gears to ensure everything worked properly and nothing leaked. Once happy with that, I checked the oil level and topped it up as neccessary. Step 10: From here I took the car off the jack stands and took it for a test drive. I started off slow to allow enough time to bring the system to operating temperature and to ensure everything worked properly and didnt leak. Once confident with it, I tried some full throttle shifts and some down shifts. To my delight everything worked as planned. Content with its operation, I returned to the garage and again inspected for leaks and check the oil level and adjusted it slightly. From go to woah it took a couple of hours but I wasnt in a rush and had plenty of distractions like pizza haha. Shouldnt take any more than 3-4 hours for someone thats pretty handy with tools and doesnt have a hoist. End evaluation? Man I wish I did this sooner! it is without a doubt the best bang for buck mod I have done so far and has completely transformed the driving experience from shit to something decent. It now accelerates quicker, upshifts and downshifts a lot quuicker and flaring is now a thing of the past. Do it, you wont be disappointed.
-
might have been mine. tis at the front gate
-
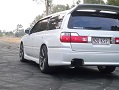
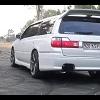
ok well Im looking for a change so Im putting my daily up for sale. I have owned it for 18 months and love it to bits. Its my daily and gets babied almost always, most trips are just to the shops and back but have taken it on a few long road trips without any faults. It has never skipped a beat at all, its always been 100% reliable requiring just the usual basic servicing. the car is always garaged and gets serviced every 3-5000kms and only use full synthetic oils. It's a very well maintained car, Im very fussy with it and always have it spotless inside. Im the second owner in Australia, previous owner was just as fussy and only racked up 6000kms in the year he owned it. owner in japan was a middle aged woman, have her on facebook now after finding her fuel card in the car haha car is a 1997 series 1 Stagea RS4 4wd automatic roughly 125000kms car is regod in QLD until feb 2011 located in Brisbane It has a short list of tasteful mods. everything is very neat and no corners have been cut. HKS pod filter R34 GTR intercooler, custom alloy piping with silicone joiners BLITZ Spec S boost controller GReddy Emanage ecu with super neat install 3" dump/front pipe in one Apexi 3" cat back exhaust gutted cat Davies Craig transmission cooler engine bay earth kit auto turbo timer Potenza suspension- almost as firm as coilovers genuine R34 GTR wheels with 245/40/18 Federal 595 tyres R32 GTR front brake calipers with slotted RDA rotors 260rs swaybars - almost zero body roll huge rear wing -rare full 260rs body kit -rare roof racks deleted -rare no sun roofs -rare no hicas -rare flawless respray in white pearle debadged dark tint white headlights and parkers clear side indicators PIAA carbon fibre wipers JVC headunit with USB outlet Kenwood 6" front splits Genuine Stagea floor mats imaculate interier slim line weather shields remote alarm and imobilisor was tuned by Trent at Status tuning 190awkw on 12psi (stock dump, front pipe and cat) so probably a bit more now. roughly 550km per tank. slightly more on an all highway trip and slightly less if you have a heavey right foot everywhere aswell as routine servicing, I have recently changed the following: new O2 sensor new battery all exhaust gaskets replaced with genuine gaskets rocker cover gaskets new slotted rotors headlight earths rewired for brighter lights $15000 cash but open to trades for something other than a track car - would prefer a clean JZX100, v35 or something along those lines
-
yeah Ive currently got a 3 inch system from front to back but have a couple of holes in the mid and rear mufflers so rather than repairing them I thought replacing it with an r33 catback which are a dime a dozen would be a quick fix.
-
hey guys, just a quick noob question... looking to replace the catback on my stagea and was wondering whether or not an r33 exhaust is the same? thanks
-
Rb26 Head With All Cam Covers
boost_bus180 replied to kevinisagoodboy's topic in For Sale (Private Car Parts and Accessories)
does the head include the inlet manifold and everything else seen attached in the pics? -
Rb26 Head With All Cam Covers
boost_bus180 replied to kevinisagoodboy's topic in For Sale (Private Car Parts and Accessories)
how many kms has the engine done? -
The Automotive Sound Track Of The Year
boost_bus180 replied to zebra's topic in Motorsport Discussion & Builds
have to disagree with you there dane http://www.nissansilvia.com/forums/index.p...78550&st=60 Audi 90 IMSA GTO
