


lwells
-
Posts
3,532 -
Joined
-
Last visited
-
Feedback
100%
Content Type
Profiles
Forums
Events
Gallery
Media Demo
Store
Everything posted by lwells
-
From the album: lwells's Gallery
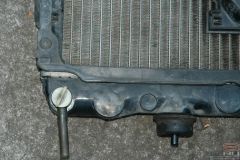
coolant and radiator flush -
From the album: lwells's Gallery
coolant and radiator flush -
From the album: lwells's Gallery
coolant and radiator flush -
From the album: lwells's Gallery
coolant and radiator flush -
From the album: lwells's Gallery
coolant and radiator flush -
From the album: lwells's Gallery
coolant and radiator flush -
From the album: lwells's Gallery
coolant and radiator flush -
From the album: lwells's Gallery
coolant and radiator flush -
From the album: lwells's Gallery
coolant and radiator flush -
From the album: lwells's Gallery
coolant and radiator flush -
From the album: lwells's Gallery
coolant and radiator flush -

Rb26 & R32 Gtr Parts For Sale
lwells replied to danh's topic in For Sale (Private Car Parts and Accessories)
Are you willing to seperate the vents from the dash? Also, do you have a drivers side window and is it scratch free? Thanks. -
Sau Upgrade Log
lwells replied to PranK's topic in Site discussion - including Ideas/Feedback & Bugs
Scratch that, image upload seems to be b0rked regardless of whether its a zip file or just plain photos... -
Sau Upgrade Log
lwells replied to PranK's topic in Site discussion - including Ideas/Feedback & Bugs
Zip file uploads in the SAU Gallery are completely b0rked. When it reaches the photo processing stage it shows completely random photos (and sometime no photos at all). Hitting process gives pages of errors, before the wrong images (and/or blanks) are inserted in to your gallery. -
R32 Gt-r In-situ Airconditioner Windings Removal
lwells replied to lwells's topic in Tutorials / DIY / FAQ
Thanks for the kind words, and its a good point you make. I checked the bearing in my pulley and it moved freely so I thought it unecessary. Out of interest, did you notice when reassembling if one of the teeth on the pressure plate / compressor spline was different to the others? The Japanese instructions make some mention of a different tooth (ie. a locating tooth) but I certainly couldn't see one. -
R32 Gt-r In-situ Airconditioner Windings Removal
lwells replied to lwells's topic in Tutorials / DIY / FAQ
Updated * Fixed a few grammar/spelling issues. * Added details about the dimple on the windings and corresponding indentation on compressor. * Added circlip sizes. * Removed some incorrect info. -
From the album: lwells's Gallery
-
Which fuse is blowing? If its fuse #10, its probably the electromagnetic clutch drawing too much current in which case you need to remove the windings. You can double check by following the instructions for testing the clutch in the workshop manual. If it is the windings, here is a guide that just might be of some assistance http://www.skylinesaustralia.com/forums/in...howtopic=112597
-
Here is a guide for removing the windings from the aircon clutch so they can be replaced/rewound: http://www.skylinesaustralia.com/forums/in...howtopic=112597
-
Part of this deals with radiator flushing: http://www.skylinesaustralia.com/forums/in...showtopic=67730
-
For those interested -- and for the sake of propagating the guide in a few related threads so its easy to find with the search facility -- here is a guide for removing the windings in-situ on an R32 GT-R (I imagine its much the same across the R32 series and probably for 33s and 34s). http://www.skylinesaustralia.com/forums/in...howtopic=112597 Thanks again to Jax for the initial instructions
-
For those interested -- and for the sake of propagating the guide in a few related threads so its easy to find with the search facility -- here is a guide for removing the windings in-situ on an R32 GT-R (I imagine its much the same across the R32 series and probably for 33s and 34s). http://www.skylinesaustralia.com/forums/in...howtopic=112597
-
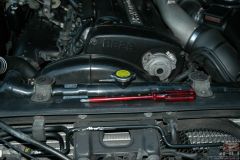
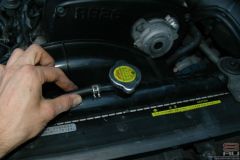
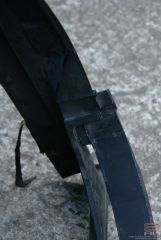
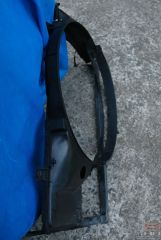
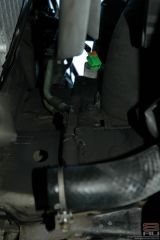
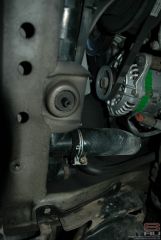
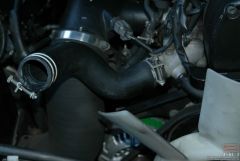
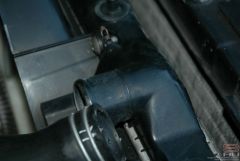
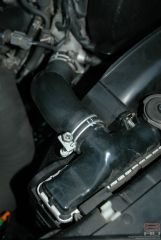
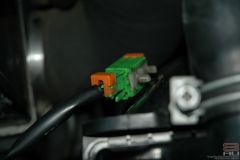
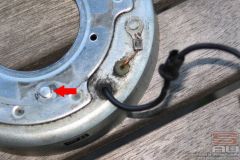
Many R32s owners have reported problems with the airconditioning system. A number have noted that it continually blows fuses (particularly fuse #10), a sign that the windings of the electromagnetic clutch -- used to engage the compressor -- may have worn and are thus drawing excessive current. The simple solution is to remove the compressor and take it to an electrical engineer. However this requires decompressing/draining the aircon system (and thus re-gassing once the compressor is reinstalled) and (obviously) the removal of the compressor, a task complicated by the lack of space and maze of pipes, wires and assorted engine parts. What follows is a guide for removing the windings in-situ (that is, without removing the compressor) and thus does not require draining the system (and a subsequent re-gas). Sources: This thread by “Jax”. This web page (translation) whose images I have reused where noted. NB: Nissan used more than one supplier and/or type of magnetic clutch assembly. The markings found on my aircon assembly were as follows: 506491 - ??-12V Diesel Kiki Co. Ltd. Ogura Clutch Co Ltd. I am aware of at least one other assembly which requires a slightly different methodology (as noted at the appropriate stage below). Your mileage may vary. Required Tools: A ratcheting wrench with 8 through 14mm sockets. Three M5 set-screws with at least 20mm of thread. I used these 40mm set-screws: Circlip pliers. You may need both a straight and offset (bent) pair of the external type (they need to open quite wide). You want the variety that open as you squeeze the handle closed. Assorted screwdrivers. A hammer. A jack and stands. Prerequisites: Jack the front of the car up. Ensure that you only use appropriate jacking points so as to avoid damaging the chassis rails or other components. Make sure that you take necessary precautions (such as axle stands) to ensure your safety should the jack fail whilst you are under the car. Remove the front undertray/protector. Drain and remove the radiator. Procedure: 1. Locate the airconditioner pulley. From the front of the car it will be the lower right pulley. The aircon pulley. Note the power steering line sitting in front of the pulley. 2. Remove the bracket that supports the power steering lines. The bracket is held in place with one bolt located near the tow hook on the passenger side. This isn't strictly necessary but will give you more room. The power steering support bracket. Here I have already removed the nut that holds it in place. 3. Take a close look at the aircon pulley. You should notice that on the front of the pulley is a plate (see the first picture); henceforth I'll refer to this as the "clutch pressure plate". The pressure plate has a large triangle in its center. In the middle of one of the edges of the triangle is a notch; you use this notch to hold the pulley in place whilst you remove the centre bolt. I used a large screwdriver braced against a part of the chassis whilst my dad undid the bolt; one of the pages I linked earlier under 'references' used an open ended spanner. Depending on how tight your aircon belt is, you might also find it helps to keep the pulley in place a little (I didn't). The clutch pressure plate with center bolt removed. Note the arrow pointing to the notch in the triangle. 4. If you haven't already noticed, there are three small holes surrounding the central nut position on the triangle. These are the three holes for the set-screws. These three holes are tapped and are used to force the pressure plate off the pulley. Break out the three 5M set-screws and screw them in; just use your fingers at first to make sure you don't end up cross threading the holes. Do them up in a pattern, a turn or two per set-screw. Repeat until the plate begins to separate from the pulley (it might take awhile, but it will start to happen). You might find it useful to place a flat-head screwdriver in the gap that forms between the pulley and pressure plate and apply some force to try and pry them apart. After a couple of minutes of turning the screws and prying action the pressure plate should finally pop off the pulley: The pressure plate removed. A nice view of where the set-screws go in. Pressure plate side on. Note that set-screws with at least 20mm+ of thread are necessary for obvious reasons. 5. You should now have access to the pulley itself. The pulley sits on a threaded shaft and is held in place with a circlip. It was very hard to get a photo of the circlip in place. The arrows point roughly to the circlip's tabs. You shouldn't have too much of a problem getting this circlip off as long as you can get the pliers on to it. I used slightly offset circlip pliers for this one. The trick is to try and lift one of the edges out of the groove it sits in as you open the circlip with the pliers. I found it easiest to lift an edge and then jam a small screwdriver under the edge; I then ran the screwdriver around the circlip forcing it out of the groove. With a little luck it should pop out and the hardest task will be trying to find where it landed 6. Undo the aircon belt tensioner. The tensioner assembly sits on a threaded bolt. You will need to undo the nut (just enough to loosen it) on the front of the tensioner and the threaded bolt on which the tensioner assembly sits. Remove the aircon belt. If you need the extra room, consider completely removing the tensioner (I didn't). 7. Remove the aircon pulley. Use a large flat-head screwdriver behind the pulley and try prying it slightly in a few different spots. If its difficult, a couple of gentle taps with a hammer should help pop it off. Here you can see a screwdriver being used to pry off the pulley. Also note the tensioner bracket attached to the bottom-left of the aircon unit (This picture is sourced from here.) Pulley removed with circlip placed on top for reference. 8. You'll finally have access to the windings. They will look something like this (I was just too grubby to take a photo at this stage; as you will see in later photos my windings have an epoxy coating) : (This picture is sourced from here.) The windings are also held in place with the circlip, although larger in size than the circlip holding the pulley. I warn you now: I found this an absolute bastard to get off. This is the hardest part of the whole removal as the circlip sits inside the inset area of the windings making it hard to get the pliers on and (at least in my case) the circlip is very strong: I nearly broke one set of circlip pliers and broke another, bought a third super expensive pair that didn't fit, and had to customise a set of pliers with a file. Because of its size you also need pliers that open a substantial distance. So the moral is: don't expect this to be easy and don't use that antique set of circlip pliers your long-dead great grandfather passed down through the family and to which you are sentimentally attached. Use the same procedure as before: try and lift an edge out of the ridge whilst you open the circlip and then stick a screwdriver in the gap. You'll probably need a small screwdriver at first just to get something wedged in there, but such was the strength of this circlip that I bent my small screwdriver and needed a very substantial one to actually get the bastard off. NB: "Jax" mentioned in his thread that there is at least one other system used for holding the windings in place. As he notes, the alternative version secures the windings with "... 3 philips-head screws onto the alloy housing of the compressor. I would suggest that a screwdriver bit adapted into a ratchet socket handle would be ideal as slipping out of the slot in the screw head could damage the slot and make removal very difficult". 9. With the second circlip off its time to remove the windings. There is a wire that runs from the back of the windings to the top of the aircon compressor where it runs through a small holder before ending in a plug. Unplug the cord. The holder uses a small piece of plastic to clip the cord in place: simply push the plastic clip forward towards the front of the car and it should pop out of the holder and the cord can be completely removed. Remove the windings. The windings, removed.... finally. Notice how deep the inset area is. A closeup of the windings cord and the plastic clip that secures the cord in the holder on top of the aircon compressor. Windings with circlip placed on top for reference. Apologies for the over-exposure (and thus lack of depth for the inset area). 10. Make a note of all markings on the aircon compressor. On my unit there was a little label on the front of the clutch pressure plate which read: 506491 - ??-12V Diesel Kiki Co. Ltd. Ogura Clutch Co Ltd. Where too next? With the windings out you can now either replace them or have them 'rewound'. I have no idea of the cost of the replacement part or their availability. I opted for having mine 'rewound' as I didn't want to have to wait weeks for a replacement part to arrive. However, rewinders seem to be something of a dieing breed. After a lot of calling around I was finally referred to: John Wallace Wallace Automotive Airconditioning Pty Ltd 10 Galahad Crescent Castle Hill NSW 2154 Ph: (02) 9894 0366 M: 0419 276 627 Rewinding is about $100-120, but may vary according to the model of windings. According to John it takes "three to four days" as the (original) epoxy coating has to be machined out and replacement coating takes two days to set. John also has a rig setup so he can test the windings in front of you; mine popped the 10 amp fuse straight away (but not a 30 amp fuse) indicating its working but drawing far too much current. Depending on their condition you may also need to replace the circlips; I opted to replace both as mine were distorted from trying to remove them (particularly the larger circlip). Circlips are usually found at your local bearing supplier. I used Hooper Bearings in Mascot as most of the bearings places are way way out west (Hooper also has a delivery service if within Sydney metro for about $10). I dealt with Neil, who was very helpful and pleasant given I was purchasing such a small amount: Hooper Bearings Pty Ltd 690 Botany Road Mascot NSW 2020 Ph: (02) 96931200 M: 0418 282 130 The circlips for my aircon compressor were 35mm and 44mm. Note that circlip measurements are taken from the inside of one side to the outside of the opposite side and are thus not simply a measurement of the inner diameter. If you are unsure which circlips you require your best bet is either to take the circlips in to a bearings shop or to measure the shaft sizes so the bearing shop can work out which circlips you need. I would suggest you get at least two of each circlip so you have a spare in case you mangle or loose one. Reassembly: To reassemble, obviously go through the above steps backwards. I have only three points to make: 1. When putting the windings back on, be aware that there is a locating dimple on the back of the windings that matches an indentation on the top left of the face of the aircon compressor. Make sure you line these two up; you'll know when they are because the windings will only sit right against the face of the compressor when the dimple is in the indentation. The locating dimple on the back of the windings. 2. It is very difficult to get the larger circlip (the one that holds the windings) in. It took me nearly 2 hours of trying. The circlip fits snugly in the groove in the shaft, and the groove is only fractionally in front of the windings; in other words, there is very little room. All I can suggest is keep trying and you'll eventually get there. I got about half of it in the groove and pushed the rest in with a small screwdriver. Unfortunately, even telling if the circlip is actually in is difficult as you basically can't see it and will have to rely on feeling if its in the groove. A small angled mirror is a godsend and only a few dollars at an auto shop. Thankfully the smaller circlip is much easier. 3. Both the windings and especially the pulley are a tight fit. I cleaned up the inside of the windings with some emery cloth and it fitted on without too much effort. The pulley was more difficult. As it sits on the threaded spline you have to be very careful not to strip the thread by applying force when the pulley isn't correctly seated/aligned. Try and push it on to the thread by hand and when your sure its actually sitting in the thread, apply more pressure. I had to resort to a lot of small taps with a hammer to get the pulley back on about 95% of the way. I put the centre nut back in and tightened it just enough to draw the pulley on the last 5%. John Wallace said to be very careful of applying too much torque to the centre nut as they are liable to snap. Once I had the pulley in position, I removed the nut and applied some threadlock, before tightening it up one final time; as per John's instructions, I only did the nut up so that it was firm rather than torquing it as much as I could. Hope that's of assistance to someone


