MountainRunner Posted December 15, 2006 Share Posted December 15, 2006 Hi Guys, I have been working away at several projects over the last year or two. A lot of you have seen some of my stuff in a few cars at track day. (maccattack's black GTR, jetman's blue GTR, Rajon's white GTR, IanB's black GTR, EVOCAM's EVO8 MR). Jetman, Azzurra and others have been kind enough to look through manuals and give valuable comment. All three of my projects can be connected to a PC / laptop and be configured, with the setup being saveable. Datalogging is also possible using the laptop. As the Device Configuration Software shows all three devices and their setup options, I have attached it for download. There have been a lot of questions about what each of my devices do, so I invite you to download the software and have a look. Paul EDIT: Hey guys, the ZIP file won't work and I cannot put the unzipped files up. Sorry to start a thread that doesn't work. EDIT 2: Seems to work for most people. Not sure why it failed for a few. If your interested and it doesn't work, PM me and I will email the zip. Also further info below on what its about. DeviceConigUtility.zip Link to comment https://www.sau.com.au/forums/topic/147560-my-projects/ Share on other sites More sharing options...
pear Posted December 16, 2006 Share Posted December 16, 2006 I'm having trouble unzipping the file. is it working for others? Link to comment https://www.sau.com.au/forums/topic/147560-my-projects/#findComment-2754360 Share on other sites More sharing options...
MountainRunner Posted December 16, 2006 Author Share Posted December 16, 2006 I tried to put the unzipped files up but they are not permitted. I just tried to download and unzip them myself and it is not working. Sorry guys. Paul Link to comment https://www.sau.com.au/forums/topic/147560-my-projects/#findComment-2754368 Share on other sites More sharing options...
IanB Posted December 16, 2006 Share Posted December 16, 2006 Works without an issue for me Paul... try winRAR? Link to comment https://www.sau.com.au/forums/topic/147560-my-projects/#findComment-2754597 Share on other sites More sharing options...
Al Posted December 16, 2006 Share Posted December 16, 2006 Program works for me. - Right click on link - Select "Open Link in New Window" - Press "OK" - Highlight all files and select "extract all files" then just follow the prompts. Now please explain what i am looking at; how it works; what it controls; how it operates. As i have no idea Looks good though......... Link to comment https://www.sau.com.au/forums/topic/147560-my-projects/#findComment-2754606 Share on other sites More sharing options...
ob1 Posted December 16, 2006 Share Posted December 16, 2006 i can extract the exe and 2 dlls, but it fails to run Says it is not a valid win32 application. What is it? Link to comment https://www.sau.com.au/forums/topic/147560-my-projects/#findComment-2754732 Share on other sites More sharing options...
Al Posted December 16, 2006 Share Posted December 16, 2006 Had no problems running the program Link to comment https://www.sau.com.au/forums/topic/147560-my-projects/#findComment-2754748 Share on other sites More sharing options...
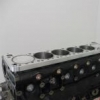
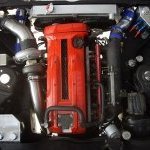
MountainRunner Posted December 17, 2006 Author Share Posted December 17, 2006 Hi Al, sorry for the lack of explaination. I have been building three projects over the last year or so to perform various functions. I have attached a sample picture of each of the units to give you an idea of what they look like. The software I put in this thread connects to each device through a serial cable. All the options in the software can also be accessed through the menu system on the device. Although it is easier on the laptop. The tabs at the top of the screen are for each of the three devices. They are the 4WD Controller, Engine Monitor and Thermo Pro. If you select the tab you will see all the options and setup parameters for each device. I have attached the manual for the 4WD Controller and Engine Monitor, the thermo pro manual is still in a draft stage, although you get a good idea of what it can do from the setup software (I will try and get it finished in the next day or two). The reason I put this info up now is that I have had a lot of guys ask what these things do and I have been saying I will have all the info ready any day now (read 6 months). I have built these as specialised devices that myself and other track orientated people have wanted. I will get a web site up in the coming weeks, but in the meantime I thought I would invite comments and discussion. Paul 4WD_Controller.pdf Engine_Monitor_Manual_V4.pdf Link to comment https://www.sau.com.au/forums/topic/147560-my-projects/#findComment-2756011 Share on other sites More sharing options...
Al Posted December 17, 2006 Share Posted December 17, 2006 What a great range of devices. Great work buddy all the best. Link to comment https://www.sau.com.au/forums/topic/147560-my-projects/#findComment-2756334 Share on other sites More sharing options...
ob1 Posted December 17, 2006 Share Posted December 17, 2006 nice bit of gear you've got there Link to comment https://www.sau.com.au/forums/topic/147560-my-projects/#findComment-2756359 Share on other sites More sharing options...


Recommended Posts
Create an account or sign in to comment
You need to be a member in order to leave a comment
Create an account
Sign up for a new account in our community. It's easy!
Register a new accountSign in
Already have an account? Sign in here.
Sign In Now