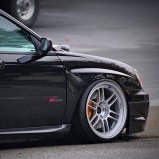
Sanding/preparing Front Bar For Painting
Announcements
-
Similar Content
-
Latest Posts
-
Howdy friends, So another weird one today, I was looking into replacing some broken clips holding the front grille for the R32 GTR (part number 01553-03831), and noticed the brackets which are supposed to hold the grille in place were also missing 😑. I do recall seeing this issue many years ago, but didn't fix it at the time. A quick look on eBay and I was able to find the genuine brackets, along with all the screws which suited the headlights (part numbers 26042-08U05,26092-08U05). Happy days!.... Once they arrived however there was an extra nut in the packaging which implied that there should also be a bolt or a stud, and sure enough, after a bit of searching I found this thread from 2013, and @Ants clearly shows a stud should be present. Reading around a bit more, it's possible the headlights on my car are the "povo pack" headlights as mentioned by @funkymonkey in this thread way back in 2008. This could explain why the studs are missing on my set of headlights. Looking at the headlight diagram I wasn't able to see a suitable part number for the stud itself. The headlight did indeed have a recess that looked like it would accept a stud, but interestingly no thread or anything obvious how the stud would be affixed to the headlight, I suspect it may have been glued in, press fit, or melted into the plastic at the factory. Another member may be able to clarify if they happen to have a genuine set of N1 headlamps. The only thing we have to work with within the recess is a keyway which likely is there to prevent the stud from rotating within the recess. In any case, back to 3D printing, I put together a model which acts like a pug with a friction fit inside this recess, making use of the keyway so it doesn't rotate while tightening a bolt. Printing in TPU will allow it to slightly swell making a nice snug fit without cracking the part. I've designed the adaptor it to accept an 20 mm M6 bolt (stainless with a cap head in my case), as opposed to the standard M5 stud and I made use of the standard galvanised split washer that came with the genuine brackets from Nissan. Once the bolt and screws were all in place, giving the bracket a gentle shake gave the classic "shaking the car" feeling, very solid, which gives me confidence this is going to be able to hold on much better than the janky solution which seems to have been here for the past decade or so. Overall I'm really pleased with how this turned out and maybe there are more people out there running these headlights without a centre stud at all! Link to the freely available model on Printables: Click here Regards, Sean
-
By GabsReDeal · Posted
Hey everyone, This is my first post apart of the introduction. I tried searching a bit on the forum but couldn't really get a straight answer. I got the car to my mechanic as I felt it being weak. It seems that it was missing on two cylinders due to the injectors. I had all my injectors clean and the car runs much better. The mechanic also confirmed my suspicions that the cat is clogged and needs to be tackled asap. The cat rattles a bit and the hot exhaust warning frequently lights up when driving after getting the injectors clean. In my introduction I was asked about what modification I might be interested in and mentioned a cat delete. From what I was told, this is not really beneficial on the RB20DE and there are more cons than pros. Could perhaps anyone give some suggestions on what the best course of action would be since the current cat is toast and needs to be removed/replaced anyway? I can also sometimes smell a strong smell of fuel, but I'm not sure if this is related. -
When I was replacing my pump due to being stranded in the wrong state, I went with the Deatschwerks 320lph kit. It is a direct plug in to the stock wires, harness, everything. It comes with a plug... but you can plug the OEM plug directly into this thing. https://justjap.com/products/deatschwerks-dw300-fuel-pump-nissan-s13-silvia-r32-r33-r34-skyline-c34-stagea?currency=AUD Downside: Won't actually flow that much on boost if you want to push it on E85, but it's comparable to the 040/255 etc. Little more actually.
-


Recommended Posts
Create an account or sign in to comment
You need to be a member in order to leave a comment
Create an account
Sign up for a new account in our community. It's easy!
Register a new accountSign in
Already have an account? Sign in here.
Sign In Now