Jump to content
SAU Community

Recommended Posts

Hey all,

Probably a simple one for you guys.. just wanted to know what's the easiest way to go about removing the front bar for a R34 GTT. I've seen the step by step article for the R33 and it looks different... but then i haven't tried so I don't know.

Can someone give me some pointers?

Cheers all,

Howie

Hey Howie,

Undo the splash guard under neath the front bar if there is one there and then there are two bolt on either side of the front bar in the guards.

One is where the guard meets the front bar and the other is about half way in between the first bolt and the headlight youy will have to feel with your hand if it is even there. If the bar has been taken off before it will most likely not be there as most people dont bother puttin gthe second bolt back.

I think that is it, if you have any issues let me knoe and i can probably come and give you a hand.

Cheers

Shaun

I'm trying to remove my front bar at the moment and I can feel there's in between the guard and headlights. It's pretty tight for me to squeeze my hand in there to undo it.. any easier method I should take? Do i need to remove the splash guard completely?

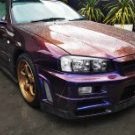
Hey ducki, you can just see it here where i removed the bar.

east_bear_lip_off.jpg

I found it easier to remove the inner plastic guard, then full right lock it to remove the two drivers side bolts.. then full left lock to remove the two passenger side bolts. I used a long screw driver with an extension to help.

Also there's two plastic clips behind the numberplate and two screws on the grill you need to remove.

All the best.. and thanks to Evil34 for putting me on the right track in the first place mate.. here's what i ended up doing over the weekend.. fixing up an east bear lip (had to make a fiberglass mould from the bumper hence why it had to come off).

east_bear_lip_quarter.jpg

yeah.. hehe managed to removed my bar.. today too...

had to really shove my hands under the bumper to get the 2 last one out.

I didn't need to remove anything behind the no. plate.. think its different for me since its the standard bar but also thanks to Evil34 otherwise I wouldn't have known the bolts in the guards existed.

Hey ducki, you can just see it here where i removed the bar.

east_bear_lip_off.jpg

I found it easier to remove the inner plastic guard, then full right lock it to remove the two drivers side bolts.. then full left lock to remove the two passenger side bolts. I used a long screw driver with an extension to help.

Also there's two plastic clips behind the numberplate and two screws on the grill you need to remove.

All the best.. and thanks to Evil34 for putting me on the right track in the first place mate.. here's what i ended up doing over the weekend.. fixing up an east bear lip (had to make a fiberglass mould from the bumper hence why it had to come off).

east_bear_lip_quarter.jpg

hey where did you get that lower lip from. looks sick

Create an account or sign in to comment

You need to be a member in order to leave a comment

Create an account

Sign up for a new account in our community. It's easy!

Register a new account

Sign in

Already have an account? Sign in here.

Sign In Now


  • Similar Content

  • Latest Posts

    • $53.35 and a double din Pioneer head unit that I have...
    • Put a camera facing your dashboard so you can film the gauges. Head out to a straight but of road, and filming it as you go from a stand still at wide open throttle to as fast as you can/feel comfortable doing. Then film the dash board as you for example accelerate like normal onto a freeway. This will give us an indicator from Speedo of your expectation of slow, and will give us the rpm reading too to see if it's shifting. (Auto still has tacho from memory)
    • Buy yourself the cooling system pressure tester. Being able to pump it up, and have a gauge on it, AND have a cold engine makes it much easier / practical to diagnose. Additionally as the engine isn't running, you can listen for pin hole leaks as well as watching if pressure drops away. In addition, you can pressurise and while doing so, watch all the little rubber hoses. Some fail very brittle, and will just leak, while others can end up very soft and bulge. While a bulging hose isn't necessarily leaking, one of those small ones starting to stretch / expand in a bad way is an indicator that you'll be looking to replace that one soon   Depending on if this is a project car, or you'll be dailying it in the summer months would alter how I'd be most comfortable with driving the car and how I'd replace. If you're planning to use it as a daily, with no backup, I'd pull the engine, and replace all the external oil/water lines in one big swoop. At the same time do the timing belt, water pump, tensioners etc. Do not open the engine at all. We just want to replace all the things that are inexpensive as a single item, but a PITA when they go. By doing the above, you've made the car from a bunch of age related issues more reliable. If it's a project, and you like swearing while trying to reach into dirty hard to reach places to replace a single hose that may or may not be the leaky one. Just replace the leaking/bad ones as they need it. If it's a project and you'd rather swear at the car once and enjoy it as much as possible, then refer to the process I mentioned in how I'd want to do it if it were a daily. However, the approaches above do come down to how much spare pocket change you have. Pulling the engine and dropping over a thousand dollars on parts, may not be practical for you. Oh, if engine outing, I'd replace as many silicon/rubber inlet joiners as possible too.
    • Yeah, they're pretty dumb though...ie; they'll throw a solenoid error if the solenoid is dead, shorted, wiring is open circuit, or even if the driver transistor has failed (they can't self-diagnose much, they can only test inputs/outputs)... but if you wanted to try, I believe it's this protocol....(uses a long pulse indicator with short pulse counter)...    
    • Yeah I'll do what I can without taking off any major parts for now. If it becomes clear I won't get far with the engine in the car I'll have to think about the next steps. I am not too stuck on keeping everything 100% OEM, if there is better solutions, like converting most lines to braided with AN adapters, I'd rather do that than buy overpriced new "shit" parts.
×
×
  • Create New...