Jump to content
SAU Community

Recommended Posts

haha not required thanks, I know which side of the steering wheel to grab. its "keeping an engine alive without something wierd happening to it" skill I desperately need.

brad - very little progress this weekend - the rear cradle is ready and mark fitted up some of the bits but we need to do some welding on those wierd little bushes for the upper control arms at the hub (weld the crush tube to the hub to solid mount it), and press out the tie rod ball joints so we can replace it with some sort of new bush too (probably ally).

spent the day putting the motor in my car, including that wonderful moment when I realised the new crank had no spigot bush (lucky mark's race motor was out, I stole his when he wasn't looking). did all the dirty lying on the ground work today and will finish off all the clean top of the engine glory work this week. then back to the nugget, cage in mark's new car and getting his filthy gas burner running, all in 6 weeks.

and to catch up on the last couple of pages:

chris - we have obtained some remote canister g4 test shocks and are going to give them a go. they need new springs at a minimum and we will probably get the shocks checked and gassed up properly before we use them seriously. right now they are just holding the car up. what are you running if not the Teins?

stu - I've never run with a bias valve before and this car has standard rear brakes and g4 fronts (ie very similar split to standard). But all skylines with stockish setups I've driven lock the rears first so I figured considering how cheap the valve is compared to a full bias bar pedal box that we better give it a go. will be interesting to see how useful it turns out to be.

yer Duncan the teins are under the old girl, thought i had been kissed on the end of the damper by the good luck fairy when i seen these just sitting there....all alone...with no car to put them in! Anyone want a set of good remote canister tein circuit masters for a R33 GTR i am traveling back to Oz this weekend.

Sorry for the possible silly question but when making the rollcages how do u go about accessing the pipework near the roof etc to weld it around completely? ive seen guys cut panels out the floor, is this normal method or is there another way? i have all glass in the car too which obviously isnt going to help i assume.

Sorry for the possible silly question but when making the rollcages how do u go about accessing the pipework near the roof etc to weld it around completely? ive seen guys cut panels out the floor, is this normal method or is there another way? i have all glass in the car too which obviously isnt going to help i assume.
benm Posted Today, 03:39 AM

Tack it up then drop the main hoop down through the floor a couple of inches and weld up the top loop properly

That's how we did mine but another way, if for some reason ya can't hole saw a hole through like if the sill is in the way or something there is another way that I've seen which works. Cut the main hoop shorter, weld around the top and then build boxes and sit the main hoop on top of them. Dosen't look as neat though.

That's how we did mine but another way, if for some reason ya can't hole saw a hole through like if the sill is in the way or something there is another way that I've seen which works. Cut the main hoop shorter, weld around the top and then build boxes and sit the main hoop on top of them. Dosen't look as neat though.

thats how mine was done

Wait, stop, don't do it! Cut holes in the floor that is.

Absolutely not need to cut holes. Best approach is to make up a triangular platform in the corner behind each door to bring it up to level with the step. Tak the step, make your bar, cut the taks to drop the step and the bar, do your welding and put the step back up and weld it all. All good cages I have seen use this method. allows you to properly weld the main hoop without having to move it too far forward or back.

I personally use the through the floor method.

If your good with the bender you can get the hoop bases close enough to the body and the step so you can actually weld the bar to the step all the way up. Looking that the 34 thats what they seem to have planned.

Merli whoever did that front leg did a pretty good job. Its nice and snug to the pillar. Takes a lot of time and patience to get them that close.

Edited by Risking
I personally use the through the floor method.

If your good with the bender you can get the hoop bases close enough to the body and the step so you can actually weld the bar to the step all the way up. Looking that the 34 thats what they seem to have planned.

Yeah that's what we had done, plated to spread the load and welded the length of the tube to it. This is about the best pic I can find;

Copyof20.jpg

Merli whoever did that front leg did a pretty good job. Its nice and snug to the pillar. Takes a lot of time and patience to get them that close.

Yep, I was blown away with the attention to detail. The entire cage is beautifully snug against all the pillars and roof.

Peter Muir from Bondy did it for me... Got the introduction and hookup from Steve Thatcher, so I think that helped with the perfectionist result of the job :P

Those front legs had 6 bends each to get them to sit that close... Amazing anal-ness that would rival my own ;)

Alan Smith tells me you guys are good mates :) Tell him to get off his arse and buy Ric Shaw's FD3S...

Create an account or sign in to comment

You need to be a member in order to leave a comment

Create an account

Sign up for a new account in our community. It's easy!

Register a new account

Sign in

Already have an account? Sign in here.

Sign In Now


  • Similar Content

  • Latest Posts

    • Nah, just take the other one off too 
    • Oh yeah forgot to also mention need to also unplug the IACV as well. Thanks for the reminder @MBS206 Unplugging the TPS takes it out of closed loop so you're able to screw down the IACV without the ECU trying to add/subtract timing to maintain the idle (not sure PowerFC can even do this, but Nistune and the OEM definitely does)
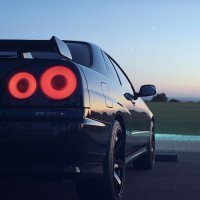
    • For sale is my 1999 Nissan Skyline R34 GT-T, tuned to 234 kW / 313 hp. I've had the car for a few years as my daily driver. The car is original (as far as Skylines go), with only a few minor upgrades to enhance performance and driving experience, as typical for such a car of its age. Overall, it is in great condition with no body rust, thanks to its earlier import date. It features a top-notch security system (not literally, but it's great!) with remote start and still functional 4-wheel steering via HICAS. It comes with several performance and handling upgrades, including:     Hypergear 450HP Turbocharger running 17 PSI boost, installed mid-2021 by Jaustech     550cc injectors     Nistune ECU     Front-Mount Return-Flow Intercooler     X-Force Stainless Steel Exhaust     Upgraded engine mounts     Bottom end bearings replaced     BC Coilovers     Lenso DR1 rims     Bridgestone Potenza Adrenalin RE003 TL 245/40R18 97W tires, fitted early 2023 The interior is mostly stock, with a few additions:     Viper Satellite Tracking System with remote start     Bluetooth Double-Din Touchscreen Head Unit     Steering wheel cover Cons:     A few paint imperfections here and there     Driver’s seat shows more wear than the others. It's not torn at all, but I've added a seat cover to protect its condition. I also have a CarVX Vehicle History report available for serious buyers, so you don’t need to purchase it yourself. Price: $26,000 ONO.
    • I've had two suzukis in the past have an extremely hard time turning over and not starting after sitting for a few weeks. Ended up the alternator would seize up causing the starter to force. Same issue both times.  Maybe they're sourcing their alternators from the same place...
×
×
  • Create New...