

Announcements
-
Similar Content
-
-
Latest Posts
-
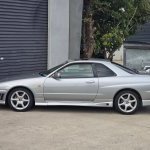
 My goals for it atm are to get it registered, respray and some mild power gains eventually... I picked up the car from an elderly gentleman near the border of NSW and VIC, its honestly a bit rough and looks like its been driven on a farm (because there was so much dirt underneath). Last week I dropped the subframe and emptied the old fuel out + added a new fuel pump (think the old one went bad from old fuel). Now I'm onto fixing a coolant leak at the rear of the engine + adding a new radiator as the old one is corroded. After that i have a new bumper, coils (as the old were leaking) and lots more
 -
 Welcome buddy! Plenty on here and YouTube. What are your plans for it? Good luck with the Rwc and Rego bud!
 -

By soviet_merlin · Posted
Love this so much! Please post a photo when you have a bike on the trailer. I was a little bit worried about having a tow bar on the Skyline, but having it hidden behind the number plate is genius -
 Came here to say, put all the wiring from the new motor and gearbox in that you can, then throw the stock ECUs in the bin, and get an aftermarket ECU. Should be pretty easy if you can use a multimeter and read a wiring diagram to then use a PNP aftermarket ECU to suit the motors wiring loom, and make the minimal changes you will to get it to work in with the body loom (If any). This will mean you can very easily circumvent/bypass the Park/Neutral start disable switch, and get everything running really easy!
 -
If the roof is dual skinned the whole way, IE, there's a "top" metal piece, and a "bottom" metal piece, to slow it down as much as you practically can, you should be able to get an attachment for a spray can/your spray gun, where it is a long, thin flexible hose, and when you're "spraying" it is spraying it in every direction possible. The I'd get that, and feed it through the roof as much and as far as you can. It's basically like fish oiling the car, but you're soaking it in rust converter. Then do the fix like Murray has described having cleaned up the existing metal as much as you humanly can. I'd also throw as much rust converter on that exposed metal before putting the fibreglass/metal filler over everything. As for welding a replacement in. I've owned my own MIG welder for about 10 years. I've also worked in an industry doing MIG welding for a job for about 3 months dead straight, and we were doing 11.5 hour work days 5 days a week, plus a Saturday 6 hour day. (I then moved over to running the massive CNC plasma as I could understand the technology, and work with the main guy out there). I also f**k around with my welders a bit at home. So what I'm saying here is, I've probably got more hours on a MIG gun than you'll manage to get under your sleeve doing home sorts of jobs over the next 5 years. I also have an ACDC TIG that I got myself a year or two back. I've got a short amount of experience on the TIG only. My home MIG is also presently setup for doing thin sheet metal. Unless I didn't care about how that roof looked, and I just wanted a functional metal roof, and it being out of alignment, warped, and bowed, I would NOT attempt a roof replacement UNLESS I could do it as a whole panel like Murray described where the spot welds were. Welding has this REALLY annoying thing, where if you want something to be perfectly square, unless you can clamp that thing to damn perfection (Welding fixture table), it is NOT going to be square, so you start to learn, the type of metal you're working with, how thick it is etc, and weld in VERY specific ways, and by knowing how YOU are as a welder, so that as the welds cool, the metal work pulls itself into place. If you want to see some cool tricky shit done, Bennets Customs is an Aussie guy, and he mentions a guy a lot call "Kyle", who is from "Make It Kustom". Watch some of their welding videos, especially on sheet metal. You can use the welder to shrink the steel in, and you can also use the welder to stretch the panel out. When you have the skill level that I have, you can shrink the metal in and out... But never on purpose like those two guys do. You just manage to f**k it all up. Then I smack it around with a hammer till it sits lower than I will want it too, then I shove filler on top and then pray to deitys that I can sand it into some form of sane shape that doesn't look like a dog has taken a shit, after eating a tonne of pumice stone... I'm all for DIY, and for learning, and please, feel free to give it a go, but be aware, you need to live with the consequences of how time consuming it is to do, AND that it's going to look no where near as good as what you can make it look with just some filler now. Oh AND, even once you replace it, it's like to still rust away again eventually, because you'll have missed putting primer and paint on some part of the newly welded in sheet metal, or against part of the existing metal you couldn't get to... Oh, and to weld all that in, you will need to pull the window out, and strip at least the roof and A Pillars of interior trim and wiring. You'll then need things like the big fire proof/weld spatter proof mats to lay down, OR you'll end up needing to strip the ENTIRE interior to avoid sending it all up in a ball of flames. If you want to see how annoying sheet metal is to weld, head to bunnings, buy there 600x600 1.6mm mild steel (Not GAL!) sheet, and cut a few pieces, and try and weld them together. Then understand, 1.6mm sheet is nearly 50 to 100% THICKER than the cars sheet metal. The photos I posted before, I'm replacing with 1.2mm thick mild sheet, and it's very easy to blow through both the original steel (Especially if I hit an area that should have probably been cut out a bit more) or straight through the new sheet metal. And I'm doing the floor, which can be hidden easily, and doesn't matter how pretty I make it, as long as it's damn strong! I'm also doing it in a 4WD, that has seen many off road trails, and doesn't need to look that pretty ever
-


Recommended Posts
Create an account or sign in to comment
You need to be a member in order to leave a comment
Create an account
Sign up for a new account in our community. It's easy!
Register a new accountSign in
Already have an account? Sign in here.
Sign In Now