
Reading Nissan Fault Codes Ecu Fault Codes How Read Them

Announcements
-
Similar Content
-
-
Latest Posts
-
 Would it be stupid to twin charge a skyline? Would that be possible/practical to do on an rb engine?Yep super expensive, awesome. It would be a cool passion project if I had the money.
 -
 Would it be stupid to twin charge a skyline? Would that be possible/practical to do on an rb engine?Getting the setup right, is likely to cost multiples of the purchase price of the vehicle.
 -
Would it be stupid to twin charge a skyline? Would that be possible/practical to do on an rb engine?So it's a ginormous undertaking that will be a massive headache but will be sorta cool if pulled off right. And also expensive. I'm sure it'll be as expensive as buying the car itself. I don't think you could just do this build without upgrading other things to take the extra power. Probably lots of custom stuff as well. All this assuming the person has mechanical knowledge. I'm stupid enough to try it but smart enough to realize there's gonna be mistakes even with an experienced mechanic. I'm a young bloke on minimum wage that gets dopamine from air being moved around and got his knowledge from a Donut video on how engines work.] Thanks for the response though super informative!
-
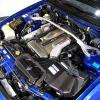
 Would it be stupid to twin charge a skyline? Would that be possible/practical to do on an rb engine?Yes, it is entirely possible to twincharge a Skyline. It is not....without problems though. There was a guy did it to an SOHC RB30 (and I think maybe it became or already was a 25/30) in a VL Commode. It was a monster. The idea is that you can run both compressors at relatively low pressure ratios, yet still end up with a quite large total pressure ratio because they multiply, not add, boost levels. So, if the blower is spun to give a 1.4:1 PR (ie, it would make ~40 kPa of boost on its own) and the turbo is set up to give a 1.4:1 PR also, then you don't get 40+40 = 80 kPa of boost, you get 1.4*1.4, which is pretty close to 100 kPa of boost. It's free real estate! This only gets better as the PRs increase. If both are set up to yield about 1.7 PR, which is only about 70 kPa or 10ish psi of boost each, you actually end up with about 1.9 bar of boost! So, inevitably it was a bit of a monster. The blower is set up as the 2nd compressor, closest to the motor, because it is a positive displacement unit, so to get the benefit of putting it in series with another compressor, it has to go second. If you put it first, it has to be bigger, because it will be breathing air at atmospheric pressure. The turbo's compressor ends up needing to be a lot larger than you'd expect, and optimised to be efficient at large mass flows and low PRs. The turbo's exhaust side needs to be quite relaxed, because it's not trying to provide the power to produce all the boost, and it has to handle ALL the exhaust flow. I think you need a much bigger wastegate than you might expect. Certainly bigger than for an engine just making the same power level turbo only. The blower effectively multiplies the base engine size. So if you put a 1.7 PR blower on a 2.5L Skyline, it's like turboing a 4.2L engine. Easy to make massive power. Plus, because the engine is blown, the blower makes boost before the turbo can even think about making boost, so it's like having that 4.2L engine all the way from idle. Fattens the torque delivery up massively. But, there are downsides. The first is trying to work out how to size the turbo according to the above. The second is that you pretty much have to give up on aircon. There's not enough space to mount everything you need. You might be able to go elec power steering pump, hidden away somewhere. but it would still be a struggle to get both the AC and the blower on the same side of the engine. Then, you have to ponder whether you want to truly intercool the thing. Ideally you would put a cooler between the turbo and the blower, so as to drop the heat out of it and gain even more benefit from the blower's positive displacement nature. But that would really need to be a water to air core, because you're never going to find enough room to run 2 sets of boost pipes out to air to air cores in the front of the car. But you still need to aftercool after the blower, because both these compressors will add a lot of heat, and you wil have the same temperature (more or less) as if you produced all that boost with a single stage, and no one in their right mind would try to run a petrol engine on high boost without a cooler (unless not using petrol, which we shall ignore for the moment). I'm of the opinnion that 2x water to air cores in the bay and 2x HXs out the front is probably the only sensible way to avoid wasting a lot of room trying to fit in long runs of boost pipe. But the struggle to locate everything in the limited space available would still be a pretty bad optimisation problem. If it was an OEM, they'd throw 20 engineers at it for a year and let them test out 30 ideas before deciding on the best layout. And they'd have the freedom to develop bespoke castings and the like, for manifolds, housings, connecting pipes to/from compressors and cores. A single person in a garage can either have one shot at it and live with the result, or spend 5 years trying to get it right.
 -
-


Recommended Posts
Create an account or sign in to comment
You need to be a member in order to leave a comment
Create an account
Sign up for a new account in our community. It's easy!
Register a new accountSign in
Already have an account? Sign in here.
Sign In Now