Jump to content
SAU Community

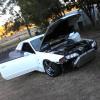
Stripping The Interior Of The 33


Recommended Posts

allright, i am completly stripping the inside of my 33, apart from a few bits n peices.

rear seats $150 for top and bottom

rearview mirror $20

door trims $150 each

rear trims $100 each

all the pillar trims except the left hand front $100 for all

centre console including the dash surround and little middle glovebox thingo $200

items that will be removed pending interest

complete dash $500

front seats $200 each

all items are plus postage, from esperance, unless you want to pick it up.

average postage is around $20

all items are in perfect condition, purchase of multipal items reduce postage.

if i have forgot anything that you want, just ask me :)

Link to comment
Share on other sites

allright, i am completly stripping the inside of my 33, apart from a few bits n peices.

rear seats $150 for top and bottom

rearview mirror $20

door trims $150 each

rear trims $100 each

all the pillar trims except the left hand front $100 for all

centre console including the dash surround and little middle glovebox thingo $200

items that will be removed pending interest

complete dash $500

front seats $200 each

all items are plus postage, from esperance, unless you want to pick it up.

average postage is around $20

all items are in perfect condition, purchase of multipal items reduce postage.

if i have forgot anything that you want, just ask me :)

WA (Esperance)

Edited by BstewyR33
Link to comment
Share on other sites

gahh i have an auto so thats no good to you jakez88

and roots33 its a series 1 but with aftermarket wheel which i need, although i have a junky one which you can have for $5 but needs boss kit.

yes im in esperance.

and today i removed the aircon control box thingo, the clock, the auto dash surround thingo (where it says what gear your in)

i have the roof lining if anyone is interested also but its a little funky

Link to comment
Share on other sites

psi parts yes i have that, i will have a look at how to remove it tomorrow and if i get it out in 1 peice ill take a photo for you can have a look at it.

lume yeah all sound equipment is out, which mounting brackets are you talking about, as i had a 7 inch screen installed so i am unsure if it would be the same as what your after, but ill take some pics and you can have a look also.

eugen syd sorry mate the carpet was gross and i ripped it out

Link to comment
Share on other sites

im not sure how to "edit" a post so i will have to add a new reply,

add to the list.

2 rear gas struts for the boot $20

rear wiper arm and motor and blade, everything $40

air con control box thingo $30

clock $10

the interior lights on the roof, front and middle $15

and there is other stuff that i cant think of, but let me know if you want anything

i want to sell this stuff, so kindly buy it

i will be heading to the car shortly to remove the items that people have shown an interest for

Link to comment
Share on other sites

hmm i was thinking about keeping elecy windows but that might be a bit to luxurious for a track car lol

ill go to the shed this arvo and have a look and see if i reckon i can get it out in 1 peice or not lol.

are you just after the motor itself, or the levers and stuff that push it up?

how about the switch, do you need that also?

Link to comment
Share on other sites

Create an account or sign in to comment

You need to be a member in order to leave a comment

Create an account

Sign up for a new account in our community. It's easy!

Register a new account

Sign in

Already have an account? Sign in here.

Sign In Now
 Share


  • Similar Content

  • Latest Posts

    • Time for millspec wiring, MoTec electronics package, Bosch Motorsport ABS, let's goooooooo!!!   Maybe as @MBS206 suggested, just swap out those stupid blue relays near the ECU plug.  
    • My only regret with the NC MX5 was no space for a spare, even a space saver doesn't fit in I do have a couple of those puncture repair spray cans, but if I get a large puncture, or sidewall damage, I'm screwed until a tilt tray turns up I'm thinking I might get one of those 4WD style of puncture repair kits that have that rope stuff and glue, whilst it will kill any hope of saving a tyre, it might help getting me out from some backwoods road far enough to find a actual tyre shop if the first can of tyre fix doesn't work I'm keen to see how your new toy pans out Uncle Duncan, I'll be moving to the Highlands next year, you'll need to shout out if your heading to Wakefield, whilst I've lost my balls for happy laps, I still love watching those that can
    • Yeah not sure what the warranty was, but it will be years outside it.  I've shot Link a message, will see what happens, I'm told their support is good. It is a plug in, so its a Link board in a factory case, very easy to access both sides of the circuit board by removing the top or bottom cover. To be fair the the Link, although I've checked to the factory connections and wiring specs, as we learned with Neil's car in the early days not all ECUs source power the same way. He'd been running a factory ECU with no trouble for years, but when we plugged a PowerFC in it wouldn't start up, just kept cycling power on and off. We worked out that the car was missing one of the 10a fuses "Electronic Parts", and to Neil's knowledge it had never been there. Turns out the ECU pulled its main power from that source not the same place the factory ECU did.  Point being....there are multiple battery and ECCS power sources in the factory ECU, and multiple grounds as well....not telling from the outside exactly what the Link uses (and doesn't use)
    • Now, thanks to sonicii, onto the uneven floor from a tyre sticking 100mm into the boot space. I looked into options to raise the floor to the level of the tyre, and ended up going Extruded Polystyrene (XPS). EPS is what I normally think of as polystyrene, the annoying tiny balls that get glued into a flat sheet but XPS is quite different, much firmer and doesn't crumble if you touch it with anything. I also looked at things like heavy duty seating foam but XPS seemed like the right way. I picked up 3x 1200x600x50 sheets for $40ea. Initially I was looking for 100mm sheets because I needed to make up a 100mm gap, but as it turned out 50mm was available, much easier to work with and made it simple to store the tools I used a simple 15cm foam cutter to make the shapes. With some practice I was able to make reasonably clean cuts but I don't think Clark Rubber are going to be calling me to offer a job. https://www.ebay.com.au/itm/405092315205?var=675175481574 First layer in place, 3 dimensions are tricky! Second layer in place, bringing it to level with the top of the spare Cutouts in the top layer for the tools With floor back in place, nice and flat with 100mm stolen but no real impact on usability
    • Sounds like a good idea to me moh
×
×
  • Create New...