
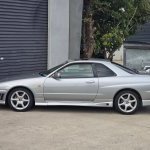
R34 GT-Four RB26 Time Attack Build

Announcements
-
Similar Content
-
-
Latest Posts
-
 Some of the filler. Also if I look under the top flap of metal it starts looking good quite close to the edge. I get the feeling it doesn't go much further.
 -
So, I finally started digging at the bit of my roof that was cracking and bulging a bit. Well, it was just thick filler that was covering some pretty bad rust. I didn't find the edges, I was too bummed to keep going. There are a few holes as you can see. There was just so much filler but looks like no attempt under the filler to prime or use rust converter, just slapped filler on exposed rust. Anyway, I'm going to take the windshield out and find the edges. I'd love to fix this myself as I'm pretty sure it'll be expensive to get done properly. I was thinking I could just get a cut piece from another E39 and just weld it in place as it would be the right size and shape. Thoughts?
-
 This is the territory of the "Stage 1/2/3 Golf GTI/R" or otherwise off the shelf tune with (relative to before) minor mods. It's easier now. Downpipe and Tune and boom, big increases. Stage 1 OEM+ is where it's at. This is where the niche evolved into and it's really easy to see why. It's rare to even NEED to consider changing turbos or going to aftermarket ECU's or building bottom ends for more power. Stage 1-2-3 will get you a LONG WAY. Civic Type R turbo GR Yaris/Corolla Anything with B58 (MKV Supra/x40i) Anything BMW in General Anything Audi in General Any turbo AMG RenaultSport Turbo offerings Korean Elantra N/I30N Ecoboost Mustangs Focus RS? List goes on. I would argue in the future it won't even need to go on... M3P is pretty rapid out of the box...
 -
 There is a way, but it's not with the same cars. You need to find the same vintage of car, that we had. Realistically, that was an affordable car with aftermarket parts around. So what people need to find is a car that had a decent base in its day, and can be modified. They're looking for a car year make of 2010 to 2015 really... Aus could have done it if Holden didn't fold as V8 commodores were cheap, and if Ford didn't get expensive thanks to COVID, then you could cheaply play with FG Barras. Realistically, those are just a bit heavier, four door skylines. I'm sure the US and UK have similar cars they could find.
 -
 Haha I do that.. thats when it chirps..The bit point for me is almost non-existent. Otherwise I stall it. But yes, in terms of performance, the clutch is solid af.
-


Recommended Posts
Create an account or sign in to comment
You need to be a member in order to leave a comment
Create an account
Sign up for a new account in our community. It's easy!
Register a new accountSign in
Already have an account? Sign in here.
Sign In Now