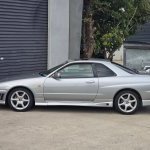
Jump to content
SAU Community

Recommended Posts

  • Replies 304
  • Created
  • Last Reply

Top Posters In This Topic

  • 1 month later...
  • 3 weeks later...
  • 2 months later...

Not much to update, just a whole heap of more parts on the way. Currently over in Japan doing the whole touring of tune shops etc.

So to add to the list of items i have.

2x Bride Gardis3 FIA approved seats

2x Bride FX-type FIA approved rails

Takata Harness

Billion Power Steering Tank

HKS SSQ3 bov

Nismo Thermostat

Defi Turbo Gauge

Voltex 1700mm Wet Carbon GT wing

HKS Turbo to Pod induction piping

Tomei Intake headlight

WorksBell detachable bosskit

ARC Side Flow Air removel tank

+more to come

  • 2 weeks later...
  • 3 weeks later...

Thanks mate.

Just been spending the last couple of days gutting the drivers side doors.

Going to weld in a couple of thin rods on the doors to mount the acrylic windows and brace them alittle.

post-38653-0-77308500-1299760151_thumb.jpg

post-38653-0-69552000-1299760189_thumb.jpg

I say go all the way and weld the rear doors shut!

refresh my memory, do 34 sedans have doors with window frames? from memory they do. it should make fitting the lexan a fair bit easier. it's a bit of a bitch on GTRs as with nothing to support the top of the windows they flex a lot.

Yeah on sedans theres window frames so alot easier for mounting. Was thinking of welding the rear shut but I might wanna chuck tools in there if I'm going to a track day etc, not gonna make much difference I don't think.

no it wont, but if you did weld the doors shut it means you could basically remove everything (including latch etc) except the outer skin itself, could even remove the hinges with some thought. but yeah it loses a little bit of rear access.

Manage to weigh the rear door up tonight and comes in at 20kg, after i made it look pretty it weighs 10kg and front doors weigh in at 28kg and i got them down around 12-13kg.

:)

If only i had the patience and like most people the money to go nuts on my car a bit more.. 10-15k doesnt get you much these days so id hate to see the final bill on this.

You going to track it all around Aus or just go to whatever it is thats local to adelaide?

Create an account or sign in to comment

You need to be a member in order to leave a comment

Create an account

Sign up for a new account in our community. It's easy!

Register a new account

Sign in

Already have an account? Sign in here.

Sign In Now


  • Similar Content

  • Latest Posts

    • This is the clearest explanation out of those: Page 77: Turn the crankshaft clockwise two full rotations with the tensioner pulley installation bolt in a loose condition. Insert a wrench into the tensioner pulley hexagonal hole to fix the tensioner pulley in place, then tighten the installation bolts. Tightening torque: 43–58 N·m (4.4–5.9 kg·m). The timing belt tension should be at the correct tension. Basically you turn the engine with the tensioner bolt loose, then use the allen key to hold it while you torque it up. And yes after that a good guide is being able to twist it 90o in one of the long free lengths of the belt
    • good choice....I have a set of those and use them all the time including on this job. Plus, no-one wants a damaged nipple
    • Thanks all, went with nismo strengthened belt and all genuine nissan idler and tensioner Question on RB25DET Neo Timing Tensioner: I have a question about the RB25DET Neo timing tensioner. In one of the videos (minute 20 of https://www.youtube.com/watch?v=17y37BB9xnA and minute 27 of https://www.youtube.com/watch?v=Pb99s2E9xUg), the process suggests tightening the tensioner pulley installation bolt to the specified torque initially, and then loosening it slightly to allow the spring to set the correct tension. Is this the correct approach? The R33 workshop manual on page 74 states: Loosen the tension pulley installation nuts. Insert the wrench into the tensioner pulley hexagonal hole and turn it clockwise to tighten the installation nut temporarily. The way this is written is confusing. Does this mean: Undo the nut, then reduce the tension by turning clockwise? Snug the nut so it stays in position without applying tension to the belt while removing the timing belt? The manual wording makes it sound like the nut will tighten automatically when you turn the tensioner clockwise , which is unclear to me.   Timing Belt Tension Adjustment Process: After loosening the tensioner nut, you turn the engine two full rotations by hand, which should set the correct tension. Once the tension is set, you tighten the bolt to 43 N·m (4.4 kg·m). Before tightening, you need to insert the Allen key into the hexagonal hole to hold the pulley in place while tightening the bolt. In one of the videos, it’s mentioned that you should twist the belt side to side, or turn it slightly to check if the tension is correct. The belt should turn halfway, indicating the right tension. However, I know that twisting or turning the belt is not a good idea. What are your thoughts on this? Finally, how can I ensure the belt isn’t overtightened? I’ve seen many cases where people have overtightened the timing belt.   Manual Excerpts: Page 74: Loosen the tension pulley installation nuts. Insert the wrench into the tensioner pulley hexagonal hole and turn it clockwise to tighten the installation nut temporarily. Remove the timing belt from each pulley. Page 77: Turn the crankshaft clockwise two full rotations with the tensioner pulley installation bolt in a loose condition. Insert a wrench into the tensioner pulley hexagonal hole to fix the tensioner pulley in place, then tighten the installation bolts. Tightening torque: 43–58 N·m (4.4–5.9 kg·m). The timing belt tension should be at the correct tension.
    • Takes a few minutes to malke one. Wood, or steel, or a wrap strap with some strategically placed solids to provide teh drive onto the ribs.
    • I would strongly suggest using the correct tool. They are not expensive and make the job much easier and don't damage the lock ring. Google "fuel tank lock ring removal tool" to see what I'm talking about. 
×
×
  • Create New...