
Announcements
-
Similar Content
-
-
Latest Posts
-

By CanadianGuy · Posted
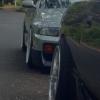
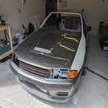
Little more work! Did some body work on the rear wheel arches and since the paint was a cheap spray job before figured I’d do something to tide me over until I wrap the car. Colour might not be everyone’s choice but I like it and it’s only temporary, just hate having primer from the wheel arches standing out. Keeping an eye out for a decent set of wheels to throw on now. Wheels and tires on the car are junk -
 Its likely to be 70% road 30% track usage, track usage will increase if anything. Decided not to fit it as I cant be arsed changing the bushes on my LCAs again 🤣 I did get the below back from GKTech though so they should work together The anti-squat kit and roll center adjusters work independently since they change the rear lower control arm's angle in different ways. The anti-squat kit adjusts the angle from front to back, which impacts anti-squat values. Roll center adjusters change the angle side to side, mainly to correct geometry on cars that are significantly lowered. They might affect each other a tiny bit, but overall, you can think of them as separate.
 -

By robbo_rb180 · Posted
What are you doing with the car? street car or race car? People get hung up on the squat of the s/r chassis rears. There is positives to the squat if a car is setup and driven correctly for it (correct ride height, spring rate, alignment, damper valving). Generally just lengthen the rear traction arm by 5-10mm and that will help the squat and bump steer too. You are also correct with the roll centre too. This too also needs to be adjustable if you start messing with suspension geometry. Having done quiet a bit of testing on race cars this year in regards to rear squat, I've seen some big positives from it in regards to drive off corners and traction. -
 I find I am using the MX5 for everything except long overnight cruises with Jackie, or, if picking up the kids to go somewhere, the SS has so much more room inside, and is much more comfortable if your going to be doing Hwy driving for 6-8 hours And the MX5 isn't bad in stop go traffic for a manual transmission car, whilst the clutch kit has been upgraded from stock, it is still light, and also not having a stupidly light flywheel in it helps as well, I've spent alot of time sitting on the M5, M4 and M7 stuck in traffic when plodding around the Greater Sydney Region in it Another benefit is MX5's are not really a car that gets stolen, you can pretty much park it anywhere, and it will still be there when you return
 -
 I can totally get why you like it for that sort of commute. I was thinking BoganDore because it's such a lazy drive, for things like stop start traffic. I used to do over an hour in stop start shit from one side of Bris to the next, twice a day. My choice of car was larger displacement, with an auto. Basically for torque in low rpm/very low speed, and no clutch pedal. But loved a fun manual for the weekends, which the partner has (plus had the LandCruiser too for other fun drives). I now have an EV as a work car, and I tell ya what, ultimate daily driver, especially if youre out of energy, like I often am after work. I don't even need to touch the brake pedal That said, I'm presently rebuilding the Liberty GTB to get it setup for weekend drives and track abuse! So small high revving turbo engine with 6 speed cog swapper! But for your style of commute, I'd probably take the MX5 too! For those choices, I'm ignoring fuel economy. Because I know how atrocious V8 daily life is for fuel from when I used to daily a manual SS, ha ha. Hence why I know I love the daily rumble of a V8
-


Recommended Posts
Create an account or sign in to comment
You need to be a member in order to leave a comment
Create an account
Sign up for a new account in our community. It's easy!
Register a new accountSign in
Already have an account? Sign in here.
Sign In Now