

Announcements
-
Similar Content
-
-
Latest Posts
-
 Car looks clean as. You ended up getting quite a bit done 😂 So what's the plan for the exhaust?
 -
 The only Neo rods that were any different to any other RB25 rods were the DET ones, and they were the same as RB26. Here is a Neo DET rod. O5U part number visible. Here is a post in a thread here on SAU with evidence from someone who has done this before. There are photos in the thread of normal RB25 rods.
 -

By joshuaho96 · Posted
Sure, but why assume that will be the case forever? And why assume you'll be able to do an oil change to swap back to a stock drain bolt before that happens? And does it even matter when I change the oil at fairly short intervals? Life can be funny sometimes and unexpected things can happen. Like breaking a collarbone so you can't do any work on your car for a few months but the oil change is due so you have to take it to somewhere and hope they don't do something stupid like stacking the new drain plug washer on top of the old one. -
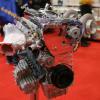
 Do u know how to identify the rods are rb25 or neo ones? Can u look into the pics and tell me is they de or de neo ones. Its confusing becoz my motor has de neo head but block is 25de 75t, so really confusing me about rods, crank.
 -
Are you talking about the oil squirters? There is only one place for them to go. Yes, you have to drill the holes. Yes you have to obtain the correct oil squirters (I presume there is some sort of aftermarket option available, because original turbo ones are going to be a diminishing resource).
-


Recommended Posts
Create an account or sign in to comment
You need to be a member in order to leave a comment
Create an account
Sign up for a new account in our community. It's easy!
Register a new accountSign in
Already have an account? Sign in here.
Sign In Now