Jump to content
SAU Community

Recommended Posts

Hey everyone.

Well as the title states.

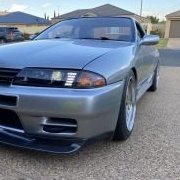
I want to get my R33 re-sprayed. But iv been told by almost everyone that its going to be alot cheaper if i do the sanding and prep.

Iv never sanded a car before. But i defiantly do have common sense.

Im wanting to know the best way to sand the car back, In a step by step way if possible.

Any help/advice will be taken in.

Thanks!

Link to comment
https://www.sau.com.au/forums/topic/332147-sanding-back-my-r33-first-timer/
Share on other sites

Use a solid block! Don't just use your hands as you will only be applying pressure where your finger tips are. Make sure you use a solid block for the whole thing, and if possible it's best to use a curved object when you do curved areas.

ehhh, I would get a random orbit DA sander and do it. don't use super coarse grit. and keep the speed down on the sander, if you turn it to full blast, you can wind up with low spots that you won't notice. 320 grit to start, and finish it with an even finer grit (800 or higher even). sanding down a whole car by hand.... no thanks. Even with the pneumatic sander it will take hours and hours of your time. In the end you are trading time for dollars. It's invaluable experience, but if you only have a day here or there to work on it, you may start to feel like it will never get done.

Yeh lol, I didn't mean to imply that you should do it all by hand. Definitely use an orbital sander. Some bits will have to be done by hand though, which is where my advice comes into it :P

It's really that easy man, just time consuming. Not much advice to be given as it's really not hard.

i got a kind of different suggestion spent several years in painting/detailing cars have come across alot of different situations before but i suggest to paint strip the whole car, fix any dints/low spots as previously mention,ededge prime it the car,hi-fill it and so on ect,ect,ect this way your car will not have a thick layer of paint weighing it down even further you will also observe that you will get a more nicer smoother finish. hope this has helped :/

cheers chris

I know it all sounds good to save some time and do the prep work yourself, but its the prep that can make or break a spray job. If you don't have a well prepared body to start with, your paint won't just hide it, it'll highlight it! There is a reason it costs you more to have the bodywork done properly but its soooo much better to save up the extra and get it done right. I see too many cars driving around with horrible looking "fresh" paintwork, and atleast 9 times out of 10 its just down to trying to save money on 1) preperation and 2) paint materials. Don't skimp on the brand of paint that get used either. For the sake of a coupla hundred bucks savings, just buy a well known brand paint and enjoy a good result.

Yeh lol, I didn't mean to imply that you should do it all by hand. Definitely use an orbital sander. Some bits will have to be done by hand though, which is where my advice comes into it :worship:

It's really that easy man, just time consuming. Not much advice to be given as it's really not hard.

Yeah thanks very much. Very helpful. What about when it comes to fixing scratches?

I know it all sounds good to save some time and do the prep work yourself, but its the prep that can make or break a spray job. If you don't have a well prepared body to start with, your paint won't just hide it, it'll highlight it! There is a reason it costs you more to have the bodywork done properly but its soooo much better to save up the extra and get it done right. I see too many cars driving around with horrible looking "fresh" paintwork, and atleast 9 times out of 10 its just down to trying to save money on 1) preperation and 2) paint materials. Don't skimp on the brand of paint that get used either. For the sake of a coupla hundred bucks savings, just buy a well known brand paint and enjoy a good result.

Yeah i wont be using cheap gear, and its not going to be rushed. thanks for the advice

i got a kind of different suggestion spent several years in painting/detailing cars have come across alot of different situations before but i suggest to paint strip the whole car, fix any dints/low spots as previously mention,ededge prime it the car,hi-fill it and so on ect,ect,ect this way your car will not have a thick layer of paint weighing it down even further you will also observe that you will get a more nicer smoother finish. hope this has helped :worship:

cheers chris

Thanks chris. So basically strip down the whole car. then do all the prep/sanding work?

my best advice to you is for you to go buy a a hood/front bar, or something from a junkyard and try sanding and priming that. if it looks acceptable to you, then move on to the car. I have painted several cars, and let me be honest with you, the first car i painted looked very novice. It was presentable, but just not having any background leads to a lot of setbacks that you will be ill equipped to address once it's too late. practice on junkyard parts and see what happens. if you take anything down to the steel on your car, you will have to be ready to prime it or it will rust, and you'll have to resand. If you primer a piece and don't paint it, the moisture in the air will get into the primer, and it will no longer be a smooth surface. things like that happen, and before you know it, you are redoing everything.

Thanks chris. So basically strip down the whole car. then do all the prep/sanding work?

yeah my advice would be that but as mentioned make sure you prime it not long after to avoid rust as other users have mentioned and try to fill up and low spots/dints

I know it all sounds good to save some time and do the prep work yourself, but its the prep that can make or break a spray job. If you don't have a well prepared body to start with, your paint won't just hide it, it'll highlight it! There is a reason it costs you more to have the bodywork done properly but its soooo much better to save up the extra and get it done right. I see too many cars driving around with horrible looking "fresh" paintwork, and atleast 9 times out of 10 its just down to trying to save money on 1) preperation and 2) paint materials. Don't skimp on the brand of paint that get used either. For the sake of a coupla hundred bucks savings, just buy a well known brand paint and enjoy a good result.

True, but any decent workshop will identify a poorly prepared body and notify you of it. It would be a poor workshop that just accepts a car and starts spraying without checking it out first.

Yeah thanks very much. Very helpful. What about when it comes to fixing scratches?

Fixing scratches is easy, use spray on filler primer. This will fill the scratches and obviously does not need to be primed again.

Create an account or sign in to comment

You need to be a member in order to leave a comment

Create an account

Sign up for a new account in our community. It's easy!

Register a new account

Sign in

Already have an account? Sign in here.

Sign In Now


  • Similar Content

  • Latest Posts

    • On the bright side, at least you knew that it happened and remedied before anything happened. A friend of mine just took his Fiat 124 to a shop for an oil change and they didn't tighten the oil filter housing properly. 4.5 quarts spewed out and even after refilling + tightening the cap the engine has a tick now.
    • So, more pain. The FAST manifold is a little larger than the stocker. This is problematic because there really wasn't much clearance to begin with, so going from 'barely enough' well into 'no' is sad based on the external dimensions of the thing, even though where it bolts to the head is the same. Result is the fuel rails sit a good 25mm higher, and this is a bit of an issue with the wiring that runs behind the motor, and the fuel lines, and everything else. When pushing the manifold on, it required a huge amount of force to crush wiring looms to fit it, sensors like the MAP sensor are about 1mm from the firewall, and the FPR just has to bend ABS lines to be forced into place. After some brainstorming and some sad drinking, the loom for some reason ran from the grommet behind the ABS sensor, then to the driver side head, then back to the passenger side head. So all of this was pulled back and stripped, a few wires cut and rejoined, so that the 'branch' was now on the passenger side's head as below: Before you basically couldn't see anything behind the driver head. This is much improved! The MAP sensor is now pointing up (instead of at the firewall) Brackets have been made up for the rail. The rails are for a LS1, the manifold is designed around a LS2 as it's base. Which of course has slightly different bracketry and water pump clearance, hence the mods people need to do. Should be hopefully mounted tonight. I spent money on a new FPR that is slightly more compact than my Turbosmart FPR1200. The gauge has also been moved to the rail. There's also apparently an ORB to AN Union instead of the adapter, because the ~25mm of the current adapter is going to make the difference. Provided this all goes together and arrives today, it'll be the totally not stressful attempt to start it.
    • This seems like a pointless exercise. There is no E30 availability. Ongoing availability of E85 should not be assumed. Flex-fuel is the only sensible approach, so you can use E85 when and where you can get it, 98 when that's al you can get, and anything in between as you fill it up and drain it down. And if that means replacing the pumps, fitting a flex capable sensor/ECU/whatever has to be done to these Renault shitboxen, then.....so be it?
    • Sorry, I wasn't very clear.....just that the standard injectors are apparently good over 600rwhp/450rwkw which you won't get to on standard turbos anyway.....they are much better sized from factory than we are used to in RBs.
×
×
  • Create New...