
What Have You Done To Your Stagea Lately?

Announcements
-
Similar Content
-
-
Latest Posts
-
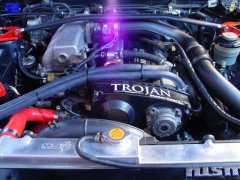
 Got started on the modification to make these splash plates fit over the long weekend. First the surprisingly time consuming task of swapping all the cam camp bolts to Tomei cam cap studs. I did the method of removing one bolt at a time, applying loctite to the stud, double nutting to torque as the manual described. Then carefully unlocking the nuts without disrupting the torque of the stud (and going back to re-torque a few times when it slipped). Finally applying the nut and torquing to spec. Repeat x28 Next up I went about removing the stock cam cover baffle so I could ensure it was fully clean after drilling for stud clearance. As the blind rivets holding the baffle on were domed I used a punch to mark the center then used 4mm drill bit to carefully drill out the rivet without going too far part the baffle. As seen in other thread here is what is inside the stock baffles I decided on M4x6mm bolts to bolt the baffle plate back on with. I used a 3.3mm drill bit with some tape to mark the depth at ~8mm. Next was to tap the threads using a cheap bunnings kit M4x0.7. With the baffle removed I also drilled out the spot welds holding in the baffle plate oil returns. Unsure whether this was the best option or if I should have cut holes in the Hypertune splash plates to allow the oil drains to still function... time will tell. I then removed the the Hypertune splash plates so I could rest the cam cover on top and use a dab of grease to mark where the studs impacted the oem cam cover baffle. The most obvious spot was on the hump from the stock mesh is held. Using this hole as an anchor I bolted the oem baffle plate back into the cam cover and lined up the Hypertune splash plate. Marked the rest of the holes for the studs and drill those out too. Total 32 holes drilled and 12 threads tapped on the passenger side cam cover alone for this bolt on part that totally clears all OEM cam covers.. Drivers side next as well as some E85 safe fuel foam to fill the space behind the behind cam cover baffle plates. oh and some lock nuts for the splash plates of course.
 -
 I had the same previously, and it really shits me. They just run off red book averages or whatever as the maximum insured, there are never good quality cars available to buy for anywhere near those prices. I don't even understand why they do it. Sure having a customer overinsure then false claim is a risk, but how often does that really happen in the world, 1%? 0.1%? On the other hand, all 10-20% above redbook listed prices and charge 10-20% higher premium, surely that is more profitable for those cockroaches
 -
 My take on gg2 48mm, 54mm, 58mm, and 62mm compressor map for same size compressor vs gg1 : All gg2 only outflow gg1 above 20 psi. As all g gen 2 surge line at lower left of comp map move to the right, all gg2 sacrifice spool vs same size gg1, surge line move to the right worst for 54mm gg2. So for same size compressor if you want best response, use gg1, if you want max hp at >20psi use gg2 but you will be laggier vs same size gg1. Max compressor efficiency drops to max 75% on all gg2 vs max 76%-80% of same size gg1. Iirc lower efficiency means hotter iat less dense air so lower hp at same operating point of comp map. Also curious why gg2 is mapped to lower max rpm vs same size gg1 (only 48mm size both gg1 gg2 mapped to same rpm) : 54mm gg1 165,000 rpm vs gg2 160,000 rpm. 58mm gg1 150,000 rpm vs gg2 140,000rpm. 62mm gg1 145,000 rpm vs gg2 140,000 rpm. If gg2 can safely spin to gg1 rpm then they can flow a bit more than as mapped. Good thing that all gg 2 interchange compressor and turbine housings with same size gg 1. So gg1 owners can buy gg2 chra only if planning to boost >20psi.
 -
 My stuff is all with Shannon's, granted, I don't really have imports I'm driving on the road, however, I've had multiple cars at the same time with them. Presently we have the Landcruiser on laid up cover, Sarah's Kluger on full cover, and the house insured. About 18 months ago Sarah wrote her Subaru Liberty GTB off, insured with Shannon's, and the payout, and buy back of the wreck was super quick. In 2020 we had the VF Commodore totalled in a major hailstorm. Storm was on the Saturday, I called on the Sunday and lodged it, vehicle was towed on Tuesday night, assessment team called on Wednesday to say it was a total loss and get payout details, money was in the bank on Thursday morning. Have had a few other claims both at fault, and not at fault, over the years, and never had an issue with them. Funnily enough, they're also the cheapest insurer I find for things like Sarah's Kluger. I will say I'm less impressed dealing with them lately around "the experience", as a lot of their staff that you deal with aren't car enthusiasts. Shannon's has a much more main stream feel ever since they decided to become "big corporate", laid a heap of staff off, and then hired a bunch of non enthusiasts. At the same time they've been making a push to be less "call us and we'll personally have someone who cares help" to "hey, this computer can do stuff for you" and are trying to get more square pegs to fit round holes. (That's just the vibe I get from them). Again, have had no issues with claims with them, but get a bit of a "less personal" feel from them.
 -
 A thing I wasn’t happy with with enthusiast was during the initial phone call they told me they’d insure it for 130k but needed photos. I then sent them photos and they told me $80k as there were other cars either similar modifications available for around that price, I told them to send me the links to said cars so that I can buy them. i then sent the modification list with prices of the parts (no labor) and the price then came to 115k, which is still shy of the 130 that was agreed in the initial phone call
-


Recommended Posts
Create an account or sign in to comment
You need to be a member in order to leave a comment
Create an account
Sign up for a new account in our community. It's easy!
Register a new accountSign in
Already have an account? Sign in here.
Sign In Now