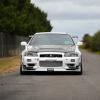
R34 Skyline Gtr Vspec
Announcements
-
Similar Content
-
Latest Posts
-
By soviet_merlin · Posted
That's odd, it works fine here. Try loading it on a different device or browser? It's Jack Phillips JDM, a Skyline wrecker in Victoria. Not the cheapest, but I have found them helpful to find obscure parts in AU. https://jpjdm.com/shop/index.php -
Yeah. I second all of the above. The only way to see that sort of voltage is if something is generating it as a side effect of being f**ked up. The other thing you could do would be to put a load onto that 30V terminal, something like a brakelamp globe. See if it pulls the voltage away comepletely or if some or all of it stays there while loaded. Will give you something of an idea about how much danger it could cause.
-
I would say, you've got one hell of an underlying issue there. You're saying, coils were fully unplugged, and the fuse to that circuit was unplugged, and you measured 30v? Either something is giving you some WILD EMI, and that's an induced voltage, OR something is managing to backfeed, AND that something has problems. It could be something like the ECU if it takes power from there, and also gets power from another source IF there's an internal issue in the ECU. The way to check would be pull that fuse, unplug the coils, and then probe the ECU pins. However it could be something else doing it. Additionally, if it is something wired in, and that something is pulsing, IE a PWM circuit and it's an inductive load and doesnt have proper flyback protection, that would also do it. A possibility would be if you have something like a PWM fuel pump, it might be giving flyback voltages (dangerous to stuff!). I'd put the circuit back into its "broken" state, confirm the weird voltage is back, and then one by one unplug devices until that voltage disappears. That's a quick way to find an associated device. Otherwise I'd need to look at the wiring diagrams, and then understand any electrical mods done. But you really should not be seeing the above issue, and really, it's indicating something is failing, and possibly why the fuse blew to begin with.
-
A lot of what you said there are fair observations and part of why I made that list, to make some of these things (like no advantage between the GSeries and GSeries II at PR2.4 in a lot of cases) however I'm not fully convinced by other comments. One thing to bare in mind is that compressor flow maps are talking about MASS flow, in terms of the compressor side you shouldn't end up running more or less airflow vs another compressor map for the same advertised flow if all external environmental conditions are equivalent if the compressor efficiency is lower as that advertised mass flow takes that into consideration. Once the intercooler becomes involved the in-plenum air temperature shouldn't be that different, either... the main thing that is likely to affect the end power is the final exhaust manifold pressure - which *WILL* go up when you run out of compressor efficiency when you run off the map earlier on the original G-Series versus G-Series II as you need to keep the gate shut to achieve similar airflow. Also, how do you figure response based off surge line? I've seen people claim that as an absolute fact before but am pretty sure I've seen compressors with worse surge lines actually "stand up" faster (and ironically be more likely to surge), I'm not super convinced - it's really a thing we won't easily be able to determine until people start using them. There are some things on the maps that actually make me wonder if there is a chance that they may respond no worse... if not BETTER?! which brings me to your next point... Why G2 have lower max rpm? Really good question and I've been wondering about this too. The maximum speed *AND* the compressor maps both look like what I'd normally expect if Garrett had extended the exducers out, but they claim the same inducer and exducer size for the whole range. If you compare the speed lines between any G and G2 version the G2 speed lines support higher flow for the same compressor speed, kinda giving a pretty clear "better at pumping more air for the same speed" impression. Presumably the exducer includes any extended tip design instead of just the backplate, but nonetheless I'd love to see good pics/measurements of the G2 compressors as everything kinda points to something different about the exducer - specifically that it must be further out from the centerline, which means a lower rpm for the same max tip speed and often also results in higher pressure ratio efficiency, narrower maps, and often actually can result in better spool vs a smaller exducer for the same inducer size... no doubt partly due to the above phenomenon of needing less turbine speed to achieve the same airflow when using a smaller trim. Not sure if this is just camera angle or what, but this kinda looks interesting on the G35 990 compressor tips: Very interested to see what happens when people start testing these, and if we start getting more details about what's different.
-


Recommended Posts
Create an account or sign in to comment
You need to be a member in order to leave a comment
Create an account
Sign up for a new account in our community. It's easy!
Register a new accountSign in
Already have an account? Sign in here.
Sign In Now