

Announcements
-
Similar Content
-
-
Latest Posts
-
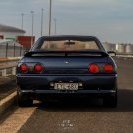
 I bought the model back in Japan in Feb. I realised I could never build it, looked around for people who could build it, turns out there's some very skilled people out there that will make copies of 1:1 cars or near enough. I'm not really a photo guy... but people were dragging me in a group chat for the choice of bumper as someone else saw the car before it was finished as they are also a customer of that shop. I took the photo in the above post because I was pretty confident that the lip would work wonders for it. Here's some more in-progress and almost-done pics. It gives a good enough idea as to what the rear looks like! I have also booked in a track day at the end of January. Lets all hope that is nothing but pure fun and games. If it's not pure fun and games, well, I've already got half an engine spare in the cupboard
 -

By soviet_merlin · Posted
Well, do ya, punk? Seriously though, let's fu<king go! The colour and kit looks amazing on the car. Do you have any shots from the rear? I don't quite follow how the model came around. You bought the white kit and he modified it to match your car? Looks nuts either way! -
So my car is finally back from paint! This took an absolutely insane amount of work and should get it's own build thread - but I didn't build it. It was completed by Troy @ https://scalekustoms.com.au/ I originally bought the AOSHIMA URAS Type R kit while I was in Japan, it's supposed to look like this when assembled: Now, I thought that was cool enough until I opened the box with Dismay, as there's no way I could possibly have completed it. The thing is 1/24 and has details down to the steering wheel horn button, which is a 2mm diameter sticker. I originally wondered if someone could make it at all, as is - But then things got a little carried away. It's worth noting that the model does not have an openable bonne, let alone engine bay, OR an openable boot. - Troy has worked wonders with 3D printer and presumably better eyes than I will ever have. My photos suck, so I will post up some of his in-progress ones he sent to me during the way. Unsuprisingly, he is very detailed. A lot of these are out of order. But he: 1) Made a LS engine and an engine bay appear out of thin air 2) Made the bonnet removable 3) Printed the rims I will buy in the future (or any rim you want) 4) Printed and added the wing that is going on 5) Tinted my back windows as this is what my car has IRL (privacy glass) 6) Added a licence plate. 7) Somehow did the interior 8) 3D Printed my actual seats 9) Made the exhaust under the car connect even though this is likely invisible. 10) Created a boot with my fking battery box, power steering reservoir, subwoofer and toolboxes back there. To say it's insane is an understatement. And I f**ked it all up because when I was re-mounting the wing (it broke in transit) I spilled glue everywhere and ripped paint up and Gregged the rear half of the car. Which about makes sense. Also, this arrived on the same day. Quite the change from: I spent 16 hours per day over the next 3 days pre-christmas putting the interior back together, mounting lip, fixing various bodykit problems with window mouldings, etc. and servicing, rebuilding my 370z brakes to go on the car 'soon', messing with heights to check clearances for new wheels, etc. I also had a foray into mounting wiper-mounted washer jets which was an absolute disaster. The bodyshop has welded (and painted) over the stock jet locations for reasons unknown to everybody (i.e they forgot) I also wanted to wire in the oil pressure sensor on Christmas Eve which was a BAD IDEA. You do not know terror like pulling your ECU apart, pinning in half-fitting pins that aren't the right ones, but trying anyway because it's Christmas eve, putting your ECU back together and having a no-start condition with a fuel pump not priming. Then you undo all your work and the fuel pump still doesn't prime. So after all that terror and horror and pain and tedious disassembly, the issue was the relay in the boot which seems to have died/stuck when I was turning the car off and on about 700 times testing shitty washer jets. I also re-wired the fuel pump power plug which fell apart in my hands. I am very happy I had 3 extra pre-made ones from a few posts/last Christmas's breakdown. https://bluewireautomotive.com/products/10-x-pcm-ecm-ecu-terminals I have put an order for these in, so I can actually add the pins to the ECU properly. The commodore ECU does not have the pins for Oil Pressure via ODB2. However the ECU can support it if you create the pins and wire them in. So for round two, and somehow attempting to route that into the engine bay through my impossible engine bay grommet is a fight for another day. It's 40C in Melbourne tomorrow, I am half tempted to drive the car with the aircon on to deliver presents to my partner's family and see if it helps with the overheating-on-40C-days-in-traffic-with-aircon-on-only issue that the vents were intended to solve. Do I feel lucky?
-
 Yes, while being... strictly unnecessary. Tuning is a bit like quantum physics. You don't need to understand what Schroedinger's equation actually means. You just need to run the computation and accept the answers. With tuning, you just push page up/down until the exhaust tells you that you've got the fuel right. The VE can stay hidden behind the curtain like the Wizard of Oz and you'll never need to know what he looked like.
 -

By joshuaho96 · Posted
The second part yes, the first part about easy VE calculation is something I've seen a few people talk about online.
-


Recommended Posts
Create an account or sign in to comment
You need to be a member in order to leave a comment
Create an account
Sign up for a new account in our community. It's easy!
Register a new accountSign in
Already have an account? Sign in here.
Sign In Now