
Clear Indicator Lense For Series 2 Project

Announcements
-
Similar Content
-
-
Latest Posts
-

By Dose Pipe Sutututu · Posted
Oh yeah forgot to also mention need to also unplug the IACV as well. Thanks for the reminder @MBS206 Unplugging the TPS takes it out of closed loop so you're able to screw down the IACV without the ECU trying to add/subtract timing to maintain the idle (not sure PowerFC can even do this, but Nistune and the OEM definitely does) -
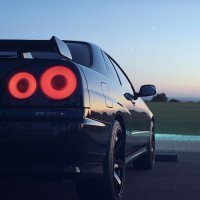 For sale is my 1999 Nissan Skyline R34 GT-T, tuned to 234 kW / 313 hp. I've had the car for a few years as my daily driver. The car is original (as far as Skylines go), with only a few minor upgrades to enhance performance and driving experience, as typical for such a car of its age. Overall, it is in great condition with no body rust, thanks to its earlier import date. It features a top-notch security system (not literally, but it's great!) with remote start and still functional 4-wheel steering via HICAS. It comes with several performance and handling upgrades, including: Hypergear 450HP Turbocharger running 17 PSI boost, installed mid-2021 by Jaustech 550cc injectors Nistune ECU Front-Mount Return-Flow Intercooler X-Force Stainless Steel Exhaust Upgraded engine mounts Bottom end bearings replaced BC Coilovers Lenso DR1 rims Bridgestone Potenza Adrenalin RE003 TL 245/40R18 97W tires, fitted early 2023 The interior is mostly stock, with a few additions: Viper Satellite Tracking System with remote start Bluetooth Double-Din Touchscreen Head Unit Steering wheel cover Cons: A few paint imperfections here and there Driver’s seat shows more wear than the others. It's not torn at all, but I've added a seat cover to protect its condition. I also have a CarVX Vehicle History report available for serious buyers, so you don’t need to purchase it yourself. Price: $26,000 ONO.
 -

By TurboTapin · Posted
I've had two suzukis in the past have an extremely hard time turning over and not starting after sitting for a few weeks. Ended up the alternator would seize up causing the starter to force. Same issue both times. Maybe they're sourcing their alternators from the same place... -
 Ah right. Maybe my rb just loves chewing through batteries lol.
 -
 On the R34 can't you just unplug the IACV? This is the way I've always done it on the R33. Disconnect IACV, get it idling around 650rpm, and then do a power reset on the ECU to get it to relearn idle (factory ECU). The big reason no one has touched on as to why you'd want to get the base idle right, is that it means the computer needs to make smaller adjustments to get a good idle at 700-750rpm. Also, cleaning the IACV won't normally make the car suddenly idle lower or higher. The main issue with the IACV gumming up is that the valve sticks. This means the inputs the ECU gives, aren't translating to changes in air flow. This can cause idle choppy ness as the ECU is now needing to give a lot of input to get movement, but then it moves too far, and then has to do the same in reverse, and it can mean the ECU can't catch stalls quickly either.
-


Recommended Posts
Create an account or sign in to comment
You need to be a member in order to leave a comment
Create an account
Sign up for a new account in our community. It's easy!
Register a new accountSign in
Already have an account? Sign in here.
Sign In Now