
Announcements
-
Similar Content
-
-
Latest Posts
-
 Unfortunately haven’t taken pics yet after it was finished. All the edges are hemmed nicely, just had to cut holes for the gear shifter and seat bolts and seat belt bolts in the rear. The molds seem like they’re done with steam and a layer of glue on the underside to hold a bit of shape but still soft enough that it’s a good fit when it’s all pressed down.
 -
 Got any pics of the carpet fitted?
 -

By Dose Pipe Sutututu · Posted
When's the rear mounted turbo kit coming? Needs dose and V8 chop idle lol. -
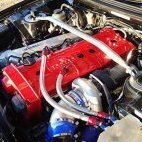
 I was very unimpressed with how the car came up from the A pillar forward, before I hit things (twice). It all has to go. It had to go, but now it has to go... more. So we finally found the very first Shennanigans with the entirely perfectly setup engine that had no problems being pulled apart to improve on 'was perfectly fine'. Cam bearings looked a bit... stock. Which isn't entirely bad given they were stock and this is a ~20 year old engine. So new cam bearings are on the way because it's somewhat difficult to get to this stage to do it later, and it will trash the block. It was quite unusual that it wasn't done when the perfectly new-looking VCM cam was originally installed by [unknown] What IS unusual is the cam that was installed there was advanced SIX degrees. As to why there is no way to know.. however it could have been @Dose Pipe Sutututu's mate who wanted a larger cam sound but also wanted it to come on earlier to be more usable. This is my dyno sheet with the previous setup - This cam is not supposed to peak until 7000+ RPM, according to VCM. This is what lead me down the whole 'my heads/intake setup is running out of puff and can't support the cam' line of thinking to begin with. Anyway too late now - New cam is in! It could be rather funny if this smaller cam acts like a larger cam because it isn't advanced six degrees. In the spirit of everything is working amazingly - the COMP cam required no dialling in whatsoever. It was about 0.5 degrees advanced, which seems pretty bang on. Any adjustment either way would be further out. I'm told as a chain breaks in it ends up regarding back about 0.5 a degree as the chain breaks in, making it bang on. In the spirit of everything was previously working amazingly - The timing gear that was taken out turned out to be was an N-Motion double timing chain kit, with adjustable cam gear (which is how it was 6 degrees advanced) and all looks entirely perfectly new. It also had a Torrington bearing, which was one of the reasons I ended up getting the Cloyes kit which they used in the C5R 24 hour racecar - Because I couldn't confirm what was in the engine when talking to Tony Mamo. I did believe however it was a Double chain kit of some kind... but found no supporting documentation or evidence for it.
 -
I recently did this to my R33 with the full set from Car Mats Direct, they can't do the vinyl anymore that's advertised on the website due to a supplier issue so I ended up with the Black Loop Pile which looks great. I went all out with rubber sound deadening sheets from Repco and also added the sound deadening foam layer option with the carpet. Makes a world of difference and got rid of all the weird smells in the 29 year old interior. It was a bit of work but I'd 100% recommend it, Car Mats Direct had awesome customer service and quick postage. Replaced my seats with some sporty ones from Autotechnia while I was at it, feels like a new car.
-


Recommended Posts
Create an account or sign in to comment
You need to be a member in order to leave a comment
Create an account
Sign up for a new account in our community. It's easy!
Register a new accountSign in
Already have an account? Sign in here.
Sign In Now