Jump to content
SAU Community

Recommended Posts

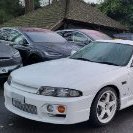
I've been watching this forum quite a while, but only became member since I finally found in love with my 350gt V35 2004. So here is my intro of the baby, any help to my questions down below would be much appreciated. Also any suggestion on mods would be precious to me :)

551209_4328431890476_98586128_n.jpg

313266_4328432010479_1774616636_n.jpg

Here is what she looked like when she's in Japan

557511_4328432650495_132798284_n.jpg487980_4328433130507_78504688_n.jpg182171_4328433490516_280051694_n.jpg

1 week after I got her

599351_4331802294734_1538868441_n.jpg

was much hesitating to choose between Injen or Typhon K&N but finally got the short ram from Injen, sound beautifully, material definitely made of high quality stuff, plug-n-play installation

250728_4561011224814_2018857980_n.jpg285578_4561011944832_491552995_n.jpg404033_4561012504846_1376356324_n.jpg485832_4561014024884_357025116_n.jpg223862_4561030265290_721182667_n.jpg

1 month of possession, and here she is.

I would love to put on new front bumper and/or front lip and rear carbon diffuser but for now, she just recently broke my bank, cant afford nothing really :D, plus next month rego is due :((

time for questions. Please help

1) I'd like to change the HID kit, not too sure if there is an aftermarket HID already or not , but apparently the bulb shoots out 6000k white I believe. Anyhow, anyone can recommend a good brand on D2R HID kit, local or international, i dun really mind. Beside, should I choose 35w or 55w coz I heard 55w is 30% brighter, but it could fry my wiring if wasnt installed properly. I myself like the idea of 8000k 55w, coz its brighter but no blue tint like the 8000k 35w.

2) With bumper material, I know FRP is the same as fiberglass, so really i only have polyurethane or abs (which is extremely rare to find) ?

3) is that right that bulb replacement for rear tailight requires me to unplug the entire light outs of its house ? I attempted but seemed quite hard (I dun have any tool kit :()

4) I will soon change my tyre/wheel set (up until the tyres wear out), so please gimme some sort of suggestions. here is what i like 1995191005E020.jpg

Im a bit confused whether i should go for 18 or 19, Indy from ISMotor racing suggested me to go 18", but i like the PIMP look of 19". also how to choose the offset ? What i want is a normal-looking at the front, and deep dish at the back, like many other RWD street-racer. also does 19" means more petrol consumed and since they are heavier, they'll make the car slower ?

5) Im currently running Potenza at the front and Yokohama S-Sport at the back (that's how i got the car). So im quite worried once i have to change the tyres, its like 400$ for a rubber, that's literally ripping my wallet apart. Well honestly I have nothing to complain about the quality of the rubber im currently running but yea, any where i can get these kinds of wheel for a minimal price ?

6) do performance spark plugs (such as Bosch or NGK) improve the car performance a lot ?

7) Im driving quite normal at most of the times, but fuel consumption is round 14 15 per 100km, is that normal :(...

8) Any other suggestions to improve the look/performance without spending a massive amount of $$ ?

Thank god they got rid of the wing on compliance.

It's hard to "recommend mods" do your own thing, be different and go your own way. Most of the questions you've asked can be answered if you try the search engine on this forum and on google. G35driver.com is also a very good forum with loads of info on our cars.

Those rims, i think are VarrsToen, someone correct me if i'm wrong. You can pick up a set pretty cheap, 19's will look much much better than 18'' and fill the guards a lot better. Tyres are expensive, check out www.theweeldeal.com.au very good priced tyres.

Love the white, welcome to the forums.

EDIT: Injen is awesome, i have an Injen CAI.

Edited by Seano350GT

6). No, performance spark plugs do not increase performance AT ALL.

7). 14 to 15l/100km is very high - most people run from 9-13l/100km depending on highway or city travel. But it will only read l/100km if you have had the English conversion done - if your screen is still in Japanese then it is in km/l - in which case 14-15km/l is VERY good!

here is what i like 1995191005E020.jpg

I think the thing that makes this car look great is the fact that it has been lowered (and the wheels have a good offset filling the guards).

I have just got new rims. One thing I found was that the rims I bought, I liked a lot (Stance 5ive in sliver and black), but they ONLY came in a set offset; they were also more expensive (450-550 each rim in 19"s). On the other hand, I could of gone for cheaper rims (around 250-350 per rim) that would of had a custom offset. I also learnt that 19" rims are a bit of a orphan size as compared to 18's or 20's, so you are more limited in choice and I would guess in tyre choice as well. One thing I am really happy about with my choice is how great they are in regards to break dust. I previously had chrome wheels with a dish, and it was a constant battle with brake dust.

Just for reference, Tempe tyres do 245 35 19' for a little over $200 http://www.tempetyres.com.au/products.php?Falken%20FK452

7). 14 to 15l/100km is very high - most people run from 9-13l/100km depending on highway or city travel. But it will only read l/100km if you have had the English conversion done - if your screen is still in Japanese then it is in km/l - in which case 14-15km/l is VERY good!

I personally have an issue with my fuel guage readings (quite common I have read), so I think my readings are a little bit random. Around the city, I get about 14-15l/100km but on the highway I can get that down to 9 or even in the 8s. Edited by vee35

6). No, performance spark plugs do not increase performance AT ALL.

7). 14 to 15l/100km is very high - most people run from 9-13l/100km depending on highway or city travel. But it will only read l/100km if you have had the English conversion done - if your screen is still in Japanese then it is in km/l - in which case 14-15km/l is VERY good!

+) so what does performance spark plugs do? which area does it improve ?

+) For the record, I filled up full tank, refilled again after doing 150km and it costed me 23l, so yea works out to be about 15l per 100km. I live in Parramatta and travel often to city, so i would call it city driving rite? Im not grounding the pedal very often by the way, this is kinda frustrating, provide I fill V Power 98 all the times Y_Y

Generally speaking performance spark plugs are a higher heat range and are suited to engines utilising a supercharger or turbocharger. They will also be gapped smaller so you don't have spark/ignition issues. As far as I know there is no need/benefit for them on a non-FI car.

Yes that is AWFUL fuel economy. Get your car on a dyno and get them to look at possible causes and your air/fuel ratios. Sadly your O2 sensors might be stuffed, which is a very bad thing since we have 4 of them and they are around $400 EACH. I use my car for work so do a lot of sitting around idling with the a/c on, plus I do almost exclusively city stop/start driving, and I still average 12-13l/100km. And I drove it like I stole it most of the time :)

I went to IS Motorracing to do my 1st car service after purchase, costed me $600 only for fluids, Indy - the owner didnt even lift the car up, nor did he drive it out to test, to tyre pressure check no any other check, so i was quite surprised yet convinced by his statement that my car is absolutely fine. I mean i replaced the air intake which it should thereotically improve the fuel economy (provided by normal driving) yet i still found this kinda fuel consumption is awful :(. if really air sensor is the problem then im screwed :(

If he charged you for that, then you were SERIOUSLY ripped off. A basic service like that should be under $200 and take less than an hour.

No, replacing your air intake does not necessarily improve your fuel consumption at all. In fact if you took the stock air box off and put a pod on, then you have probably decreased performance. All the reading I have done on G35driver.com and sites like that is that unless your pod is fully enclosed from the engine bay with cool air ducted into it from the front of the car, then you are probably sucking very hot engine bay air into the intake, which will result in decreased performance.

the reason I didnt complain was because actually after being serviced, the car was much more responsive, drives smooth and newly installed air intake gave me a roaring factor, which is very exciting. but yea, service took me about 1.5 hours as I watched from A->Z, but absolutely no under car testing, no driving out, no brake check or any other check. the fluids they use was royal purple. I mean they spoke with honesty and didnt seem to be a rip off deal. and he got great reputation all around sydney, none of customer saying bad thing at all . so yea, im so stuffed up :(

and O2 sensor is different with MAF sensor I believe rite ? MAF sensor i quikly ebay check and found few used parts for < $100, or brand new <$200, but O2 sensors, there are 4 it says, 2 at front 2 at rear, and costed near $400 like u said for a set :(...which will once again rip my recovering wallet apart.

another question is that My air con doesnt always reflect the temprature very well, sometimes 24 is warm but sometimes its cool. each time i notice, i tried to lower down but usually they do no reflect changes very quikly, or not at all (for small change, such as 24 down to 23). any thought, nitecrawler :)

If the $600 included the intake, then it is not that bad a deal (depending on what it is).

No idea on the air-con, but could be the lower part of the trim under steering wheel has been removed and put back at some point in the past (to get to the wiring under the steering column), and the air temp sensor pipe that connects to it may not be connected.

ANY question you can possible think of about V35s/G35s has already been asked and answered on www.g35driver.com - I suggest you go do a HEAP of reading in the 2003-2007 G35 section for every possible thing you ever want know about our cars.

http://g35driver.com/forums/g35-coupe-v35-2003-07-14/

soz for making a misunderstanding, i purchased the intake myself, brought it there and get help installed. Just checked the receipt and it says $200 royall purple engine oil, $132 each for transmission fluids and brake fluids, $60 to install intake and few small stuff. so yea, didnt get a chance to get my car checked thoroughly.

I will come to him soon to see how he responses :)...anyway, thanks so much NightCrawler (^_^)

  • 2 weeks later...

and O2 sensor is different with MAF sensor I believe rite ? MAF sensor i quikly ebay check and found few used parts for < $100, or brand new <$200, but O2 sensors, there are 4 it says, 2 at front 2 at rear, and costed near $400 like u said for a set :(...which will once again rip my recovering wallet apart.

Does the Series1 run A/F sensors for the 2 fronts or just standad O2 sensors? I had to replace an A/F sensor in my S2 a while back and bought it from ConceptZ. for much less than $400.

http://www.conceptzperformance.com/Cart/description.php?II=7431&Car_Type=NIS350&UID=20120925144953101.163.4.28

The rears should be cheaper as they are just an standard narrow band O2 sensor, and are really just there to confirm the Cats are working, they aren't involved in tuning.

  • 2 weeks later...

Just a small update on my newly added front lip (polyurathen) and carbon fibre grill . painting was really bad on the lip so i decided to repaint it (it didnt pop out much glittering of the metallic pearl white). Yet since i've purchased full kit (pretty much all products in sale line of Meguiar's) and detailed the car (costs me few hours), not a bad idea to share how good these cleaning products were

481078_4690072731271_760727952_n.jpg

536515_4690073291285_1719314569_n.jpg

535989_4690073531291_1476007320_n.jpg

Create an account or sign in to comment

You need to be a member in order to leave a comment

Create an account

Sign up for a new account in our community. It's easy!

Register a new account

Sign in

Already have an account? Sign in here.

Sign In Now


  • Similar Content

  • Latest Posts

    • Can perhaps see how the R33 appreciators would think so.  
    • Thanks, I removed the fuse and the relay from the car and made my own circuit with them to test them with a test bulb.  I will look for the wiring diagram and go from there.
    • Jdm DC2R is also nice for a FF car compared to the regular hatches of the time.
    • Now that the break-in period for both clutch and transmission is nearly over I'd like to give some tips before I forget about everything that happened, also for anyone searching up how to do this job in the future: You will need at least 6 ton jack stands at full extension. I would go as far as to say maybe consider 12 ton jack stands because the height of the transmission + the Harbor Freight hydraulic platform-style transmission jack was enough that it was an absolute PITA getting the transmission out from under the car and back in. The top edge of the bellhousing wants to contact the subframe and oil pan and if you're doing this on the floor forget about trying to lift this transmission off the ground and onto a transmission jack from under the car. Also do not try to use a scissor jack transmission lift. You have to rotate the damn thing in-place on the transmission jack which is hard enough with an adjustable platform and a transmission cradle that will mostly keep the transmission from rolling off the jack but on a scissor lift with a tiny non-adjustable platform? Forget it. Use penetrating oil on the driveshaft bolts. I highly recommend getting a thin 6 point combination (box end + open end) wrench for both the rear driveshaft and front driveshaft and a wrench extension. These bolts are on tight with very little space to work with and those two things together made a massive difference. Even a high torque impact wrench is just the wrong tool for the job here and didn't do what I needed it to do. If your starter bolts aren't seized in place for whatever reason you can in fact snake in a 3/8 inch ratchet + 6 point standard chrome socket up in there and "just" remove the bolts for the starter. Or at least I could. It is entirely by feel, you can barely fit it in, you can barely turn the stupid ratchet, but it is possible. Pull the front pipe/downpipe before you attempt to remove the transmission. In theory you don't have to, in practice just do it.  When pulling the transmission on the way out you don't have to undo all the bolts holding the rear driveshaft to the chassis like the center support bearing and the rear tunnel reinforcement bar but putting the transmission back in I highly recommend doing this because it will let you raise the transmission without constantly dealing with the driveshaft interfering in one way or another. I undid the bottom of the engine mount but I honestly don't know that it helped anything. If you do this make sure you put a towel on the back of the valve cover to keep the engine from smashing all the pipes on the firewall. Once the transmission has been pulled back far enough to clear the dowels you need to twist it in place clockwise if you're sitting behind the transmission. This will rotate the starter down towards the ground. The starter bump seems like it might clear if you twist the transmission the other way but it definitely won't. I have scraped the shit out of my transmission tunnel trying so learn from my mistake. You will need a center punch and an appropriate size drill bit and screw to pull the rear main seal. Then use vice grips and preferably a slide hammer attachment for those vice grips to yank the seal out. Do not let the drill or screw contact any part of the crank and clean the engine carefully after removing the seal to avoid getting metal fragments into the engine. I used a Slide Hammer and Bearing Puller Set, 5 Piece from Harbor Freight to pull the old pilot bearing. The "wet paper towel" trick sucked and just got dirty clutch water everywhere. Buy the tool or borrow it from a friend and save yourself the pain. It comes right out. Mine was very worn compared to the new one and it was starting to show cracks. Soak it in engine oil for a day in case yours has lost all of the oil to the plastic bag it comes in. You may be tempted to get the Nismo aftermarket pilot bearing but local mechanics have told me that they fail prematurely and if they do fail they do far more damage than a failed OEM pilot bushing. I mentioned this before but the Super Coppermix Twin clutch friction disks are in fact directional. The subtle coning of the fingers in both cases should be facing towards the center of the hub. So the coning on the rearmost disk closest to the pressure plate should go towards the engine, and the one closest to the flywheel should be flipped the other way. Otherwise when you torque down the pressure plate it will be warped and if you attempt to drive it like this it will make a very nasty grinding noise. Also, there is in fact an orientation to the washers for the pressure plate if you don't want to damage the anodizing. Rounded side of the washer faces the pressure plate. The flat side faces the bolt head. Pulling the transmission from the transfer case you need to be extremely careful with the shift cover plate. This part is discontinued. Try your best to avoid damaging the mating surfaces or breaking the pry points. I used a dead blow rubber hammer after removing the bolts to smack it sideways to slide it off the RTV the previous mechanic applied. I recommend using gasket dressing on the OEM paper gasket to try and keep the ATF from leaking out of that surface which seems to be a perpetual problem. Undoing the shifter rod end is an absolute PITA. Get a set of roll pin punches. Those are mandatory for this. Also I strongly, strongly recommend getting a palm nailer that will fit your roll pin punch. Also, put a clean (emphasis on clean) towel wrapped around the back end of the roll pin to keep it from shooting into the transfer case so you can spend a good hour or two with a magnet on a stick getting it out. Do not damage the shifter rod end either because those are discontinued as well. Do not use aftermarket flywheel bolts. Or if you do, make sure they are exactly the same dimensions as OEM before you go to install them. I have seen people mention that they got the wrong bolts and it meant having to do the job again. High torque impact wrench makes removal easy. I used some combination of a pry bar and flathead screwdriver to keep the flywheel from turning but consider just buying a proper flywheel lock instead. Just buy the OS Giken clutch alignment tool from RHDJapan. I hated the plastic alignment tool and you will never be confident this thing will work as intended. Don't forget to install the Nismo provided clutch fork boot. Otherwise it will make unearthly noises when you press the clutch pedal as it says on the little installation sheet in Japanese. Also, on both initial disassembly and assembly you must follow torque sequence for the pressure plate bolts. For some reason the Nismo directions tell you to put in the smaller 3 bolts last. I would not do this. Fully insert and thread those bolts to the end first, then tighten the other larger pressure plate bolts according to torque sequence. Then at the end you can also torque these 3 smaller bolts. Doing it the other way can cause these bolts to bind and the whole thing won't fit as it should. Hope this helps someone out there.
×
×
  • Create New...