Jump to content
SAU Community

Recommended Posts

Hi all,

I wrote a long and awesome back story about getting this car and the drive back from QLD but I hit the back button on my mouse and lost it, so you get the brief version of the post...

  • Saw car had a price drop
  • Made and offer and it was accepted
  • Flew up to QLD with a mate one weekend
  • Drive car home via Newell Hwy (never again on this route)
  • Blew a coilover on a pot hole, got pulled over by the cops, smelt like petrol fumes. Made it home by Sunday night.
  • Plan is to track it next year and tidy it up for club rego at some point so I get more use out of it.

Goodies list....

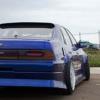
Blue (lexus ISf colour) 88 model A31 cefiro

ENGINE / GEARBOX

Series 2 RB25det gearbox with near new NPC button clutch, also just fitted a new centre bearing.

completely forged rebuilt series 2 rb25det engine. (same engine that matches the mod certificates)

scat rods, JE forged pistons, Total seal rings. All balanced with the clutch flywheel and balancer all attached.

Engine sits at a good 8:7:1 ratio so still responsive and not lazy off boost.

head had all tests done for warping and cracks etc. and all new valve guides fitted.

permaseal multilayer steel headgasket

Brand new nissan standard oil pump

front and rear main seals

new tensioner, idler and gates racing timing belt

new water pump

new cam cover seals and cam gear seals. etc.

wrinkle coated cam covers.

WALBRO (genuine) intank fuel pump mounted properly to avoid any fuel surge and hardwired to battery (still under ecu control)

Apexi power FC ECU with handcontroller

Currently tuned to 366hp on 21psi

Greddy copy front facing plenum that has had the ports cleaned up on and the manifold faced for proper seal to the head.

SARD 850cc injectors in standard fuel rail

Drift fuel pressure regulator with associated speedflow lines

D1 remote header tank for the cooling system.

Massive 52mm alloy radiator and still running standard clutch fan. (thermos simply dont work trust me!!)

splitfire coilpacks

GARRETT GT2876r dual ball bearing turbo with internal wastegate and standard nissan dump pipe rear housing.

VH41de airflow metre with custom pod adaptor and filter

Greddy profec electronic boost controller with incab adjustment.

Full 3inch exhaust from the turbo back with a hotdog style muffler and twin 3" drift pipes out the rear

Oil relocation kit and 15 row cooler

PWR powersteering cooler

new engine mounts and gearbox mount.

Allstar performance custom alloy catch can with proflow filter and speedflow lines.

BRAKES

Recently had a full overhaul. =) the standard stuff was pathetic

RDA slotted front 33gtst rotors and bendix ultimate pads

RDA slotted rear 33gtst rotors with brand new genuine handbrake shoes

fitted an r33gtst master cylinder and booster aswell

Has full 5 stud conversion. aftermarket front hubs with new wheel bearings

rears are s14 5 stud hubs with gktech extra long wheel studs.

locked r200 r32 diff with 5 bolt half shafts

SUSPENSION

S13 JIC MAGIC Coilovers. Base height adjustable front and rear and dampening adjustable think they are 8kg fronts and 6kg rears from memory but relatively comfortable on the street anyway

SELBYS sway bars with 3 way adjustment. (these thinks are awesome)

unknown brand front strut brace

adjustable castor arms

adjustable rear camber arms

GKteck hicas elimination kit (intern gives u adjustable toe arms)

hicas lock bar

Solid subframe collars.

INTERIOR

Full safety 21 6 point bolt in rollcage - Sold this as I will get a weld in CAMS cage next year

Rear seats removed

Stock seats

Boost guage (autometer)

Oil pressure and water temp (supercheap specials =P )

MOMO pedal set.

EXTERIOR / WHEELS

Factory metal guards have been flared roughly 50mm in the front and 80mm in the rear

these have been properly done with the standard bodywork cut, stitched then glassed/filled and painted.

full URAS bodykit with spare kit aswell.

DMAX roof wing

carbon wrapped pillars.

Wheels are genuine SSR Vienna schnitte wheels

rears are 18 x 10.5 +5 with a 8mm spacer to clear the bigger brakes (hence the long wheel studs)

Fronts are 18 x 9.5 +30 with a 45mm spacer to bring the trackwidth inline with the rears.

Future plans

  • Buy new front seats (at least drivers so I can actually fit in the car comfortably)
  • Get it re-tuned by Chequered so I'm confident to thrash it
  • Fix speedo cable so it works
  • Fix the tacho which is stuck at 3k rpm
  • Get new coilovers
  • Clean up the interior and replace a lot of the trim pieces (leaving out the rear seats)
  • Replace the locked diff with a 2-way
  • Weld in CAMS cage

Some images to enjoy...

Stopping off for some food after finally finding a tyre shop that had 16in tires to fit the stockies. $400 I didn't want to have to spend on stock tires but we were desperate :(

post-18824-0-28439500-1355036427_thumb.jpg

Stayed at Moree overnight and stopped off at Parkes quickly the next day.

post-18824-0-66914800-1355036448_thumb.jpg

Reached Nagambie about 8pm Sunday after leaving Moree at 6:30am and had a fuel / food stop

post-18824-0-59748700-1355036547_thumb.jpg

After putting the car in the garage and not touching it for a week I thought I should put the old rims back on it and take it for a spin while it still had rego and a cover note.

post-18824-0-71666900-1355036605_thumb.jpg

post-18824-0-89351700-1355036617_thumb.jpg

post-18824-0-31856600-1355036645_thumb.jpg

Link to comment
https://www.sau.com.au/forums/topic/415275-cefiro-3-cant-stay-away/
Share on other sites

  • Replies 47
  • Created
  • Last Reply

Top Posters In This Topic

Top Posters In This Topic

Posted Images

good to see your in another ceffy

plan on owning it longer then the black one ? :P

Haha for sure! Got the house with a garage now so no reason to sell the car. Want to make it something pleasant to drive and slide. Right now it feels like a bit of a tin can.

Edited by konect

Haha for sure! Got the house with a garage now so no reason to sell the car. Want to make it something pleasant to drive and slide. Right now it feels like a bit of a tin can.

nice, congrats!

i bet you claimed the garage so the misses cant even enter it lol

  • 2 weeks later...

Also activities happening over the next week or so....

1. Purchasing weather shields

2. Welding up holes in the floor where the bolt in cage was

3. Removing the carpet over where the rear seat was welding in some sheet metal to fill in the hole that goes through to the boot.

4. Filling AC holes in the firewall and any other holes I can find to try and stop the petrol smell coming through.

  • 3 weeks later...

ooh , that looks nice , so number 3 eh? which one was your favorite?

That's like saying "which kid is your favourite?"! I expect this one will become my favourite because it is so setup but I can't go past my first ceffy as the current fave. It was my first import, learnt how to drift in it, learnt the punishment of speeding in it (haven't had a speeding fine since I sold it in 2007!) and learnt how expensive imports really are.

Getting reeeeally keen to drive this car though and really see what it can do on the track.

  • 2 weeks later...

*insert James May voice* and now its time for THE NEWS!

  • Pulled out the dash cluster to see if I could fix the tacho problem and I can't, so I'm going to try a new cluster - let me know if anyone has one
  • BRIDE Artis arrived today. Just gotta patch a hole in it and then it can be installed
  • Went hunting for 2 grommets in a 7mm and 40mm size and got no where - any one know where I can get closed grommets?
  • Washed the car for the first time since I drove it home from QLD and the bugs came off quite easily
  • Moved 1 step closer to club rego
  • Thinking I might sell the wheels and go a bit smaller for the street
  • WTB a pair of indicators for the front bar if anyone has some for sale

Going to same some bickies and get it tuned next. Stay tuned!

Update.

Seat has arrived and been fitted complete with pimp padded tiger patch I got my gfs mum to sew for me. I ended up glueing the rip that was there closed first, then glueing the patch on with upholstery glue and seems to hold really well. So good to not hit my head on the roof any more but I've got the rail up for sail as I want to get the FG super low for even more head clearance.

Next item is a retune but probably wont be for a few months >.<

Pic...

post-18824-0-21709200-1360845364_thumb.jpg

Create an account or sign in to comment

You need to be a member in order to leave a comment

Create an account

Sign up for a new account in our community. It's easy!

Register a new account

Sign in

Already have an account? Sign in here.

Sign In Now


  • Similar Content

  • Latest Posts

    • Howdy friends, So another weird one today, I was looking into replacing some broken clips holding the front grille for the R32 GTR (part number 01553-03831), and noticed the brackets which are supposed to hold the grille in place were also missing 😑. I do recall seeing this issue many years ago, but didn't fix it at the time. A quick look on eBay and I was able to find the genuine brackets, along with all the screws which suited the headlights (part numbers 26042-08U05,26092-08U05). Happy days!....  Once they arrived however there was an extra nut in the packaging which implied that there should also be a bolt or a stud, and sure enough, after a bit of searching I found this thread from 2013, and @Ants clearly shows a stud should be present. Reading around a bit more, it's possible the headlights on my car are the "povo pack" headlights as mentioned by @funkymonkey in this thread way back in 2008. This could explain why the studs are missing on my set of headlights. Looking at the headlight diagram I wasn't able to see a suitable part number for the stud itself. The headlight did indeed have a recess that looked like it would accept a stud, but interestingly no thread or anything obvious how the stud would be affixed to the headlight, I suspect it may have been glued in, press fit, or melted into the plastic at the factory. Another member may be able to clarify if they happen to have a genuine set of N1 headlamps. The only thing we have to work with within the recess is a keyway which likely is there to prevent the stud from rotating within the recess. In any case, back to 3D printing, I put together a model which acts like a pug with a friction fit inside this recess, making use of the keyway so it doesn't rotate while tightening a bolt. Printing in TPU will allow it to slightly swell making a nice snug fit without cracking the part. I've designed the adaptor it to accept an 20 mm M6 bolt (stainless with a cap head in my case), as opposed to the standard M5 stud and I made use of the standard galvanised split washer that came with the genuine brackets from Nissan. Once the bolt and screws were all in place, giving the bracket a gentle shake gave the classic "shaking the car" feeling, very solid, which gives me confidence this is going to be able to hold on much better than the janky solution which seems to have been here for the past decade or so. Overall I'm really pleased with how this turned out and maybe there are more people out there running these headlights without a centre stud at all! Link to the freely available model on Printables: Click here Regards, Sean  
    • Hey everyone, This is my first post apart of the introduction. I tried searching a bit on the forum but couldn't really get a straight answer. I got the car to my mechanic as I felt it being weak. It seems that it was missing on two cylinders due to the injectors. I had all my injectors clean and the car runs much better. The mechanic also confirmed my suspicions that the cat is clogged and needs to be tackled asap. The cat rattles a bit and the hot exhaust warning frequently lights up when driving after getting the injectors clean. In my introduction I was asked about what modification I might be interested in and mentioned a cat delete. From what I was told, this is not really beneficial on the RB20DE and there are more cons than pros.  Could perhaps anyone give some suggestions on what the best course of action would be since the current cat is toast and needs to be removed/replaced anyway? I can also sometimes smell a strong smell of fuel, but I'm not sure if this is related.
    • Hope the cans went down well at least 
    • 255 can't go wrong with the price.
    • When I was replacing my pump due to being stranded in the wrong state, I went with the Deatschwerks 320lph kit. It is a direct plug in to the stock wires, harness, everything. It comes with a plug... but you can plug the OEM plug directly into this thing. https://justjap.com/products/deatschwerks-dw300-fuel-pump-nissan-s13-silvia-r32-r33-r34-skyline-c34-stagea?currency=AUD Downside: Won't actually flow that much on boost if you want to push it on E85, but it's comparable to the 040/255 etc. Little more actually.
×
×
  • Create New...