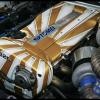
My Rb26Dett Build 650 To 700Hp 9000Rpms
Announcements
-
Similar Content
-
Latest Posts
-
This is a story of my life things, I learned eventually (thanks to someone calling me out) that my enthusiasm for discussing and sharing ideas that it came across as arrogance and I'm like... WTF?! One thing I'm pretty sure I justifiably pride myself on is knowing that everyone will have things they can teach you, and you're always going to find out that something you think you know turns out wrong - you just don't know what it is until you get there. Just the bursting enthusiasm that comes with ADHD when you hit something that gives you dopamine dumps can come across like you think everyone else is wrong or don't matter. But yeah, I'm a software engineer by trade and also do tuning in weekends and 100% have long had a reputation for quickly making connections when resolving problems or forming solutions that I've sometimes had to take people form a long walk from start to end to explain how I ended up where I did when it's seemed "too simple" when I've stated my initial case, and had the "WTF" type reaction when they've realised how much was actually considered haha. My reward is that I get all the curly problems thrown at me.
-
Wives never seem to find things funny. Especially when they're trying to sleep, and you've found the new funniest thing ever. I've never seen someone be able to get try and be cranky with me, while they're holding back fits of laughter... 😛 Also, I tell mine it's payback anyway. She has BiPolar. So the household can get quite emotionally wild at times 😛
-
I'm not up to date on the latest, but for basic modifications like pod filter, lower springs etc you can get a modification permit at the time of inspection. For more serious modifications you will need engineering. Intercoolers used to fall into the mod permit rule but its been a long while since i looked it up. Either way you will be able to get it registered, just a case of $300 vs $3k .
-
Hi everyone! I’m the new owner of a 1996 R33 GTS-T, I’ve purchased this car over from Queensland and brought it to Western Australia and I’ve found that there is a hole cut out in the engine bay for the FMIC that enters into the wheel well (fender liners are in the boot). For anyone that has had to get their car over the PITS here, will this be a major issue?
-
Yeah I've spotted this one too, whenever it's lotto superdraw week and I'm browsing car sales dot com for my new ride They must be dreaming, maybe it's worth 150k for the link to Brock?
-


Recommended Posts
Create an account or sign in to comment
You need to be a member in order to leave a comment
Create an account
Sign up for a new account in our community. It's easy!
Register a new accountSign in
Already have an account? Sign in here.
Sign In Now