Jump to content
SAU Community

Recommended Posts

  • Replies 51
  • Created
  • Last Reply

Top Posters In This Topic

What i usually do is a little complicated, and there's probrably easier ways.....

I copy & Paste the body onto two new layers. Let's call them Body1 and Body2.

Then what i'll do to the bottom body layer (Body1) is desaturate it. Then i'll do the same to Body2. Then on Body2 i'll adjust the levels to make it dark and adjust the highlight levels to suit. After this i'll usually get out the eraser on 2% and slowly make the really dark bits lighter. Then adjust the layer opacity til i'm happy. after this i'll merge it with Body1 and then play with the colour levels etc.

I think that basically sums up the basics of it. I play around with things ALOT, add little bits here and there, adjust this, that etc.. but that's BASICALLY how i do it.

on the first body layer (the one i just desaturate) i leave that 100%, and i adjust the top body layer to suit what looks right....

then i merge them and play with the colour and reflections...

  • 3 months later...
  • 2 months later...
  • 2 weeks later...
  • 2 weeks later...
  • 1 month later...
  • 5 months later...

OMG, THATS NOT HOW YOU MAKE PORIDGE!!!!!!!

what program are you using for that?

why not use a later edition photoshop?, select the areas you want to fill, and deselect areas you dont wanna fill by using the "alt" key, then go into edit/hue/saturation....then you dont have to just choose 1 colour, you can go through the whole scale of colours, and you can modify 3 diffferent levels to make it come out perfect!....

if you really care i can pm a better description....but f*cks me where you learnd that method...i went to QANTM for a year...they didnt teach that! lol.

ok i re-read your post....yeh not too bad...comes up good...

but try my method to see how it comes up...

you can check my chop i just posted before...

http://www.skylinesaustralia.com/forums/sh...ead.php?t=35571

take note, the colour isnt just washed over the whole car, it still looks like its actually reflectiing light...true to the colour on the car.

  • 3 weeks later...

Sorry guys but as someone posted above " I cant even make a layer " I am in the same boat. I have p/shop ver. 7 and have no clue. I clicked on new layer and nothing happens. Dont like to be a prick but can someone post a how to with a tiny bit more detail. As if you had to explain it to a moron who had never even seen photoshop before and struggled to come to grips with paintbrush. LOL Just like me.

  • 4 weeks later...

Here ya go guys, this should explain how to convert a white car to black (metallic with pearl just like normal black skylines).

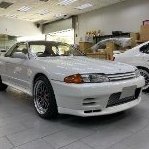
Start with the base picture.

Make a selection of the car (Saved as an Alpha channel in the PSD file). Save this selection.

Then you Make a copy of what you've selected, then invert it and desaturate it.

Once you've inverted it you'll notice that there are white bits where it used to be black, these need to be converted back to black. Use the colour selection tool or manually go in with the paintbrush and an 80% grey colour and fix up them white spots.

Once this is done create a new layer (Ctrl + Shift + N). Reload the selection (Go to load selection and load the alpha channel you saved it in). Now use the black paintbrush and just paint in solid black, go over it a few times to make sure. Now you have a black blob on top of your car, change the blending of the channel to Soft Light and play with the opacity of the channel till you get a shade of black you like.

Create another new layer. Now to make it look convincing draw a few thin lines n dots in solid white. Then use either the warp tool, wind tool or in later versions of photoshop the Liquify tool, to make the line n dots look like streaks. Set ths layer to soft light as well.

Create a new layer. Load the selection again. Now fill it with 50% grey. The go to filters and add some monochromatic gaussian noise. Keep it to a small percentage so it looks like realistic pearl effect. Now set the blending of this layer to Colour dodge or Linear dodge and adjust the opacity to something really low (below 8%). You'll notice the colour dodge reacts with the layers underneath to give it a sort of pearl like light diffraction effect.

And that's it, you're done.

Here is the photoshop file.

In case you didn't notice in the photoshop file I did before I didn't take the white spots out coz I was too lazy... as you can see the bottom of the sideskirt which was black to start with is now white.

oh yeah, the split and tootone effects are done in layers

for those who dont know how to get the layers, read this

TO ADD A NEW LAYER u just open the picture u want to put in (without closing the one ur working on), and in the LAYERS window u click and drag it onto the canvas ur using. ittl appear on it.

to resize and move it go edit>transform>scale and ull get the dots around it, so u can resize and move it. when urve got it, hit enter

to merge two layers together, get ur first picture up, then insert a new layer with the above procedure. then click on the mask button in the layers window, and make sur the mask (the whte square next to ur image in layers window).

to see ur other layer underneath it, get ur paintbrush, and have black up top (not in backround) then paint over it and ur first layer will appear underneath it

so....yeah hope ive helped someone

Create an account or sign in to comment

You need to be a member in order to leave a comment

Create an account

Sign up for a new account in our community. It's easy!

Register a new account

Sign in

Already have an account? Sign in here.

Sign In Now


×
×
  • Create New...