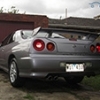
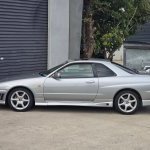
simonl Posted February 16, 2014 Share Posted February 16, 2014 Hi everyone, I'm a new member and Skyline owner! So I purchased my first car on Feb 6th of 2014. It was a (basically) complete stock R34 25-GT Skyline from a mature owner not far from my house. The only modification done to the car was a headunit put in from the owner in Japan and some weird DVD player hooked up, too. The car is semi-automatic 4SPD and I have been thinking of perhaps a transmission swap, but for now it will stay! A few pictures of when I first got her; Since owning the car I have made a few mods (this is my first time modding a car); - Headunit with sub / amp - HID lights at footwells on both driver and passenger side - Temporary plasticdip rims until proper ones will be bought - Removal of spoiler Future plans for the car; - Rims - Coils and lowering (heard the stock springs are awful?) - HID lights above rear number plate - Center console and dash makeover - Tidy up & touch up of body work - Maybe a transmission swap (Auto --> Manual) At the moment the car looks like this! Apologies for the crappy iPhone pictures. I'll grab a proper camera soon. Would also love some ideas for any mods to do! Link to comment https://www.sau.com.au/forums/topic/439220-my-first-car-build-diary-r34/ Share on other sites More sharing options...
simonl Posted February 17, 2014 Author Share Posted February 17, 2014 (edited) So my first mod for the car was taking off the spoiler. Grabbed a friend with some tools and we eventually managed to squeeze the middle clips off the spoiler and take it off. Although taking off the spoiler resulted in a mark which I've yet to try get rid of, and a very amateur filling job for the time being. And now it looks like this from the rear. Far better in my opinion! While taking off the spoiler I realised that the damn boot keyhole barrel has come off a little bit. Probably best I actually glue the rim lightly and stick it back on! Edited February 17, 2014 by simonl Link to comment https://www.sau.com.au/forums/topic/439220-my-first-car-build-diary-r34/#findComment-7202255 Share on other sites More sharing options...
simonl Posted February 17, 2014 Author Share Posted February 17, 2014 Next up was installing the new headunit and sub for the car! When I bought the car, it came with 2 headunits. The top one was from the previous owner (outdated too) and the bottom one was a Japanese headunit which didn't work at all! So before the replacement it looked like this; Here's the new and updated headunit! After a fiddly installation this is what it looks like now! Still need to find a head unit filler for the bottom so it hides all the awful and untidy wiring, lol. Link to comment https://www.sau.com.au/forums/topic/439220-my-first-car-build-diary-r34/#findComment-7202263 Share on other sites More sharing options...
wild31 Posted February 17, 2014 Share Posted February 17, 2014 Good to see your not wasting anytime mate, keep the mods coming! Link to comment https://www.sau.com.au/forums/topic/439220-my-first-car-build-diary-r34/#findComment-7202640 Share on other sites More sharing options...
Artic Choc Posted February 18, 2014 Share Posted February 18, 2014 hey buddy great base to your build. i like your plans for it (being on your P's?) keeping it simple and clean.maybe some ideas for you are:LED tail lightsxenon headlights (if they are non xenon)clear front/side indicators (orange ones are horrid in my opinion)get a gtt gauge cluster 2nd from ebay/sau member and do a gauge conversion (much better looking then the flat top thing n/a have)use some paint dr / soft cutting compound rub over the glue/residue left from the spoilerpaint the dash, its simple enough and looks much better then the peely shit thats already on itall in all keep going mate will be keeping an eye on your progress happy modding Link to comment https://www.sau.com.au/forums/topic/439220-my-first-car-build-diary-r34/#findComment-7203502 Share on other sites More sharing options...
krzysztof Posted February 18, 2014 Share Posted February 18, 2014 Probably best I actually glue the rim lightly and stick it back on! hey best to order yourself the clip that holds the boot lock against the bootlid... glue wont last long Link to comment https://www.sau.com.au/forums/topic/439220-my-first-car-build-diary-r34/#findComment-7204207 Share on other sites More sharing options...
simonl Posted February 19, 2014 Author Share Posted February 19, 2014 Good to see your not wasting anytime mate, keep the mods coming! Thanks for the support! hey buddy great base to your build. i like your plans for it (being on your P's?) keeping it simple and clean. maybe some ideas for you are: LED tail lights xenon headlights (if they are non xenon) clear front/side indicators (orange ones are horrid in my opinion) get a gtt gauge cluster 2nd from ebay/sau member and do a gauge conversion (much better looking then the flat top thing n/a have) use some paint dr / soft cutting compound rub over the glue/residue left from the spoiler paint the dash, its simple enough and looks much better then the peely shit thats already on it all in all keep going mate will be keeping an eye on your progress happy modding Oh yeah, nice additions to the list there! The clear indicators is something I should invest in, I too don't like the orange, haha. hey best to order yourself the clip that holds the boot lock against the bootlid... glue wont last long I have the clip but honestly have no idea how to put it back on because it just fell off when I took my boot lining off Link to comment https://www.sau.com.au/forums/topic/439220-my-first-car-build-diary-r34/#findComment-7204613 Share on other sites More sharing options...
simonl Posted February 19, 2014 Author Share Posted February 19, 2014 So I put some nice lights at the footwells of both passenger and driver's side! Looks really nice in the dark when it's obviously showing Passenger side: Driver's side: Looks nice in my opinion! Link to comment https://www.sau.com.au/forums/topic/439220-my-first-car-build-diary-r34/#findComment-7204617 Share on other sites More sharing options...
krzysztof Posted February 19, 2014 Share Posted February 19, 2014 I have the clip but honestly have no idea how to put it back on because it just fell off when I took my boot lining off you slide it over the lock from behind the panel (inside the boot) - it'll wedge between a groove on the lock and the panel.. i wouldn't even attempt to glue it, it'll last a whole of 5mins good luck! Link to comment https://www.sau.com.au/forums/topic/439220-my-first-car-build-diary-r34/#findComment-7204702 Share on other sites More sharing options...
simonl Posted February 19, 2014 Author Share Posted February 19, 2014 you slide it over the lock from behind the panel (inside the boot) - it'll wedge between a groove on the lock and the panel.. i wouldn't even attempt to glue it, it'll last a whole of 5mins good luck! I see. I'll give it a go tomorrow when it's not pissing down with rain, haha. Thank you! Link to comment https://www.sau.com.au/forums/topic/439220-my-first-car-build-diary-r34/#findComment-7204714 Share on other sites More sharing options...
Manuel Kasko Posted February 19, 2014 Share Posted February 19, 2014 Interesting build, I personally like the wing on but I like your choices with the lights etc. Keen to see how this car turns out Link to comment https://www.sau.com.au/forums/topic/439220-my-first-car-build-diary-r34/#findComment-7205049 Share on other sites More sharing options...
simonl Posted February 20, 2014 Author Share Posted February 20, 2014 (edited) Interesting build, I personally like the wing on but I like your choices with the lights etc. Keen to see how this car turns out Thanks! I actually put the wing back on today and personally like it more now that I plasitcdipped the rims!: Today I managed to fix that damn loose boot barrel lock that was driving me insane: Clipped in pretty easily, after I realised it was meant to be clicked in horizontal and not vertical, haha. Nothing major but I wrapped my sub wire with a basic heat casing: EDIT: If anyone was curious as to how the engine bay looks, here's a few pictures. It's really clean for how old the car is! Edited February 20, 2014 by simonl Link to comment https://www.sau.com.au/forums/topic/439220-my-first-car-build-diary-r34/#findComment-7205633 Share on other sites More sharing options...
Artic Choc Posted February 20, 2014 Share Posted February 20, 2014 a little bit of engine degrease and some elbow will have that looking immaculate! very tidy example though great stuff Link to comment https://www.sau.com.au/forums/topic/439220-my-first-car-build-diary-r34/#findComment-7205782 Share on other sites More sharing options...
simonl Posted February 20, 2014 Author Share Posted February 20, 2014 a little bit of engine degrease and some elbow will have that looking immaculate! very tidy example though great stuff I'll have to make sure to grab some and give it a good 'ol clean! Btw, anyone know where I could get some replacement rubber buttons for my central locking key? Doing some D.I.Y fixing atm, but I don't think it will last long, lol. Link to comment https://www.sau.com.au/forums/topic/439220-my-first-car-build-diary-r34/#findComment-7205830 Share on other sites More sharing options...
75coupe Posted February 21, 2014 Share Posted February 21, 2014 Get a new key Link to comment https://www.sau.com.au/forums/topic/439220-my-first-car-build-diary-r34/#findComment-7207117 Share on other sites More sharing options...
simonl Posted February 22, 2014 Author Share Posted February 22, 2014 (edited) Get a new key I probably should but I can't be bothered so I decided to unleash my inner D.I.Y skills! the 'drawing board': What it looked like before: What it looks like now: So it took me hours to actually think of a way to apply enough pressure to make the small receivers click. I bought 2 rubber discs from Clark Rubber which would act as the buttons. I took out the original rubber frame and tossed it. Underneath the 2 buttons I glued 2 ends of a toothpick, lol. It sounds stupid but I had to find something small and sharp so that when I press down on the rubber discs, something will click the receivers. It's a tad hard to explain but it ended up working pretty well and saved me some $$$! Edited February 22, 2014 by simonl Link to comment https://www.sau.com.au/forums/topic/439220-my-first-car-build-diary-r34/#findComment-7207418 Share on other sites More sharing options...
krzysztof Posted February 23, 2014 Share Posted February 23, 2014 Clipped in pretty easily, after I realised it was meant to be clicked in horizontal and not vertical, haha. Link to comment https://www.sau.com.au/forums/topic/439220-my-first-car-build-diary-r34/#findComment-7208302 Share on other sites More sharing options...


Recommended Posts
Create an account or sign in to comment
You need to be a member in order to leave a comment
Create an account
Sign up for a new account in our community. It's easy!
Register a new accountSign in
Already have an account? Sign in here.
Sign In Now