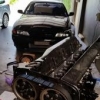
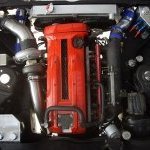
Jump to content
SAU Community

Recommended Posts

Hey guys. I've got an RB26 in pieces in the garage. I'm doing a standard rebuild reusing the pistons/rods but replacing main and big end bearings. New MLS head gasket, ARP head studs. New genuine piston rings too.

I'm about to Hone the block and clean up the deck ready for the new gasket. The Head is getting re-conditioned and the machine shop is going to take up to 1mm out of the head for me.

My question is about honing the bores. Which type of hone tools is better?

A brush type like this: 909.jpg

or the stone plate style: HoningStone.JPG

Either way I will be borrowing the tool.

Also, I've been told not to use a razorblade to clean up where the old gasket was on the deck. Incase of scratching. Is this really an issue on a cast iron block like the RB26? Someone told me to use some oil or other lubricant along with the blade to protect the surface. Someone else told me to use a stone of some description. What is the consensus here?

For those who have shaved some thickness out of the head in order to bump compression could you share your experiences? How did it change the way it drives? Is it noticeable? My other concern is how will I go getting cam timing spot on. I'm thinking some adj. gears might be on the shopping list anyway seeing as I'm keeping factory cams.

Any input would be appreciated. Thanks fellas

I'd suggest if you are using an MLS head gasket, that you take it to a machine shop and get them to surface the block properly.

It won't seem so great having done it at home when it leaks, those gaskets need a pretty damn good mating surface

Home honing is not good. Especially with the ball style tool as it just conforms to the bore rather than trueing it up.

Definitely worth paying for a hone, and as 89CAL said, if using an MLS gasket you really should have the deck faced to suit.

yeah well the original cross hatch is very visible. there's barely a glaze at all. I'm very reluctant to take the block away, tempted to assemble it as is. how bad can the surface be? It's a low KM engine that had the typical R32 oil pump failure.

before anyone flames me for this. I had a sport accident 4 weeks ago and fractured 3 vertebrae in my neck along with soft tissue damage. 3-4 months off work isn't cheap. Whereabouts in sydney would I be able to get it done without being ripped off?

can anyone share their experiences with a slight bump in compression for a standard internal RB26?

Edited by Blackkers

The material removed from the head would make no noticeable difference to how it feels or drive's,

It may possibly feel a bit more crispy than before due to being a tighter engine after rings etc.

As for honing, it will need some form of hone before fitting new rings as they need somthing to bed into. If you just assemble it as is, it will just burn oil and have heaps of blowby eventually.

And if you do it at home, the block WILL need a PROPER wash after, degrease, scrub, scrub some more, pressure wash, scrub all the little nooks (requires special cleaning brushes, like gun cleaning tool's) degrease again, oiling etc. Its not just a case of hone and wipe!

If you get a shop to do it, they can put the h6 finish (or what ever its called, cant remember) on the block to seal the gasket, power hone it to give the 100% correct cross hatch angle, and bath the block, it will look 100% brand new! And work also!

+1 to what others have said. There's no easy or cheap way to build a motor correctly to last.

It is unclear what other components and what thickness of MLS you are using. That will affect your overall compression ratio.

I ordered 9.0:1 pistons but the block and head I bought off another member were both shaved ~1mm. Combined with a 1.3mm head gasket yeilded 11.3:1! I had to shave 2mm off the top of the pistons to bring it back to 9.0:1. Be sure that your compression ratios are going to be in check if you have a modified set up.

So the block is already bored and honed? You say you already have the cross-hatch pattern. Again, I asked my shop to use a torque plate, check tolerances, true bores and hone. They had to do an additional 0.0004 to bring the bore back into round.

The material removed from the head would make no noticeable difference to how it feels or drive's,

It may possibly feel a bit more crispy than before due to being a tighter engine after rings etc.

As for honing, it will need some form of hone before fitting new rings as they need somthing to bed into. If you just assemble it as is, it will just burn oil and have heaps of blowby eventually.

And if you do it at home, the block WILL need a PROPER wash after, degrease, scrub, scrub some more, pressure wash, scrub all the little nooks (requires special cleaning brushes, like gun cleaning tool's) degrease again, oiling etc. Its not just a case of hone and wipe!

If you get a shop to do it, they can put the h6 finish (or what ever its called, cant remember) on the block to seal the gasket, power hone it to give the 100% correct cross hatch angle, and bath the block, it will look 100% brand new! And work also!

I was never going to assemble without a hone But I am tempted to give the block to a shop to do the hone and surface the deck then clean the block

+1 to what others have said. There's no easy or cheap way to build a motor correctly to last.

It is unclear what other components and what thickness of MLS you are using. That will affect your overall compression ratio.

I ordered 9.0:1 pistons but the block and head I bought off another member were both shaved ~1mm. Combined with a 1.3mm head gasket yeilded 11.3:1! I had to shave 2mm off the top of the pistons to bring it back to 9.0:1. Be sure that your compression ratios are going to be in check if you have a modified set up.

So the block is already bored and honed? You say you already have the cross-hatch pattern. Again, I asked my shop to use a torque plate, check tolerances, true bores and hone. They had to do an additional 0.0004 to bring the bore back into round.

I don't know which size headgasket I can use yet. Once the pistons are in I can measure the deck height and calculate the squish which will let me pick a head gasket.

OR seeing as I'm using all the factory rotating assembly with the stock deck height does anyone know the factory deck height? that would at least get me close enough to buy a gasket now

The cross hatch is still there from the factory. Which doesn't guarantee that it's a low KM block but it at least tells me it wasn't a super high KM block. Car has 90,000 on the dash

Edited by Blackkers

I've done in chassis rebuilds at work where there simply wasn't a budget to remove the block, crank etc.

We use the brush type hone on a drill with plenty of CRC for lube. Obviously the bores have to be thoroughly cleaned. ATF is very useful here. An oil stone, along with CRC, is used to clean up the block surface. Alternatively, if the surface is quite rough to start out, you can use a steel block or similar with varying grits of sandpaper and an oil stone to finish.

It should be noted though, that these were standard rebuilds in daily drivers, i.e. A Transit van, and not on a highly strun RB26. And it was more of a case of get it in, get it done and get it going.

I was never going to assemble without a hone But I am tempted to give the block to a shop to do the hone and surface the deck then clean the block

I don't know which size headgasket I can use yet. Once the pistons are in I can measure the deck height and calculate the squish which will let me pick a head gasket.

OR seeing as I'm using all the factory rotating assembly with the stock deck height does anyone know the factory deck height? that would at least get me close enough to buy a gasket now

The cross hatch is still there from the factory. Which doesn't guarantee that it's a low KM block but it at least tells me it wasn't a super high KM block. Car has 90,000 on the dash

If you use a super thin gasket your mating surfaces may not be good enough. If you use a factory stock gasket you should still end up with a little higher compression. FWIW I have used stone type hone and a sharpened piece of a large machine hacksaw blade for a scraper.

  • 2 weeks later...

Okay the block is with the machine shop now. The owner is really looking after me, he's going to machine the deck and hone the bores for free.

Also I got the crank back with the bearings they ordered. Also the crank collar is on.

The rings I got are standard factory rings so I imagine I won't have any issues with sizing but I'm going to check the gaps anyway once I get the block back. Then I can assemble the bottom end, measure the deck height and order a head gasket.

Can't wait to get it together

Why the ARP studs? Would you not be better off with the standard studs if it is a standard rebuild?

Is there a draw back to arp studs?

How much do standard bolts cost?

Why the ARP studs? Would you not be better off with the standard studs if it is a standard rebuild?

I plan to run 1.5+bar of boost through it on relatively small turbos with higher than factory CR. I can't see a reason not to other than the cost.

Blackkers, be honest, what did you do to get the work for free ;)

haha well free is a relative term.. He asked me to tell my friends about his shop. So if anyone needs some work done, speak to Gary at Leon's engineering Artarmon he's an absolute legend.

They chemical cleaned all the bits and pieces for free too

Create an account or sign in to comment

You need to be a member in order to leave a comment

Create an account

Sign up for a new account in our community. It's easy!

Register a new account

Sign in

Already have an account? Sign in here.

Sign In Now


  • Similar Content

  • Latest Posts

    • If you get 12v at one of the relay pins with IGN on, and 12v at another for about 3 sec when you turn the key from ACC to start, then yes you can just earth the relay trigger pin. Just have a look at the top of the relay, it should tell you which pin needs earth when the 12v signal is sent (or if it's not clear, just post the pic and we can work it out). If you always have 12v at 2 pins with IGN on, they it is earth triggered by the ECU which makes it harder to fix (you really need to check the ECU pin is earthing when it should, and if so it is a wiring issue from there to the relay.
    • Tomei make a 1.5mm restrictor, I'd just use that.
    • Got the gearbox in and the front drive shafts.
    • Hi There I went through a rabbit hole of reading about Xenon headlights and the ADR regulations for having them installed. As people have been defected by running factory xenon I was researching in ways to make them compliant. Everyone always say needs to be self leveling and have washer installed, which I don't necessarily agree with. For this argument I'm using R34 as reference as I'm more aware on the construction of the headlight compared to the R33 Xenon, which may still be the exact same case.   For the self leveling clause taken from ADR 13 - Installation of Lighting and Light Signalling Devices on other than L-Group Vehicles As you can see the bold text "these manually adjustable devices from driver seats" are fine to use. As Series 1 Xenon model headlights do have a 4 level adjuster on the right near the ignition (however not series 2) then these model are consider compliant in that argument.   For the Self Cleaning aspect of this argument clause taken from ADR 13 - Installation of Lighting and Light Signalling Devices on other than L-Group Vehicles Now i can understand the argument that Xenon will need a washer as they are over 2000 lumens, but I clicked on the 12 at the end of that sentence and it takes me to the end notes which states R34 for headlight lenses are plastic, not sure if PL is mark as I don't currently have my skyline to confirm that marking is there. But could you not technically get a lenses with the PL marking on it and then get away with the argument that you need a washer. I went through a quick read of the adr and might have missed something else that may cause them to be non-complaint.    But wouldn't these technically be complaint headlights   Would love to hear other people input on this and shed some light   Edit In regard to the the washer portion I might be mistaken ADR 45 (which I believe is Regulation NO.45) states 12 cd (candela) I dont understand that portion in regarding to calculating the candela if anyone can shed some light. Otherwise I guess throw in a washer for the headlight and you definitely comply.
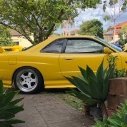
    • Took it to all Japan day, flogged the hell out of it and took it all, am a very very happy man  don’t know how that ended up in Greg’s thread before
×
×
  • Create New...