
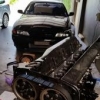
Almost Ready To Re Assemble Rb26. Need Some Advice
Announcements
-
Similar Content
-
-
Latest Posts
-
 When sanding across a convex panel, you need to sand, as much as possible, at right angles to the curve. If the panel is compound convex curved (ie curved in both directions) then you are SOL and have to use "craftsmanship" to get it right.
 -

By DraftySquash · Posted
Today in Skyline arts and crafts!! I’ve made some progress. had to put extra notes in there so I don’t stuff it up 😂 -
-
 This sounds like me. And then why I leave shit that I had previously hobbled together broken. Lately I've changed strategies to "If I don't want to justify the money on decent stuff, I'm not going to justify hobbling it together". I'm still for DIY, but DIY it properly is more my thing. However, I am terrible on not setting up backups still... Which reminds me, I need to go backup some of my work VM machines... Oh, it's also why I've become a lover of building things into Docker Containers... Then I just need a machine that can run docker, and bam, that specific system is up and running, on the specific versions of everything I need for it to run (In the event a change in required software version breaks something else). Also, these days, my steep learning curves are spent with work related stuff, and on very varied projects, that my want to do other random projects like build a dashboard for my own car has dwindled away to "I just want the car running", which is my current PITA, as I'm getting the Landcruiser usable again, and it has just been non-stop the past 6 to 8 weeks of buying parts, and working on it. Oh, and tools that are meant to be fit for purpose... And they break, because 25 year old 4WD decides it's stronger... But by the time I have it ready to roll back out the drive way, nearly all the stuff in it will have been touched and serviced, so the damn thing better give me NO FREAKING ISSUES, for at least the next 50,000KMs! Just redone whole front of the motor, and resealed the up top stuff, replaced a bunch of things getting perished, new timing belt done, water pump, lower timing cover (Toyota diesel engine runs timing GEARS for the bottom half the motor, and a timing belt from halfway up to the top), new harmonic balancer, fix up the alternator, new thermostat, full swivel hub rebuild, new bearings and seals front and back, steering box rebuild, new battery, and today, it turns out a rear shock has let go, so four new shocks are about to go on order, and that will leave me with after the next run of work, to see if I need to order just a brake caliper re-seal, or if I'll need new pistons in them too. Oh, and I'll finish welding in the new floor sheet metal shortly too. Presently I just want it finished already... But once all the above is done, I still need to fully service diffs, gearbox, transfer, and motor. Then flush and bleed the clutch, and flush and bleed the brakes. But enough about our waffle, back to Duncan's heat problems... I think for Duncan he just gets a thermoswitch, and a manual switch to run some water misters. Thermo so it's only on above certain temps, and the manual switch so it can be turned off even if it is above certain temperatures. IE, switch on for "I'm now on track", then it doesn't need any "smart" computers that might try and do things wrong. And switch the thing off completely on the cool down lap, so when he stops in pits, there's not even a possibility of it dripping any water out to get him in trouble.
 -
 So I ran into the same problem. I got stuck in the cycle of again of putting putty sanding it, putting putty sanding it, because of a low spot. And notice my block is not completely flat with the panel, even though it's a long block. My panel is slightly curved. Is this an issue? Do I need something that matches the door perfectly, or no? I do have the smaller flexible block that covers the width of the repair just not the length, I was experimenting with it again to but seems to be the same issue
-


Recommended Posts
Create an account or sign in to comment
You need to be a member in order to leave a comment
Create an account
Sign up for a new account in our community. It's easy!
Register a new accountSign in
Already have an account? Sign in here.
Sign In Now