
Announcements
-
Similar Content
-
-
Latest Posts
-

By svenskalice · Posted
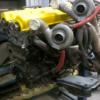
Pulsar gtx3076r (.83 exhaust housing), ID1050cc injectors, full radium fuel setup, forgot pumps, Greddy intake mani, mishimoto intercooler, koyo radiator, 6boost top mount, custom exhaust. That's kinda the gist of the build -
By svenskalice · Posted
Not sure exactly, but I had a 20det wastegate on my 25det stock turbo lol -
 If you like how loud the car is now a resonator behind that mid muffler should help with drone and not effect the volume much I've added resonators to a few aftermarket exhausts before specifically to reduce drone, volume really never changed, but cabin noise hwy cruising was much improved......with great success
 -
 Well, that's why I left Shannons. First they made us pay the excess after a taxi hit the z when it was parked. We supplied the rego and police report, they didn't feel any responsibility to find the owner and would not pay for the repair until we paid the excess. Then our house (insured with Shannons) was broken into, and the safe containing spare keys for 9 cars was stolen. Shannons tried to tell us that as well as the house excess we had to pay the excess for each car to key them rekeyed (ie almost $10k in excesses for one theft event). They backed down on that after we went through the ombudsman but we left them after that.
 -
 Am guessing the "steering wheel shroud/cover" you're after is actually the steering column shroud?
-


Recommended Posts
Create an account or sign in to comment
You need to be a member in order to leave a comment
Create an account
Sign up for a new account in our community. It's easy!
Register a new accountSign in
Already have an account? Sign in here.
Sign In Now