Jump to content
SAU Community

Recommended Posts

Looking but not posting haha. I like the filter adaptor, but surely its easier to get a filter assembly that doesnt have the heat exchanger on it? (rb20 and some rb30 i believe). Regardless, it looks good, must be handy having access to good machinery to make stuff like that.

Cheers buddy, yeah could buy something like that but just money and a possibility it might not fit etc.. this way it cost me nothing except half hour and some scrap bar i had at work lol. Yeah i definatley couldnt've done half this car without working in the industry lol.

Well have fitted the oil spiggot and works a treat

post-96314-14334912418602_thumb.jpg

Also if you remember i made a cardboard template of what i wanted for the coolant and power steering tank.

post-96314-14334912970945_thumb.jpg

Well its now home for test firting

post-96314-14334913171168_thumb.jpg

Once im happy i will cap them. The front is obviously coolant and has the sight glass and the back is power steering so that will just have a screw on lid with a pin in the middle that will have a line on it lol.

Also awhile ago had issues with overheating so sourced a ISC alloy rad and made an alloy thermofan holder

post-96314-14334914531828_thumb.jpg

post-96314-14334914670307_thumb.jpg

Havent had a chance to test it on the track but just warming it up and driving on the street as soon as i hit the switch it dropped 30* easily so should be alright

Funny to look at the fact that 6 months ago i had this...

post-96314-14334915489351_thumb.jpg

Also it makes you appreciate what you have i used to be working in a gravel carport awhile ago and now i have progressed upto a nice single garage

post-96314-14334916029437_thumb.jpgpost-96314-14334916162519_thumb.jpg

Tight ass form of racking and my whiteboard with list of what needs to be done etc....

And the engine bay as it sits currently

post-96314-14334916614087_thumb.jpgpost-96314-14334916756951_thumb.jpg

Sorry for the long ass post just had 10 mins to chillout today hahaha

  • Like 1

Well trying to make some headway with this wiring. My plan is just to build the engine loom for now. I dont want to turn this into a bigger project than it already is. The provisions are there for a full engine and body loom but thats down the track.

post-96314-14338579220769_thumb.jpg

Thats obviously the haltech mounted with fuse box and relays mounted and all getting wired up. Cant do much on the engine loom untill Intake manifold rocks up to run cables for injectors and CAS etc..

post-96314-14338580135375_thumb.jpg

Gotta admit i do have a pretty amazing Fiance. Its too hard to wire everything up in the shed so she lets me setup in the lounge room to do all my soldering etc..

post-96314-14338580898188_thumb.jpg

My amazing fiance and the helper :P

  • Like 1

Cheers guys, hopefully get some done on it this weekend. Already cut off the T2 flange and have mocked up the T3 flange so will tig that back on sunday and then can start doing oil and water lines.

Hopefully inlet manifold will be here soooooooooon so i can start doing injector wiring. Hopefully have some more pics sunday arvo guys

Also i have had a couple of people message me telling me that my oil cooler mount is all wrong and that you should have both the inlet and outlet up top. This is is a common miss-conception caused by the fact that most people mount theres this way. If you think about how a radiator is mounted you have your inlet at the top and your outlet at the bottom as the coolest oil will be at the bottom. So if you have your outlet at the top your still pushing hot oil back into the motor. Just found this

oilcoolermount.gif

The reason you dont want the inlet and outlet at the bottom is because you will almost definatley just fill the cooler with air and then have the possibility of getting air into the system.

Got slightly side tracked today.... My tig just gets picked up an moved around the shed an its a pain in the ass with the bottle etc... coming home last night an someone has brought a trolley up my street lol... yepp that will do. post-96314-14342505616068_thumb.jpg

:D now have a nice little tig trolley

  • Like 1

Got slightly side tracked today.... My tig just gets picked up an moved around the shed an its a pain in the ass with the bottle etc... coming home last night an someone has brought a trolley up my street lol... yepp that will do. attachicon.gif1434250559143.jpg

:D now have a nice little tig trolley

Hahahahaha love it. Lets hope it makes for easier progress and more updates :)

Mainly wiring this weekend but did manage to get the new T3 flange welded onto the manifold. Also because im running LS2 coils i made some coil mounts that bolt upto the tocker covers.

post-96314-14342674977402_thumb.jpg

As for the wiring made a mount for the isolator.

post-96314-14342675841304_thumb.jpg

So now the starting box is pretty much complete. Has all headlights, indicators and wipers under the iso switch.

How do you bend up sheet metal when your too slack to go into work?

post-96314-14342676457959_thumb.jpg

Clamp 5mm plate to your bench and bend away! Haha worked reasonably well.

So currently wiring up the coils with power, earth and switching wires etc..

post-96314-14342677101186_thumb.jpg

  • Like 1

Hahaha sorry mate works been hectic and thats whats paying for the build lol. I got one of the Chinese FFP and it needs some love so have just been attacking all the ports and port matching and blending it all. But my biggest concern is the water outlet as there meant to be a "tollerence" fit and it was as loose as a goose so have drilled and tapped the manifold and machined the outlet

post-96314-14349449916845_thumb.jpg

post-96314-14349450065854_thumb.jpg

Will try get some more updates this week tho

Create an account or sign in to comment

You need to be a member in order to leave a comment

Create an account

Sign up for a new account in our community. It's easy!

Register a new account

Sign in

Already have an account? Sign in here.

Sign In Now


  • Similar Content

  • Latest Posts

    • Yep that's pretty much what I want to see. Racecars that look and sound like the Group A but with newer tech underneath to make them faster and safer. I'm sure there's enough VK-to-VN commodore, E30 BMWs and Foxbody mustangs shells around to make up a decent number of cars with hopefully a couple of sierras, rx7 and R31s in there too. 
    • Contact Jessestreeter.com/Skevas Racing/JustJap for a new r34 rb gearbox or go a cd00# conversion. No point playing with unknown condition gearboxes.
    • Such a shame places like Amaroo Park have been redeveloped, smaller tracks always make for good racing. Cheers for sharing @PranK there's some good Lakeside video's too. Its so hard with older the cars as parts are so rare and everything was made for a particular chassis at that point in time. Even the V8 Supercar Blueprint era cars are all different between each chassis within a team as they learnt things and made improvements. The COTF cars between each Chassis builder is different too especially motor/oil systems/intakes. The Group A stuff is worth so much too especially chassis with good history. The only way to do it would be composite panels and similar engine drivelines to the original cars. Ford sierra running Focus RS driveline, Commodore running a short stroke LS/LT or a Falcon with coyote and a H Pattern dog box. Could use a standard ecu across all models with a Torque Map and DBW for parity which is not even used in Supercars currently. Hell a TCM is almost a full chassis car these days and the suspension is not even close to standard style in the front running cars.  
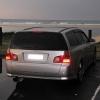
    • Dashcams Australia (13/05/25) captured JDMHSE (Vic plate) being a right tosser. 
    • Wish someone would start a racing series for Group A replica cars, a bit like Touring Car Masters but for 1985 onwards and not grandpa's falcon and/or Monaro. I know they race in some historic class but that's for original cars, no replicas allowed.
×
×
  • Create New...