Jump to content
SAU Community

Custom Billet Badge's - Unique To Your Car


Recommended Posts

Hey mate, these look awesome going to shoot you a pm as I woulld like a set of gaurs badges ;)

Hi All,

Updating post with recent inquiries in PM with the GTR R35 Badges draeted and now ready for cutting

Custom Machined CNC Billet - R35 GTR Guard badges to replace R33 or R34 GT Style - or what ever size you require can make these with any dimension required

R35 GTR Custom Billet Guard Boot Badge Emblem.png

Anyone interested send a PM and will advise details

Cheers

Edited by GMVLLE
Link to comment
Share on other sites

Hi mate

Price on Nitto Engine Ornament on RB26

Thanks

Hi Bruce,

Due to many variations and aspects of the machining - depths, curves, edges, contours etc - we design to what you want in every detail.

After we have finalized the drawing we send our customers the final draft for approval before machining.

We have multiple finish options available

  • Mill Finished - straight off the machine
  • Semi Polished
  • Full Mirror Polish
  • Anodized
  • Multi Color anodized
  • Color Inlay's with pretty much any color
  • Crystal Clear filled above the color - which is designed to withstand high temps in engine bays and the harsh weather, UV's etc
  • Expressive Tool Path

Mixture of all of the above - whether you want full polish on certain area's, Anodized mixed with color inlay etc

All products are coated with our own special seal protecting it from oxidation - when anodized obviously we dont get this issue but fresh billet needs protection from the elements.

We also ensure to use high quality products and having our own special formula provides a mirror sheen for up to 2 years before needing to either polish or apply another protective coating.

Many products out there will affect the mirror polish and they lose part of their shine when they apply the coating, or discolor yellowish, where as our blend does not affect it at all when we apply it.

I will shoot through a PM and we can look to provide some design's with you to be able to advise an accurate costing.

Thanks

Link to comment
Share on other sites

wheel center caps for rays te37 18inch wheels?

We have a customer visiting tomorrow with the Gram Lights to take some measurements

Below are some design aspects - the most important part is the correct Outside dimension as most wheels have different centre hole dimensions - if we have this we can design them for you

any design that you want incorporated

Anodized any color - with various color inlay - mill finished, polished etc

post-141798-0-46378700-1460263751_thumb.png

post-141798-0-70146500-1460263809_thumb.jpg

Cheers

Link to comment
Share on other sites

Hi mate, just wondering if mine have been completed just yet? Fingers crossed as looking forward to seeing them.. Cheers mate and talk soon. Cheers

Hi Mick,

sent a PM again regarding your badges, they have been completed for a week now :)

attached image of the badge after cure and post cure of the inlay

This image was taken after a semi polish and inlay - awaiting the final mirror cut and sealing. You will see in the image some polish still on the base surface area

GTT - Black Carbon Set

post-141798-0-47526300-1460264789_thumb.jpg

Cheers

  • Like 1
Link to comment
Share on other sites

Hi All,

with some recent work over the last week or so - I just wanted to update this thread

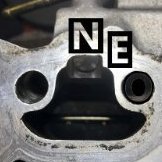
See below RB26 Engine Ornament Plate

Mirror Polished Upper Surface and - Logo Font accents

Some pretty awesome color inlays - with a Crystal Clear Over

post-141798-0-86278500-1460460614_thumb.jpg

Also if anyone is interested in Custom CNC Machined Top Feed - RB25 and 26 Billet fuel rails - let me know we can provide the following options, also supplied with the accessories AN8 fittings, Spacers, O'rings etc - spacers and fittings also anodized to which ever color you want

Anodized any color

Machine Finish

Custom logo or font work incorporated

Polished accents

Color inlay

or a mixture of all of the above

post-141798-0-78899000-1460460905_thumb.jpg

post-141798-0-49781100-1460460906_thumb.jpg

post-141798-0-88418500-1460460906_thumb.jpg

Cheers

www.kustom20.com.au

  • Like 1
Link to comment
Share on other sites

Received my gtt badging and must say.. they look good. Nice work.. i will be recommending your work to all. Thanks heaps.

Thanks Mick,

Very much appreciated - I ran off some sample GT-T Badges for you to lay in some blue and red as requested. I will send the images when these are complete with our other production orders.

Take care champ

Link to comment
Share on other sites

Received my gtt badging and must say.. they look good. Nice work.. i will be recommending your work to all. Thanks heaps.

As requested by some members,

See below - Custom CNC Machined Billet GT-T Emblem

Color Inlay Red Green and Blue - Cross Carbon effect in Blue and Green - the Red only received the full flat finish with the mirror polish under inlay

If I had to do green again - I would probably lay another coat to darken the edges makes the centre pop a lot more - or maybe a very light coat of Black in the cross lines under the green which would highlight the highs and lows much better. The green still looks amazing just a personal preference

post-141798-0-21034000-1460984486_thumb.jpg

Thanks All - PM if you are interested and any color choice

Edited by tuning_vs_hardware
Link to comment
Share on other sites

Hi again, i will get another lot done for me. Im liking the red carbon look the 2nd one down. And gee alot of people have asked me about my badges on facebook and other sites so i think a few are gunna be wanting. Anyway talk soon. Thanking you. Mick

Link to comment
Share on other sites

Hi again, i will get another lot done for me. Im liking the red carbon look the 2nd one down. And gee alot of people have asked me about my badges on facebook and other sites so i think a few are gunna be wanting. Anyway talk soon. Thanking you. Mick

Thanks Mick,

Yeah they look pretty good - with the Carbon Effect

I had a play the other day with some other designs - but I guess its personal preference on design I put the words NISSAN going across the top of the letter T underneath the Inlay where the carbon effect is, and then going downwards in the letter T I used the S in the word NISSAN and put the word SKYLINE - in the drawing it looked pretty cool

I think with this wording slightly noticeable under the inlay would be a cool design.

If I can get a sample of this I will post it up

As for the other set in Red thats no probs we can run a couple of sets and have them sitting ready for what ever color needed.

Again thanks for your interest and support Mick - much appreciated

Link to comment
Share on other sites

Hi All,

Just wanted to update thread with some images of the new designed Carbon Black Effect - GT-T Boot/Guard Badge

post-141798-0-18694600-1461575655_thumb.jpg

Anyone interested in the GT-T Badges let me know to get an order faster than normal as these will be getting cut in tomorrows production for current customers orders

Thanks

Link to comment
Share on other sites

Create an account or sign in to comment

You need to be a member in order to leave a comment

Create an account

Sign up for a new account in our community. It's easy!

Register a new account

Sign in

Already have an account? Sign in here.

Sign In Now


  • Similar Content

  • Latest Posts

    • The two diagrams are equivalent. The R32 one is just one sheet out of about 3 showing everything in the whole car all at once. And without knowing the functionality that occurs in the modules, they are both equally opaque.
    • 8v - 2.48ms 9v - 2.15ms 10v - 1.74ms 11v - 1.41ms 12v - 1.15ms 13v - 0.99ms 14v - 0.89ms 15v - 0.82ms 16v - 0.81ms I'm running these values on my RB20 Neo with 570cc Denso R35 stock jets and it's great. Also bought a set for my Legnum VR4, love these injectors!
    • Thanks for your reply,  Those blue/green wires running to the actuator aren't attached to anything, so I'm not sure how the central locking is still working. I will have to take a good look tomorrow, I don't have the car with me. After googling it seems like a pretty common aftermarket actuator which even uses the same green/blue wires the immobiliser required. i'll test everything tomorrow and if it's working i'll melt the solder, strip it, resolder and neaten it all up with some heat shrink. I don't have to understand it if it works hahaha I just don't want a fire/ short circuit. That R32 diagram looks more like a continuity chart? Can you make sense of this form the R34 manual? 10V is probably due to very flat battery, i'll recheck as well tomorrow, I did have to jump start it haha. Thanks again!  
    • So, COM doesn't mean comms. It means common. What common itself means will depend on the type of device. For a two directional actuator (ie, one that can push and pull on the same output rod) then the common will typically just be the earth connection. There will be at least 2 other wires. If you put 12V on one of the other wires, then the actuator will push. On the other 12V wire, it will pull. Can't quite make out what is going on with the wiring of your actuator. It appears to have several wires at the actuator plug, but there only appears to be 2 wires where its loom approaches the door control module, with at least one of the others cut off. I don't know these actuators off by heart. I'd have to look at a wiring diagram for one before knowing what the wires were about, and that's despite me having to replace one in my car not all that long ago. Just not interesting enough to have dedicated memory set aside for trivia like that any more. That actuator is an aftermarket one, not the original one, which probably died and was replaced. That might require some sort of bodge job on wiring to make it work. Although nothing should justify the bodginess of the bodge job done. As to the soldering job on the door module's loom plug. Ahhahhahaha. Yes, very nasty. Again, I cant tell you what any of those wires do. You'd need to study the R34 wiring diagram (if you can find one that shows the door module). I don't think I have any. I'd have to study the R32 diagram to start to understand what mine is doing, and again, even though I've had a problem with mine for the last 25 years (where it locks the passenger door when the driver's window reaches top or bottom of travel) I'm just not interested enough to try to to work it out. So long as it's not burning down, it's fine with me. Here's the R32 GTR diagram, which, confusingly, has rear door lock actuators and window motors on it!! As you can see, unless you understand the functions of the door lock timer and the power window amplifier, you'll never be able to work out how it works just from the diagram. I don't imagine that the R34 one is any better. Hopefully an R34 aware bod can help. FWIW, the two wires that are cut and joined look like they are both power supply - so hopefully it is not fatal to join them. The 10V you measured on the cut off free end of one of them is concerning. You'd expect 12V, and it might be the reason for the bodge job joining them together.
×
×
  • Create New...