Jump to content
SAU Community

Recommended Posts

Got the bay done yesterday after work! Not a fun job pulling the loom out with everything still attached... Car's almost ready to go to painter now. I want to weld up the stock intercooler holes so we have no drama drilling new one later. Ideally I'd like to get motor in with manifolds and turbo on and mock up piping and cut holes etc and then get it painted. Will see what happens though. 

Need to degrease the bay and give it a good clean with the gurney. My powersteering has been leaking for a while so its covered in oil.. 

4dJqTOB.jpg

97Lg3CK.jpg

MybQcJU.jpg

f7L4e6p.jpg

  • Like 2
  • 2 weeks later...

So she went off to the painter on Wednesday. Should be ready mid next week ? start putting all the stuff back into the bay and get the loom all cleaned up ready to go.

Ordered plazmaman 100mm intercooler, 72mm throttlebody and flange to weld onto the greddy intake and a few 3" plazmaclamps. Hopefully be here in the next few weeks and start mounting it up. 

eLxSmpo.jpg

  • Like 3

Car came back today! Super happy with how it turned out! Makes me wanna respray the whole thing ? 

Got a few things back in today, auto brake pedal, booster and throttle cable all done so rest of it is engine bay work now. Tomorrow I'll plumb the A/C, bring wiring harness back through the guard and put the headlights back in.

U6WJDji.jpg

BQPWdt3.jpg

  • Like 1

Progress is happening slowly. Got almost everything back in the bay now. Decided I'm going to delete the fuse box and make it look nice somehow. Also put in a new universal washerbottle instead of the hideously massive stock item. Heres the car as she sits. 

jo4sShL.jpg

Pulled the loom apart to add/remove anything we wont be using, going to give it a makeover with some nice sleeving and reroute wiring into the guards to keep it looking clean! Few more wires and stuff to add for additional sensors and thing then start depinning and sleeving it all! Should be a fun time.... not!

C9nuKYP.jpg

RIPSNZ sump is on the way, should be here this week/early next week! Thing looks nice ? Can't wait to bolt it all up!

bxIRyN5.jpg

kAVynxj.jpg

H0shC8k.jpg

1E4gwpD.jpg

Last but not least new pistons! Couple bores were a bit out of wack so stepping it up to a 86.5 9:1CR. Should bump it up nicely from the 8.5:1 pistons that were in it. Dropped them off at machinist tonight, rotating assemblys off to balancer this week and the blocks going for a bore and acid dip to clean it up nicely ? Should only be a couple weeks away now!

IzwgKt9.jpg

  • Like 3
  • 3 weeks later...

So been working on the wiring harness the last few weeks. Im pretty happy with how it turned out for what it is. I think id rather do a brand new loom then resleeve a stock one again ?

PbKIjfr.jpg

9Eeef2x.jpg

7n0MMzj.jpg

hL0sWeV.jpg

bp0dPnL.jpg

0Cq0kTa.jpg

In the go fast department motor is almost due back! Head will be finished this week coming and block should be the week after. Got bored and honed for new pistons last week and balanced rotating assembly this week. Waiting on spool to get more L19 rod bolts back in stock so we can get rod bearing clearances set. 

  • Like 2

Rod bolts and bearings ordered yesterday, engine builder is really busy atm and said should be all done by end of next week :) Also dropped my sump down to be painted black which should be ready in a couple of days.

I pulled my fuel pump out of the tank then decided to get a surge tank instead of modifying the stock hat. Ordered an AI SP1200. Will make it a lot easier if i have to put a 3rd pump in if we need more fuel. I'll be running hardline in boot and remove the factory lines to run twin 1/2" hardlines to engine bay then split the feed to twin -6 to feed the rail. Using these billet clamps to fix it to the body should look nice and semi stock. 

JJCJYvw.jpg

4JhnMHZ.jpg

Wiring is coming along pretty good! Finished sleeving the lot then forgot to bring the wires down for the crank trigger so ill have to pull it apart and do that then thats its for the loom! I hope... i didnt like the look of just heatshrink for finished product so got sum sleeving and came up 10x better! Looks a lot nicer now.

iSAgjrp.jpg

s7LVAHt.jpg

  • Like 1

Yeah shes a big one hahah! It was making 910whp on a 2.8 GTR. Should get pretty close to my goal I think :D

Since the turbos black already I'm going to f**k the polished intake off and go black as well. Should come up nice ?

  • Like 1

Create an account or sign in to comment

You need to be a member in order to leave a comment

Create an account

Sign up for a new account in our community. It's easy!

Register a new account

Sign in

Already have an account? Sign in here.

Sign In Now


  • Similar Content

  • Latest Posts

    • Hi Yes we're a bit optimistic we might get something out of sealing up the two pipes of the external wastegate and reactivating the stock one. I believe the orginal stock wastegate was tack welded shut. It doesn't budge and visually looks closed and sealed. The car has noticeably more lag so it could be at least part of the problem, maybe all. It's definately one of the key changes made since last tune. And it's one that's more difficult to fully understand and measure, not like for instance timing or cylinder compression.  Thanks for that feedback, we'll let you know how this progresses. Fingers crossed.   Regards Rob
    • Transplanting the vvt from a 25neo into an rb26?
    • Well, I was going to say, "Is the wastegate set up so that it is not leaking?" That's actually a different thing to what you're asking about. In theory, if you have allowed the two halves of the manifold to commmunicate (more than the stock manifold does - which is at least a little bit) then the negative effect should be apparent in delayed spool, not in outrigth power. OK, maybe just maybe, a badly set up twin scroll wastegate "crosstalk" might kill the top end, although it's hard to see how. What is happening with the original wastegate in the turbo? is it sealed off properly. If it's left flapping in the breeze, it will f**k everything up. If it is still there, and can be returned to service, I'd be capping off the external (presuming the two halves can and will be isolated from each other after doing so) and have a go with just the stock wastegate. I have an internal wastegate in my highflowed rear housing. The bigger opening and flapper should be fine to >250 rwkW. So there's not exactly a pressing reason to have the external. Done right, an external will give better results. Done wrong, it might just be possible to have worse results. Report back!
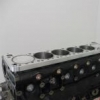
    • Hi Rob It's a nistune ecu. Yes same shop, good reputation. Apparently the computer on the dyno is compensated for temperature.    Chris was saying that the lean or richness of the mixture would be covered in the actual tune, but he's already picking up in advance that it's under what it should be. Regards the dyno, it's also noticeable on the road. But I just want to add something that has just come in, it appears there might be something in the setup of the external wastegate. In the exhaust manifold there is a centre divider between the front three and rear three cylinders. The external wastegate has a pipe from each side that join at the wastegate. Theory is those two pipes just might be pypassing that divider and introducing a problem somehow. Is anyone familiar with the divider in the exhaust manifold and the effects if the two wastegate pipes were to create a bypass path? Thanks for your questions Rob, interested in your thoughts on this external wastegate bypass theory. Regards Rob
×
×
  • Create New...