Jump to content
SAU Community

Recommended Posts

Help with Series 2 tail lights and trailer wiring

Heya so I have a few questions,

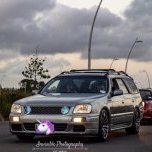
Went and got some Series 2 tail lights and installed the tail gate ones, although I did have to scrape off the black gooey silicone tar looking stuff and reuse it on the series 2 set,
Where can I get some of that tar sticky stuff that's now stuck on my hands forever (New Zealand please)


And, little did I know the side tail lights fit but need different indicator bulb plugs
So where can I get the indicator plugs from? I'll head to supercheapauto and repco tomorrow to see if they have any but I don't feel too confident that they'll have anything. 
And because I need amber coloured indicator lights now, does anyone know the bulb number/part? 

And because the previous owner of my car had series 2 lights and took them off at sale he cut all of the trailer wiring, so I wanted to know when doing the trailer wiring do I just place the trailer wiring into the light bulb plug? where the normal indicator wires go etc?

Now before you say use the search or what ever, I did, but nothing about rear tail light bulb plugs (Maybe i'm not using the correct names?)

Thanks!


IMG_0321.jpeg

Repco will have amber light bulbs. Why do you need amber bulbs anyway? Looks as though you have amber lenses... or are the top white ones indicators and not reversing lights?

Trailer wiring as per diagrams (you'll get them all from the drivers side but will have to bring a wire over from the LH turn indicator)

http://cmtrailer.co.nz/technical/typical-trailer-wiring-diagram

  • Like 1
Repco will have amber light bulbs.
Trailer wiring as per diagrams (you'll get them all from the drivers side but will have to bring a wire over from the LH turn indicator)
http://cmtrailer.co.nz/technical/typical-trailer-wiring-diagram


Cheers, do you know about the 'socket' or 'plug' that the light bulbs go into?

And with the wiring, does the actual bare wire go into the 'socket' or 'plug' as such?

IMG_1482829047.860562.thumb.jpg.551051a4

Or in other words where does the end of the wire get plugged into
36 minutes ago, spudtatoe said:


Cheers, do you know about the 'socket' or 'plug' that the light bulbs go into?

And with the wiring, does the actual bare wire go into the 'socket' or 'plug' as such?

IMG_1482829047.860562.thumb.jpg.551051a4

Or in other words where does the end of the wire get plugged into


You need to buy a trailer plug and a length of 7 core trailer wire. One end goes into the plug and you have to bare the ends of the 6 or 7 wires at the other end. Ideally you solder the joints and cover with shrink tube but otherwise you can use individual connectors. If you buy the flat connector and the 7 core wire from an auto electrical supplies rather then Repco or Supercheap they may be able to give you some tips on what to use for connecting the individual wires to the car if you are not going to solder the joints.

Here is a video for the socket end:


OK in case you need it I found the notes for my S1 trailer wiring (7 core wire colours first)

all on RH rear

white to black

brown to green/white

green to green (RH)

red to green/yellow stripe

but

yellow to LH side of car - green wire for LH indicator (may be different on your car - use multimeter to check (or just a test light probe).

OK in case you need it I found the notes for my S1 trailer wiring (7 core wire colours first)
all on RH rear
white to black
brown to green/white
green to green (RH)
red to green/yellow stripe
but
yellow to LH side of car - green wire for LH indicator (may be different on your car - use multimeter to check (or just a test light probe).


Cheers! Exactly what I needed,

I don't suppose you have a photo of behind your RH tail light so I can get a grasp of it?

Otherwise what type of connector would I use to join the wires together as I have no tools to solder
1 hour ago, spudtatoe said:


Cheers! Exactly what I needed,

I don't suppose you have a photo of behind your RH tail light so I can get a grasp of it?

Otherwise what type of connector would I use to join the wires together as I have no tools to solder


Refer my previous post

Refer my previous post


I'm wiring it up now, you mention yours goes white to black, I have two black wires, one for indicator and the other goes to the brake light.

Do I wire it to the brake light or two both?
23 minutes ago, spudtatoe said:


I'm wiring it up now, you mention yours goes white to black, I have two black wires, one for indicator and the other goes to the brake light.

Do I wire it to the brake light or two both?


White is earth so if both black wires are earths then either should do.

White is earth so if both black wires are earths then either should do.

Thanks a bunch mate, super helpful. Got the tail lights all wired up and the trailer lights working.

Repco had the light bulb socket thing, it works, but not really. So I had to silicone it in there lol.

Series 2 looks so clean, got it for a bloody good price $200NZ considering people were asking $350NZ for just the tail gate ones...

IMG_1482903083.082098.thumb.jpg.b54473d8

Create an account or sign in to comment

You need to be a member in order to leave a comment

Create an account

Sign up for a new account in our community. It's easy!

Register a new account

Sign in

Already have an account? Sign in here.

Sign In Now


  • Similar Content

  • Latest Posts

    • They see me rollin' they hatin'....... Took me most of the day to make the necessary mods to the mounts to make them fit the car.  Fortunately I was able to just use the mounts that came with the rotisserie. The rear ones are really secure, the front I feel i might reinforce a bit more as it doesn't seem like enough attachment to the vehicle. I'm sure it's fine but better to be safe than (extremely...) sorry.  I drilled and tapped thread into additional M12 holes to each car mount where it attaches to the rotisserie as an extra fail-safe. Without them the side to side movement is just restricted by the allen head pinch bolts, nothing actually goes though the beam. Does now! I still need to adjust the rotisserie to get the car centred in terms of centre of gravity. If it's too high or too low relative to the rotational centre line of the car, it will be like a turtle and roll onto its back or as it currently sits, I dont think I'd be able to rotate it as it sits as it needs to lift the whole car up as it rotates. Ain't happening... I'm going to be nervous as hell the first time I go to spin it on its side...    
    • Oh yes done this when the window started flopping around.  Turns out the guides that run along the rail chanel had crumbed way. Took off the door card and pulled out the window mech, then the window, which you have to pull out through the top. As said unbolt the guide rail and don't spend 30 minutes getting frustrated trying to find a way to slide it out upwards cause that don't frigging work. Drop it down and out through the door hole. All I did to repair it was slice some 10mm clear plastic tube, vertically, then screw it to the guide rail both sides. This tubing rolls inward on both sides and leaves a gap wide enough to hold the window. To finish all I did was lube the plastic tube with olive oil and Bob's your uncle . . . well if he has the operation he can be your Aunt ! !  10 bucks in plastic tube and another 5 minute job done again . . . . YEH BULLSH#T ! My love for Skylines knows no bounds !
    • So was there a solution to this problem? I’m having this issue now. 
    • not expensive, just irreplaceable if you don't go sub 60 at wakie in that thing people will start talking
    • I haven't replaced that, but I have had the doors apart on the r32 a couple of times The door skin will be held on by a combination of clips and bolts, just take it slowly and make sure all the sneaky hidden bolts are out Once the skin is off you should be able to pop that piece off pretty easily, looks like there are only 2 bolts holding it on
×
×
  • Create New...