Jump to content
SAU Community

Recommended Posts

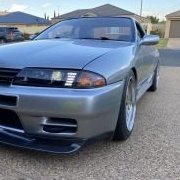
Daymo's R32 GTS-T

Hey everyone,

I thought i'd start a build thread, just so i can keep a log of everything i'm going to do to the car, and keep track of how much i'll no doubt spend on it in the next few years.

I'll give a brief introduction, i'm from the U.K. but currently on a sponsorship with a goal of getting permanent residency further down the line, located in Griffith NSW, and there isnt a great deal to do here so im gonna spend my time and money on a car ive always wanted, an R32 skyline!


I'm no stranger to nissans, i had a 1997 Nissan Primera GTSE, not sure if you get them over here as i definitely haven't seen one on my travels!

She had a few tasteful mods:-

Full Stainless Exhaust with Powerflow Backbox,
Hotshot 4-2-1 Manifold,
Koni Shocks and Springs,
Uprated ECU (Datsek Piggyback System)
Hotshot Cold Air Intake,
Ported and Polished Head,
JWT-S3-Cams,
Short Shifter,
Plasma Dials,
Nissan VZR Splitter,
JDM Headlights,
Yellow Foglights


6653513915_e04988e75c_b.jpg.0710cd612fadb001aaa001f17fd13b71.jpg

6653482845_c250a7a5ae_b.jpg.6ba12dd792bf491362c4fa3980ef8877.jpg


photo.jpg.e1c0701167e13e564c72cd281f298a71.jpg

6653602381_dcb85f10f5_b.jpg.33ffcfc4a6b4bc288b629fe600282dd1.jpg

The primera was a great car to drive, but it did get boring in the end, being NA it just needed that extra kick from a turbo but i never got round to doing the conversion.

Anyway, i'll get onto the skyline now, i bought it in December 2016, its a Type-M Manual (was an auto) im still discovering little mods here and there, as the sales advert wasn't the best, i have a dyno print out for 230kW/308bhp and i know it has a kinuwaga TD06-20G but apart from that im unsure. (maybe you guys can spot some mods and i'll keep updating the list!!)

Mods:-

Engine:-

Kinuwaga TD06-20G
Tial 45mm Wastegate - did have a screamer pipe but the previous owner had this welded up when he was defected.
Forward Facing Plenum
Oil Catch Can
Spitfire Coils
3 or 3.5" Full Stainless
HKS Pod Filter  (hidden underneath some awful chequer plate)
Haltech Platinum ECU
FMIC
14 Row Oil Cooler + Filter Relocation Kit
RB20 Manual Gearbox Conversion
 

Suspension & Wheels:-

BC Racing Coilovers
Lenso D1R's - 17x9.5 Fronts - 17x10 Rears
Just Jap Lower Control Arms Front and Rear

Exterior:-

Carbon Fibre Bonnet - Unsure of brand
GTR Grill
Black Indicators
Aero mirrors,
GTR Front Bumper,
GTR Spoiler

Interior:-

Momo Deep Dish Steering Wheel
Drift Button
Double Din Headunit
Oil pressure, boost gauge, A/F Gauge


and here are a few pictures from the day i picked her up,

58d22db1c9e18_IMG_1482709067.090586.jpg.01bf337b24d084cc380b40f98844453e(1).thumb.jpg.d8fd0032af181bd28cfa7dac16236887.jpg

58d22dc3056f1_IMG_1482709102.046237.jpg.67b6a727a88c698c2f240605db0ad317(1).thumb.jpg.ec542dfdebefdcf5e10d9bf3eec3bb55.jpg

IMG_1482709118.723240.jpg.8f23c8650ac829a008ff547f7768e4e3.thumb.jpg.2d63628f75fdeb8522a6bde99e457e59.jpg

IMG_1482709135.572970.jpg.e883b88bd22dbbfb63ad115a63849aa4.thumb.jpg.ea7076c87ae04d8c1ffa27f32355da49.jpg

I got defected pretty much two days into owning it for being too low, so raised it up a touch (25mm at the front and 30mm at the rear). i then decided i hated the vinyl wrap as it was bubbling in places and pretty poorly done. i was hoping the paint was going to be okay underneath the wrap, but with the wrap being on for a good few years (the previous owner had the car 18 months, and he reckoned it had been on a while when he first bought it) this was not the case.

So this is where im currently at now, ive taken all the wrap off, im currently in the process of buffing all the left over glue off the car with prepsol, and getting her ready for paint. i bought a GTR-ST front bumper from kmak aero, did a little bit of modification to the slam panel or "reo" as you call it over here. 

16195519_10158186808875054_6481635110044525115_n.thumb.jpg.7489b05b7a5be4fb1f989c16a3c86a6a.jpg


17239919_10158429701255054_3409374300355571928_o.thumb.jpg.16cf593441af9cb945cbf0f0b5c4d11b.jpg

17353321_10158443716115054_5070979897407575293_n.jpg.53e11c1d37587312548942f83eb7bc02.jpg

17361975_10158443716120054_3155486901902301210_n.jpg.3c99852555d3aaefd3db8681ecec01c0.jpg

17264463_10158443716145054_6335253206467191191_n.jpg.1902bb636f577d98531c0d14cd40889a.jpg

Future plans are to tidy up the bodywork, add a few subtle mods, change the wheels and sort the ridiculous camber out on the front, then try and figure out how to get an rb25/30 engineered in here, its quite frustrating as we don't have all the engineering hoops to jump through in the UK, we can literally do what we want as long as it passes an emissions test! i'll try and keep the updates frequent!!


Cheers,

Daymo

DSCF2945.jpg

IMG_1482709067.090586.jpg.01bf337b24d084cc380b40f98844453e.jpg

IMG_1482709102.046237.jpg.67b6a727a88c698c2f240605db0ad317.jpg

Edited by DaymoR32
Link to comment
https://www.sau.com.au/forums/topic/469717-daymos-r32-gts-t/
Share on other sites

  • 2 weeks later...

Slowly but surely getting glue off the car a panel at a time. It's a tedious task but I know it will be worth it in the end once it's all respected and one solid colour!

Managed to get both front wings done, the roof and passenger door. Just the rear quarters, rear bumper and drivers door to go [emoji30][emoji30]

Has a bit of rust on the boot from where the GTS-T spoiler was before it was wrapped. Deciding wether to fix the rust, but a second hand boot or just dig deep and go for a carbon one to match the bonnet! If I go with a second hand boot I'm tempted to get a carbon GTR spoiler and a carbon dmax rear window/roof spoiler to match

IMG_8021.JPG

IMG_8022.JPG

IMG_8023.JPG

  • Like 1
Looking forward to seeing the progress you make with this! Looks like you've already gotten a decent amount done.


Yeah I am too, especially when I manage to get all the glue off! I might attack it again today, try and get at least one side of the car completely glue free ha!
  • 1 month later...

Thought I'd do a quick update,

Progress has been pretty slow on the car, but i have managed to get 95% of the glue off the car - there are some very stubborn patches on the boot lid.

However in a bid to motivate myself a bit, i started sanding panels that were glue free, I've done most of the passenger side, and I'm aiming to get the rest of the car sanded by next weekend. then I'll hopefully have the motivation to sit and do the boot properly as that will be the only thing holding the painting up!

I've ripped most of the seals off the front and rear windows, as there were a few tiny patches of rust beginning to creep through. i'll get the windows removed and some generic aftermarket seals put on. as i prefer them to the standard nissan pricey items anyway.

IMG_8264.thumb.JPG.b15dfed30faaad86c9a9f5f385b4e75c.JPG

Also some new exhaust hangers arrived, as 2 of them had snapped. so will be nice to get the exhaust back sitting nicely.

And i fitted a white led dash globe kit too. makes the cluster look a bit nicer in the dark.

IMG_8169.thumb.JPG.fedf412579aba73df6c057e548b9c461.JPG

  • Like 1

Did a little more sanding tonight, got most of the drivers side done too, using a 1/3 sheet sander so getting as much done with that before I do the fiddly bits and plastic parts by hand.

Also set about removing the rear wiper in preparation for the rear windscreen being removed prior to spraying. The locking nut was seized on so I've cut it off as I'll be keeping the wiper off anyway seeing as though it never gets used!

Filled the hole with a rubber grommet from the boot floor :)

IMG_8271.JPG

  • 2 months later...

Right, its been  a while since i last updated this, and to be fair nothing has really changed much with regards to the painting of the car scenario. a lot of the local painters in my area have been tied up with a few restoration projects and wont be available for the near future. I also realised that a few of the rubber seals and weather strips had seen better days. upon searching the internet for said seals and seeing how much they cost to replace i realised costs were going to spiral out of control. So with this in mind i scoured the internet day in day out looking for a rolling shell, or something that just needed a replacement engine. The rolling shell just had to have two things, decent paint and decent rubber seals etc. In general just a decent body as i have everything else.

Finally, last week i found a decent shell, negotiated a little with the owner and managed to bag the shell for a reasonable price (much less than a respray anyway).

So, i sourced a car trailer and borrowed a work ute, and made the 4 hour drive to Dubbo to pick up the rolling shell. It wasn't just a shell though, The amount of extras i got with the car will hopefully recuperate some of the money i spent on it, thats if i don't use them all.

IMG_8595.thumb.JPG.a36ef179bc2af6ae91362b167bf9affb.JPG

The included extras are:-

Pretty much every single adjustable suspension arm you can think of.
Brand New BC Racing Coilovers ER series with external reservoirs - they have never been driven on, just been placed on the car whilst its been stored for 5 years!
Brand New Black FMIC - cant remember the name of the top of my head.
Aluminium Radiator,
Thermo Fans
17" Impul Wheels,
R33 GTR Brakes,
R34 Neo Turbo - This wont get used - or it may get used in the future when i eventually put an RB25 Neo in.
Thicker Swaybars - Huge compared to the standard ones - brand new
Front and rear strut braces - will use the rear, will keep my strut brace.
Surge tank in the boot, with 2 x walbro fuel pumps - already plumbed in.
RB20DET Manual Gearbox and all conversion parts. - mine was also an auto so already have this gearbox and conversion parts so will keep the box as a spare.

IMG_8596.thumb.JPG.9262ac44d290da26ac0bdf50dbcb4ecd.JPG

I rearranged my garage a bit and organised all the spares

IMG_8607.thumb.JPG.3f66d3bf050712e96b8a6cf6d5b514bc.JPG

IMG_8608.thumb.JPG.f7ef25180e9420891c22ecbe23e8e224.JPG

Both of the cars sitting together,

IMG_8599.thumb.JPG.2d90b436ff45f310faa4d1928c7dbb5a.JPG

The old car and everything ive got to rip out of it

IMG_8600.thumb.JPG.b4abb0bcdf0aadf8cbbfaafcc81f4920.JPG

and a nice empty engine bay in the new car

IMG_8601.thumb.JPG.39b3d2f45e094bf3e0dbc1e11aded685.JPG

So first things first, i set about removing all the wiring from the new car - not knowing anything about the history of the car apart from a revs check etc, i thought it would be best to eliminate anything that could cause me any problems. I know my current car runs and everything works as it should so i'm going to transfer everything from the old into the new. That means wiring too along with my alarm system. 

Another reason for removing this loom is that it has had an alarm inserted at some point but no parts of the alarm system where present, just a load of random wires everywhere that could have caused me a lot of dramas.

IMG_8602.thumb.JPG.8f12736f0c736ab926528f19fc730c5f.JPGIMG_8603.thumb.JPG.bc85c3984d30b7e617f3907008614966.JPGIMG_8610.thumb.JPG.620061f1d3d8b5f23eeb0b463c32da15.JPG

So after an hour or two i was eft with this

IMG_8612.thumb.JPG.589c805d17a941c350da3ce8ed5dddb6.JPGIMG_8611.thumb.JPG.5b761cc77b2b99099de8905b3ab361a8.JPGIMG_8613.thumb.JPG.e6bdd410b303cb168c341313bde74420.JPG

and just to finish the day off i chucked the carbon bonnet on to see what it looked like.

IMG_8609.thumb.JPG.f390db9258e145a9b15302b40daa3590.JPGIMG_8605.thumb.JPG.86b370af7dbdcaaba4a32923d0c5c386.JPG

I know i've got a huge project in front of me. but i'm hoping to learn a hell of a lot through the process and get stuck in.

Hopefully updates will happen a lot more often now i'm not waiting for anything!


IMG_8604.JPG

IMG_8614.JPG

  • Like 3

Didn’t get as much time as I’d hoped on the car this weekend, managed to strip out most of the interior on the old one and get a little bit of labelling done though. Hopefully will have the rest of the interior out - roof lining, carpet and ancillieries behind the dash out by the end of the week if I get a couple of hours in after work.

Then just a bit more labelling to do on the inside then move onto the engine bay.

IMG_8652.jpg

10 minutes ago, PranK said:

This is looking great! Well done! 

:cheers: 

Cheers mate, i'm trying to spend at least an hour a day on it at the moment, making the most of the daylight when i finish work! 

Had quite a productive day yesterday and this morning, managed to get the heater core interior wiring loom out and roof lining/roof handles/interior lights out and into the new shell

IMG_8703.jpg

IMG_8712.jpg

IMG_8713.jpg

Also got the clutch pedal and accelerator pedal swapped over too.

Feels nice actually starting to put parts into the new car,

And I’ve just managed to get the injector/igniter loom out of the passenger side, this will go into the new car tomorrow night after work.

IMG_8728.jpg

And I’ve managed to take the intercooler and radiator off and drain the coolant out of the car.

Trying to take stuff out of the old cars engine bay and transfer straight into the new car so I don’t forget where things are supposed to go.

Got a feeling I’m gonna have to take all the old hicas lines out as the lockout bar is just a bar rather than an eliminator kit. Will eventually take this out of the old car and swap it into the new one too. But that’s at the end of the long list of stuff to do.

Also managed to get the ignition barrel out. i used a trusty hammer and small chisel to make a groove in the headless bolts. 

Then a couple of turns with a screwdriver and it popped off. also managed to tighten it back up pretty tight using this method too. I've used my ignition barrel as im going to use my locks from the old car too. the locks on the new car feel a bit sticky and like the key is about to snap. so rather be safe than sorry!

Got home yesterday after work, fed the injector loom back through the hole in the firewall on the passenger side and clicked a few of the cable ties back into the correct place. Bolted the boost solenoid back down too.

Also managed to get the brake assembly of the firewall and slot it back in place on the new car, will have to do a bit of wrestling tonight with the interior side of the brake assembly so that I can get the 4 nuts onto the threads. Should be easier with two people.

IMG_8730.jpg

Tackled a bit more of the wiring tonight, was getting worried that I’d have to cut and stick bullet connectors onto all of the alarm wiring as the box for the alarm won’t fit through the firewall. I am absolutely hopeless with electronics so really hoped To try and cut as few wires as possible.

Then I had a little brain wave and hoped that if I cracked the alarm box open there would be some sort of connector on the PCB board. And as luck would have it it did. Means I finally got to use my security bit set that case with my toolbox haha!

IMG_8738.jpg

IMG_8737.jpg

So now the alarm box has been removed, I can now remove the plugs from the white frame that sits in the drivers footwell.

IMG_8734.jpg

IMG_8735.jpg

I just have to cut maybe 4 or 5 wires now, these are where the alarm goes into the door to do the windows up when you press lock on the key fob and a few to the alarm siren then hopefully tomorrow night I’ll have all the wiring out and transferred into the new car!

All being well I should be able to connect everything back up and get the interior back into the car to free up some much needed garage space!!

  • Like 1

Had a quite productive day today, got the third and final loom out of the old car

IMG_8746.jpg

Then fed it into the new car, clipped most of it back into place, and bolted the washer bottle and coolant overflow bottle back into place.

IMG_8747.jpg

IMG_8748.jpg

I’m gonna tackle the wiring and connect it all back up tomorrow.

In the mean time I threw the drivers side wing back on, bolted the headlights and orange indicators back in place. So glad to get rid of them horrible aftermarket black ones!

IMG_8751.jpg

Also decided to throw the rear strut brace into the boot too

IMG_8749.jpg

Borrowed a drill off my housemate and put the power steering cooler onto the new car, (well I think it’s power steering as the fluid is red).

IMG_8750.jpg

I’ve ordered a box of dynamat to replace the sound deadening that was ripped out of the new car, ordered the bulk pack (9 sheets). Will do a bit of the floor and maybe chuck a bit in the doors too.

Also ordered some AN spanner’s so I can remove the AN fittings for the catch can and oil cooler.

Plans for tomorrow are to connect all the wiring loom back up and try and get most of the dash back in place.

And maybe change the brakes from the old car onto the new one and maybe fit the thicker anti roll bars while there’s no exhaust or engine in the car.

Feeling like I’m finally getting somewhere now that the wiring is back in the new car.

  • Like 1

Got the last bit of the aircon stuff back in, the dash support bar, dash, instrument cluster, upper interior panels all back in the car today.

Put bullet connectors on the few wires that i had cut and taped them all up for a bit more security. Also chucked the alarm unit back in and wired that all up again.

Feeling like I’m getting some progress done now.

IMG_8761.jpg

IMG_8762.jpg

IMG_8763.jpg

IMG_8764.jpg

IMG_8769.jpg

IMG_8770.jpg

  • Like 1
11 hours ago, admS15 said:

Good work, keep it up. At this rate, you'll be driving it again before you know itemoji106.png

Cheers, its taking a little longer than first planned, but nothing is ever straight forward is it haha!

8.9Kg’s of Dynamat arrived today, I bought the 36 Sq ft pack so that should be enough to do the floor and any left over I’ll chuck in the doors and boot.

Just got to prepsol the drivers side floor and chip any more of the old sound deadening off. Or I may just dynamat over any old stuff that’s still in the car. As I don’t have access to dry ice, and I hate tedious tasks haha!

IMG_8793.jpg

Create an account or sign in to comment

You need to be a member in order to leave a comment

Create an account

Sign up for a new account in our community. It's easy!

Register a new account

Sign in

Already have an account? Sign in here.

Sign In Now


  • Similar Content

  • Latest Posts

    • Of course you can. That was a waste. Straight down one oil drain gallery and out the sump hole. Could at least have run the engine a little (obviously with at least minimum oil level on the stick).
    • Oh really? Maybe I'm being silly. I'll get some more shots. I had it higher but found that it went too high after a drive, I never knew this but exhausts can move around a bit when hot (makes sense, just never knew) and when it was higher it would make nice cooking plastic smells. That said, I could put some heat tape on a'la 90's R33 exhausts     Ha, I've spent a lot of my life in castle hill waiting for cars to be done. I think I'd prefer something closer but thanks D. 
    • @Duncan Yes, changed filter every time. I don't have the service manual for the car yet (Car was imported and they removed everything when importing). I've been using the oil change threads in the forum as reference.   @Milkmun The second oil change was after ~4 months after the first months and I wasn't sure about reusing engine oil that was opened. The third oil change happened within 3 weeks of the second oil change and I used the previous leftover oil to just "clean up" the system. (Poured it through while the sump plug was open")
    • I left the ceramic coating off this bit, hopefully it just comes off after a few drives.   The gap between the spokes is too tight for anything on a stick, its only marginally bigger than my finger. I have to use a brush to get in there and its a big reason why I thought I'd try the coating.   Absolutely will do. I have EBC Blue Stuff pads to put on the front which will make them a bit dirtier. I'm hoping a pressure wash will just get most off. The shine is different to most, its very thin but seems very well 'attached' so hopefully it lasts.   
×
×
  • Create New...