Jump to content
SAU Community

Recommended Posts

As the title suggests, does anyone know what components are available to increase the amount of negative camber in the rear of an NM35 Stagea? I'm slowly attempting to create a 'VIP'/'bippu' style build but I can't find a whole lot of parts to suit the NM35. Currently I have fitted Driftworks Front Upper Camber Arms to suit a 350z and have gotten to -6 deg happily but the rear is sitting at -5 deg with only a coilover installation. I do have 350z Rear Camber Arms but they seem to only be able to mount to adjust toe. At this stage its looking like most components will have to be fabricated. 

Link to comment
https://www.sau.com.au/forums/topic/473581-stagea-m35-rear-camber/
Share on other sites

Japan is always the best place to look first, to see whats available.

http://www.nagisa-auto.com/products/nissan/m35.html

Following that, I think you have to risk attempting to fit parts from Y34/F50 for the rear upper arms and the rear spring bucket lowering perch
http://www.nagisa-auto.com/products/nissan/y34_f50.html

You could also use the Z33/V35 rear spring delete for full coilover conversion and additional toe adjustment (to allow more camber from the camber arms).

Or you can weld on some thread for rear spring bucket adjustment
bucket_zpshnnqgeec.jpg

OR (and probably the easiest method) is to fit offset bushes to the rear upper arm.
(i think its these)
https://superpro.com.au/find/superpro-performance-handling-kit-for-a-superpro-suspension-parts-and-poly-bushings-for-nissan-350-z-z33-2003-2009-/productnr-SPF3321K/cid-999501121/vid-
https://superpro.com.au/find/superpro-performance-handling-kit-for-a-superpro-suspension-parts-and-poly-bushings-for-nissan-350-z-z33-2003-2009-/productnr-SPF3313XK/cid-999501121/vid-

Also, you said you have rear camber arms, but what about rear toe arms? its a must-have with camber arms because the camber arm adds just as much toe as it does camber....

  • 2 weeks later...

I do have MCA Suspension 'Street Performance Series' coilovers installed all round dropping my ride height very low.

Since initially posting this thread I have seen a number of cars (none being stageas unfortunately) using an adjustable spring bucket as well as other components to adjust rear camber. 

I may try offset bushes before attempting to order parts from Japan. Thank you for those links. I haven't been able to find any to suit from my own research. 

I have said I have them but they aren't able to be installed for their intended purposes. They do, however, bolt in to replace the factory toe arm. All of the camber in the rear currently is achieved through lowering the car alone. 

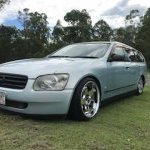
Attached is a photo of how the stagea sits currently. 

IMG_6275.JPG

That's a lot of camber from just lowering.
The rear end of Z33/V35/M35/G35/M45/Y34/F50 should all be very similar. Americans don't have any M35's so not many brands advertise for them or have test fitted to confirm.

I know, even I was impressed. 

I think I may have to run the risk of fitting parts from Japan to get the desired camber. I'm not hugely keen on cutting and welding unless I absolutely must. 

Create an account or sign in to comment

You need to be a member in order to leave a comment

Create an account

Sign up for a new account in our community. It's easy!

Register a new account

Sign in

Already have an account? Sign in here.

Sign In Now


  • Similar Content

  • Latest Posts

    • I would again like too thank Matt for his help in me sourcing the detachable hard top for the little red car, without Matt's assistance in inspecting it and locking it down, I can guarantee it would have sold before I could get up to see it,  and as that was the only available NC hardtop in Australia, I consider myself extremely lucky on multiple levels To say I'm more that happy would be an understatement And, it is 100% water tight, I drove through torrential rain coming back south, and by torrential, they type of rain that doing 40kph in a 110kph zone was a real thing, and even then, the standing water on the Hwy was deep enough to throw waves I'm also more than happy that the huge "BEASTS" that Matt calls dogs didn't eat me for lunch, I'm sure the sniffs and licks were more to "taste test" me, over being to friendly Now to work out what colour to get it painted, panel match, or gloss black........first world problems are real
    • Actually I might have figured out. Looks like there is a tab according to google images but it's hidden. Silly me.
    • No clips on this one like the other connector. Only that red tab that I can push slightly up.
    • For any loom connector that has an obvious release that resists pushing far enough to unclip, just spray some silicone lube into it. You might also benefit from using a bent screwdriver or small pick to push in the right place at the right angle.
    • Hey all, I went to try and fix my indicator not canceling, but I couldn't remove the clockspring cable under the column so I could twist that green thin. Anyone know how to remove this cable? I see this red tab but didn't have any luck. I was thinking of unscrewing it but wasn't sure if it would cause issues. I did notice for my indicator stalk, 2 out of 3 cables were plugged in but the last cable wouldn't fit in the stalk. I'm getting it's for fog lights. It was like this when I originally pulled it off.  
×
×
  • Create New...