satanic Posted July 24, 2005 Share Posted July 24, 2005 I picked up a single boost gauge and holder from another SAU member so I could regulate the boost pressure (after installing the manual boost controller for sale here as well). I couldn't find any R34 specific installation guides for this, so I decided to do all the R&D and then write this DIY up for any other R34 owners. A big thanks to Eric who supplied the gauge, and talked me through heaps of the steps. STEP 1: Positioning your gauge... * After you've assembled your gauge, position it to the exact location. * Use the base plate and the top of the bevel ring as "wedges" or stops. * "Wedge" the gauge into place and see if it stays put. * Use trial and error to get your desired positioning. STEP 2: Making sure your gauge doesn't move... * I had some sticky tape with foam backing lying around for cushioning. * Cut out enough to cover the base plate and top of the bevel ring. * These two will act as "grips" that "wedge" between your dash and A-Pillar. * The foam will also prevent slipping or movement when driving. (The ring above has also been padded with foam tape for grip purposes) NB: Using the foam not only keeps the gauge in place, but also protects your dash and A-Pillar from any damage. This will mean a 100% reversable installation. STEP 3: Running your electrical wires and tubing... * I used black plastic covers to "hide" the electrical and rubber tubing needed for this gauge to work. * Open your door and bring both the housings around as shown above. * Make sure your housings sit as high up as possible (prevents squashing). * Open/Close door a few times to test. * Blow through the rubber tubing to test air flow. STEP 4: Running housings into engine bay * Now many of you will install gauges with all the wiring going through the firewall (usually requires heaps of disassembly) - I opted for this method, it doesn't look half bad due to the black housings and more importantly it works and it saves time. * Open your door and bonnet and you shall see a few holes that are just perfect for your installation needs. Feed your housings through there and test out all your lengths (do not alter any lengths at this stage). * Again, open and close your door to test the fitting (remember to keep the housings as high up as possible). (The housings will run right into the engine bay, very neat and clean) (Black housing makes installation look almost factory, hard to notice) STEP 5: Hooking the gauge up so it works... * The above picture shows how I worked the housings so it reached the intended destination. This step can be changed to suit your likings... keep in mind the allowance for cable flex etc. * All connections to hold housing to wires etc were made using cable ties. * I completed this stage using the simplest and shortest path for the pressure hose to get to the connection. (The above shows the connection between pressure hose and main line) * Use your supplied T piece (available from Super Cheap for $2.99) and connect your pressure hose to the main line. Make sure you get the right size T piece (I actually went and bought 2 sets due to size errors). * Again, secure the fittings with cable ties to stop any leaks or chances that the hose will fly off the T piece. STEP 6: Finalizing your installation * After you have made all your connections and are 100% sure that it will all be right, you can commence final installation. * Cut any excess lengths of tubing/housing before pulling it all tight (cable ties to be pulled tight last). It is important to start this pulling tight process from the GAUGE -> DOOR/ENGINE BAY -> T-PIECE * It may be a good idea to get someone to hold the gauge in place so you can tighten everything up. Remember, the tighter everything is, the better your installation will be (less chance of movement) Since I'm not very good with electrics, the wiring up of the lights for the gauge will be done at a later stage - will write that up later. END NOTE: This is the first DIY write-up I've done... hope it all helps the R34 owners out there. If there are any suggestions for changes, all ideas will be welcomed. I'm looking forward to getting more DIY jobs done but that's later on down the track. Stan Link to comment https://www.sau.com.au/forums/topic/81617-r34-installing-boost-gauge/ Share on other sites More sharing options...
3R1K Posted August 6, 2005 Share Posted August 6, 2005 Where do you wire the electrical to? I don't see any explanation about electrical wiring. Btw, top job clean and great way to hook a boost gauge Link to comment https://www.sau.com.au/forums/topic/81617-r34-installing-boost-gauge/#findComment-1504863 Share on other sites More sharing options...
satanic Posted September 1, 2005 Author Share Posted September 1, 2005 Haven't had time to hook the electricals up... will do so this weekend - should just hook it up to the fuse box under the bonnet. Will keep you posted... Link to comment https://www.sau.com.au/forums/topic/81617-r34-installing-boost-gauge/#findComment-1558310 Share on other sites More sharing options...
Restless 33 Posted September 1, 2005 Share Posted September 1, 2005 what stops the door from clamping down on the tubing going from inside through to the bonnet. i have an R33 and thought i mite try this...but it seems to clamp down a little, havent tried it with the actual tubing yet, jsut wondering if it would cut the flow of air? Link to comment https://www.sau.com.au/forums/topic/81617-r34-installing-boost-gauge/#findComment-1558457 Share on other sites More sharing options...
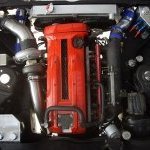
satanic Posted September 1, 2005 Author Share Posted September 1, 2005 Restless 33: You'll notice from the photos that the pressure tube is housed in the black tube. The pressure tube is clear and very very soft (this will definitely be crushed by the door and cut the air). The black tube is made from very hard PVC plastic and withstands heaps of pressure (I stood on it and it didn't deform). Furthermore, the door seals are made of soft foam which wraps around the tube when the door is closed. There is no pressure loss as the aftermarket gauge reads exactly what the stock gauge does (only more accurate with more numbers). Hope this helps - the PVC tubing can be purchased at any hardware store... I just used whatever was lying around at home! Link to comment https://www.sau.com.au/forums/topic/81617-r34-installing-boost-gauge/#findComment-1558575 Share on other sites More sharing options...
SnRuB Posted October 8, 2005 Share Posted October 8, 2005 Restless 33: You'll notice from the photos that the pressure tube is housed in the black tube. The pressure tube is clear and very very soft (this will definitely be crushed by the door and cut the air).The black tube is made from very hard PVC plastic and withstands heaps of pressure (I stood on it and it didn't deform). Furthermore, the door seals are made of soft foam which wraps around the tube when the door is closed. There is no pressure loss as the aftermarket gauge reads exactly what the stock gauge does (only more accurate with more numbers). Hope this helps - the PVC tubing can be purchased at any hardware store... I just used whatever was lying around at home! <{POST_SNAPBACK}> Just my 2 cents worth :-) If you take your door seals off and pillar cover you can slip all your cables down there very easily and up through firewall. I got a stiff bit of retic and poked it through then taped on the vacuum pipe. With the electrics, and the fuse box. i found running the "Light" wire to the tail lights or headlights didnt work and it was on all the time. It seemed like the switch was somewhere else. So i cut into the parker lights and ran my cable into that. With the battery wire i just ran it direct to the input of the fuse box, right behind the battery (on the r34) Other than the tweaks, good tutorial, i used it for the pics :-P Link to comment https://www.sau.com.au/forums/topic/81617-r34-installing-boost-gauge/#findComment-1628918 Share on other sites More sharing options...
satanic Posted October 8, 2005 Author Share Posted October 8, 2005 Thanks dude... I've heard that the hole through the firweall is REALLY tiny and I'm saving that for my car audio wires I still haven't gotten around to wiring up the light dammit Link to comment https://www.sau.com.au/forums/topic/81617-r34-installing-boost-gauge/#findComment-1629048 Share on other sites More sharing options...
xRHETTx Posted October 9, 2005 Share Posted October 9, 2005 I know with my r32 the hole through the firewall is quite substantial, the hardest bit is getting the wires through the rubber boot, i jammed them through and used a coat hanger. Link to comment https://www.sau.com.au/forums/topic/81617-r34-installing-boost-gauge/#findComment-1630659 Share on other sites More sharing options...
AcoustiK Posted October 17, 2005 Share Posted October 17, 2005 If you have the center gauge cluster could you do a switchover replacement of the boost gauge controller? Link to comment https://www.sau.com.au/forums/topic/81617-r34-installing-boost-gauge/#findComment-1646466 Share on other sites More sharing options...
satanic Posted October 17, 2005 Author Share Posted October 17, 2005 I don't think so as the centre cluster is controlled as a single unit - someone can correct me if I'm wrong. It isn't mechanical like the boost gauge I installed so it would not work?!? Anyways, I'm planning on installing a dual gauge pillar so that I can accomodate some other style of gauge as well - most probably install a water temp gauge or AFR gauge Link to comment https://www.sau.com.au/forums/topic/81617-r34-installing-boost-gauge/#findComment-1646508 Share on other sites More sharing options...
SnRuB Posted November 2, 2005 Share Posted November 2, 2005 I don't think so as the centre cluster is controlled as a single unit - someone can correct me if I'm wrong. It isn't mechanical like the boost gauge I installed so it would not work?!?Anyways, I'm planning on installing a dual gauge pillar so that I can accomodate some other style of gauge as well - most probably install a water temp gauge or AFR gauge <{POST_SNAPBACK}> Yeah i ripped mine apart and its all on the same pbc. The boost gauge on the other hand fits snug in there :-) so i was tempted to cut it out. Some people mention putting in in the aircon vents to avoid fines... Link to comment https://www.sau.com.au/forums/topic/81617-r34-installing-boost-gauge/#findComment-1683608 Share on other sites More sharing options...
Silver_R34_GT-T Posted December 11, 2005 Share Posted December 11, 2005 how do u wire up the electrics? Link to comment https://www.sau.com.au/forums/topic/81617-r34-installing-boost-gauge/#findComment-1781202 Share on other sites More sharing options...
Howie Posted June 18, 2006 Share Posted June 18, 2006 been a while since this was posted, but i found this very informative. thanks for posting it up. made any progress on having mounted on the pillar? also think you can repost the images for this diy? looks like they've disappeared Link to comment https://www.sau.com.au/forums/topic/81617-r34-installing-boost-gauge/#findComment-2266647 Share on other sites More sharing options...
PranK Posted June 20, 2006 Share Posted June 20, 2006 added to members tutorials Link to comment https://www.sau.com.au/forums/topic/81617-r34-installing-boost-gauge/#findComment-2272778 Share on other sites More sharing options...
satanic Posted June 28, 2006 Author Share Posted June 28, 2006 Sorry guys just saw that this has been brought back from the dead; I'll try get the photos up very soon. As for the electrics, we ran wires to the fuse box and hooked it up to the parkers so you can have it light up when the parkers are on. Link to comment https://www.sau.com.au/forums/topic/81617-r34-installing-boost-gauge/#findComment-2293210 Share on other sites More sharing options...
shnaped_second Posted May 16, 2007 Share Posted May 16, 2007 Back from teh dead again, Pics? Link to comment https://www.sau.com.au/forums/topic/81617-r34-installing-boost-gauge/#findComment-3122345 Share on other sites More sharing options...
Suj Posted June 6, 2007 Share Posted June 6, 2007 old thread i know, but any chances of getting the pics back up? Link to comment https://www.sau.com.au/forums/topic/81617-r34-installing-boost-gauge/#findComment-3163279 Share on other sites More sharing options...
webng Posted August 24, 2007 Share Posted August 24, 2007 Planning on installing my boost gauge this weekend, would love to find updated post with updated pics that work. Looks pretty straight forward, but would like to make sure i'm connecting the hose to the right line! Link to comment https://www.sau.com.au/forums/topic/81617-r34-installing-boost-gauge/#findComment-3308075 Share on other sites More sharing options...
Howie Posted August 24, 2007 Share Posted August 24, 2007 Nick, i can probably take a pic for you tomorrow if you want. Link to comment https://www.sau.com.au/forums/topic/81617-r34-installing-boost-gauge/#findComment-3308087 Share on other sites More sharing options...
satanic Posted August 24, 2007 Author Share Posted August 24, 2007 Hey guys, sorry about this but I don't have the photos anymore... my setup has changed since so I can't get updated photos If someone posts a photo of their engine bay (area in front of driver) I will happily edit it to show which hose needs to be tapped. Link to comment https://www.sau.com.au/forums/topic/81617-r34-installing-boost-gauge/#findComment-3308097 Share on other sites More sharing options...


Recommended Posts
Create an account or sign in to comment
You need to be a member in order to leave a comment
Create an account
Sign up for a new account in our community. It's easy!
Register a new accountSign in
Already have an account? Sign in here.
Sign In Now